
How to Set Up Your First Customizable Product?
To let shoppers design on your store, you first make a product customizable in Custy.
Your products still live in Shopify. Custy adds the custom part on top: sizes, colors, printing methods, print areas, and which tools shoppers can use. Follow the steps below in order. You can change anything later. Nothing here deletes your Shopify store.
Step 1: Open Products
In Custy, click Products on the left. This is where you sync Shopify products and turn them into custom products.
At the top you will also see tabs for shared lists you can reuse on many products: Create Colors, Product Size, Printing Types & Pricing, and Quantity Discount.
Step 2: Sync products from Shopify
If the list is empty, or a new product is missing, sync from Shopify first. Custy does not invent products. It imports the ones you already sell.
- Click Sync Products on the banner (or Sync in the toolbar after you already have products).
- Wait until the list fills. You may see Syncing… while it runs.
- If a product is still missing, add it in Shopify first, then click Sync again.
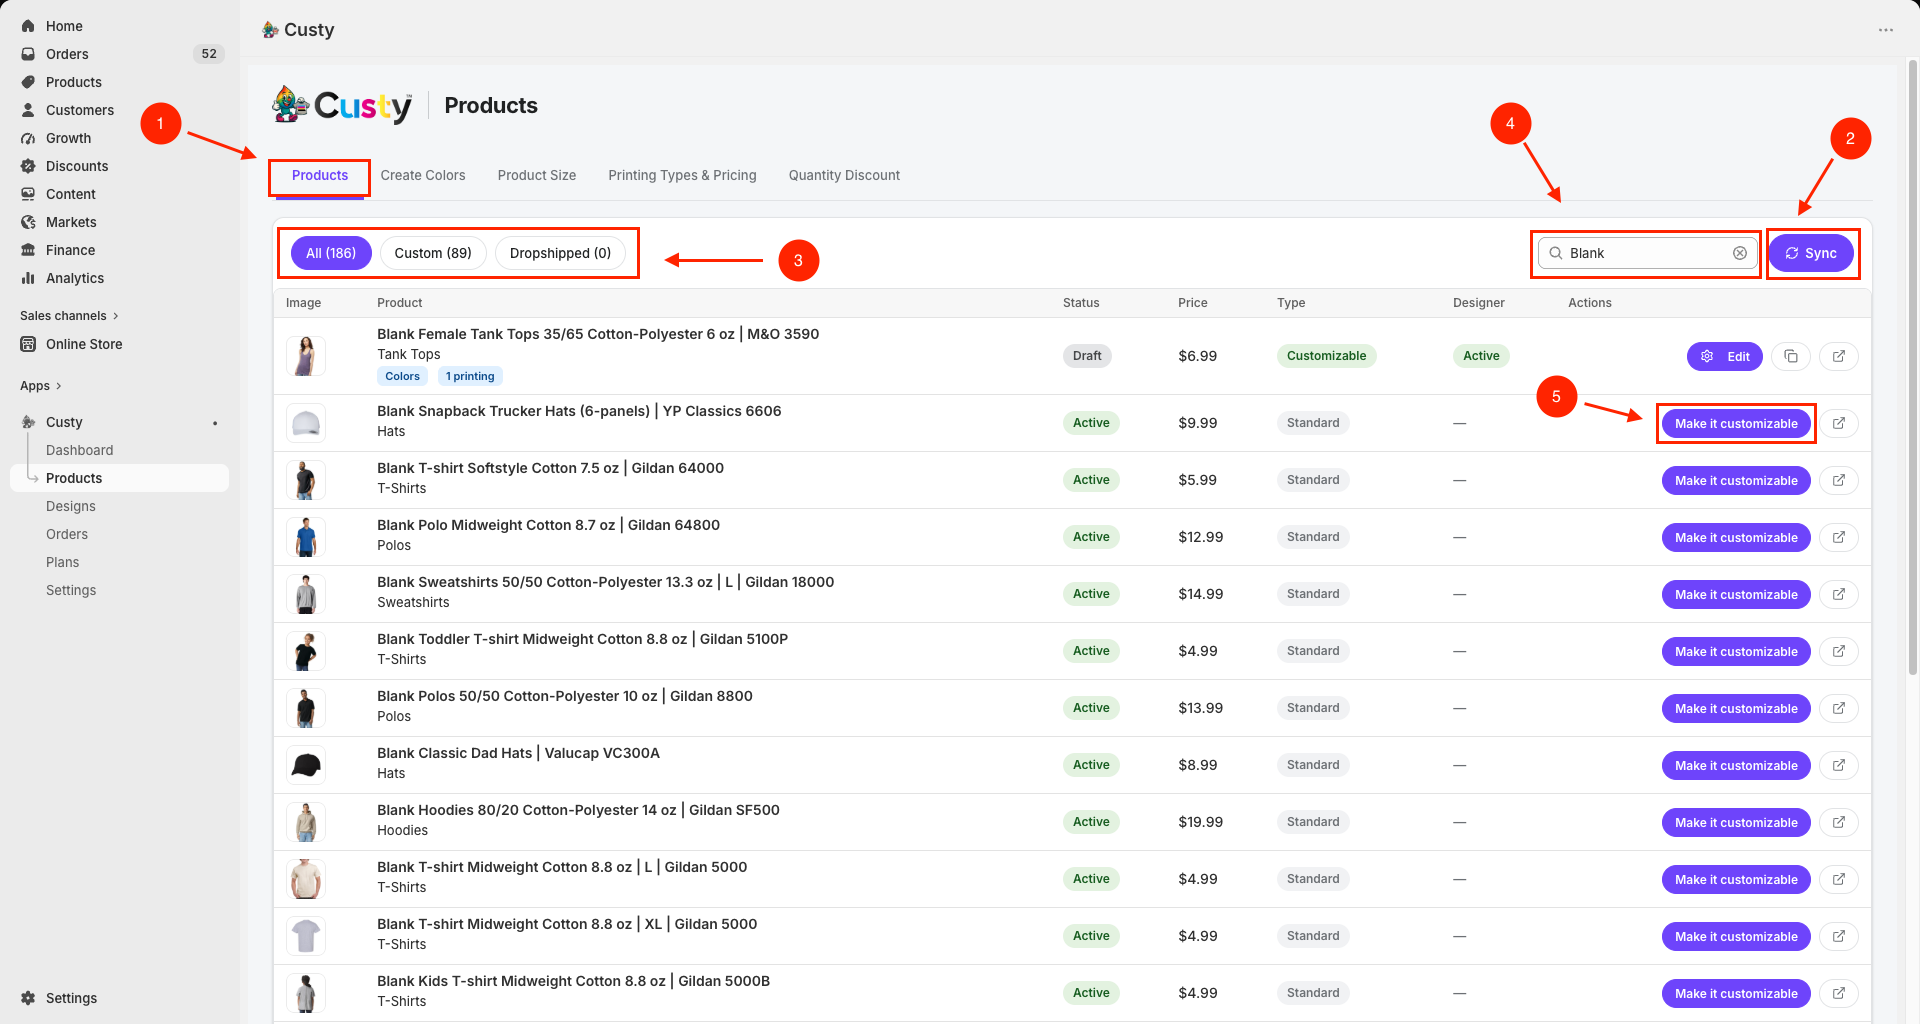 Full size
- 1
Products tab
Your product list. Other top tabs hold shared colors, sizes, printing types, and quantity discounts.
- 2
Sync / Sync Products
Pulls the latest products from Shopify into Custy.
- 3
All / Custom / Dropshipped
All shows every synced product. Custom shows ones you already made customizable. Dropshipped shows dropship products.
- 4
Search products
Type part of the product name to find it faster.
- 5
Make it customizable
Click this on the product you want shoppers to design. If you hit your plan limit, you will see Upgrade Plan instead.
Step 3: Select a product and make it customizable
From the Products list, find the product you want. Click Make it customizable beside it. Custy opens the Customize Product screen for that item.
Already set up? Click Edit instead to change it.
- Stay on the All filter (or search) until you find the product.
- Click Make it customizable.
- If the button says Upgrade Plan, raise your plan limit first, then try again.
Step 4: Work through Customize Product
After you click Make it customizable, the Customize Product page opens. Work from top to bottom. Only turn on sizes, colors, and printing methods you can really make in your shop.
The page has six sections in this order:
- 1Product Overview: photo and price from Shopify (turn the designer on later in Step 7)
- 2Product Sizes: which size list shoppers can pick
- 3Printing Types & Pricing: how it can be printed, plus optional quantity discount
- 4Product Colors: which colors shoppers can switch to
- 5Design Tool Setup: sides, photos, and print areas
- 6Restrictions & Settings: which tools shoppers may use, and optional stock rules
Photo and price
The product photo and base price come from Shopify. Change those in Shopify if you need to, then sync again if the list looks out of date. You will click Save and set Active on designer after the setup steps below.
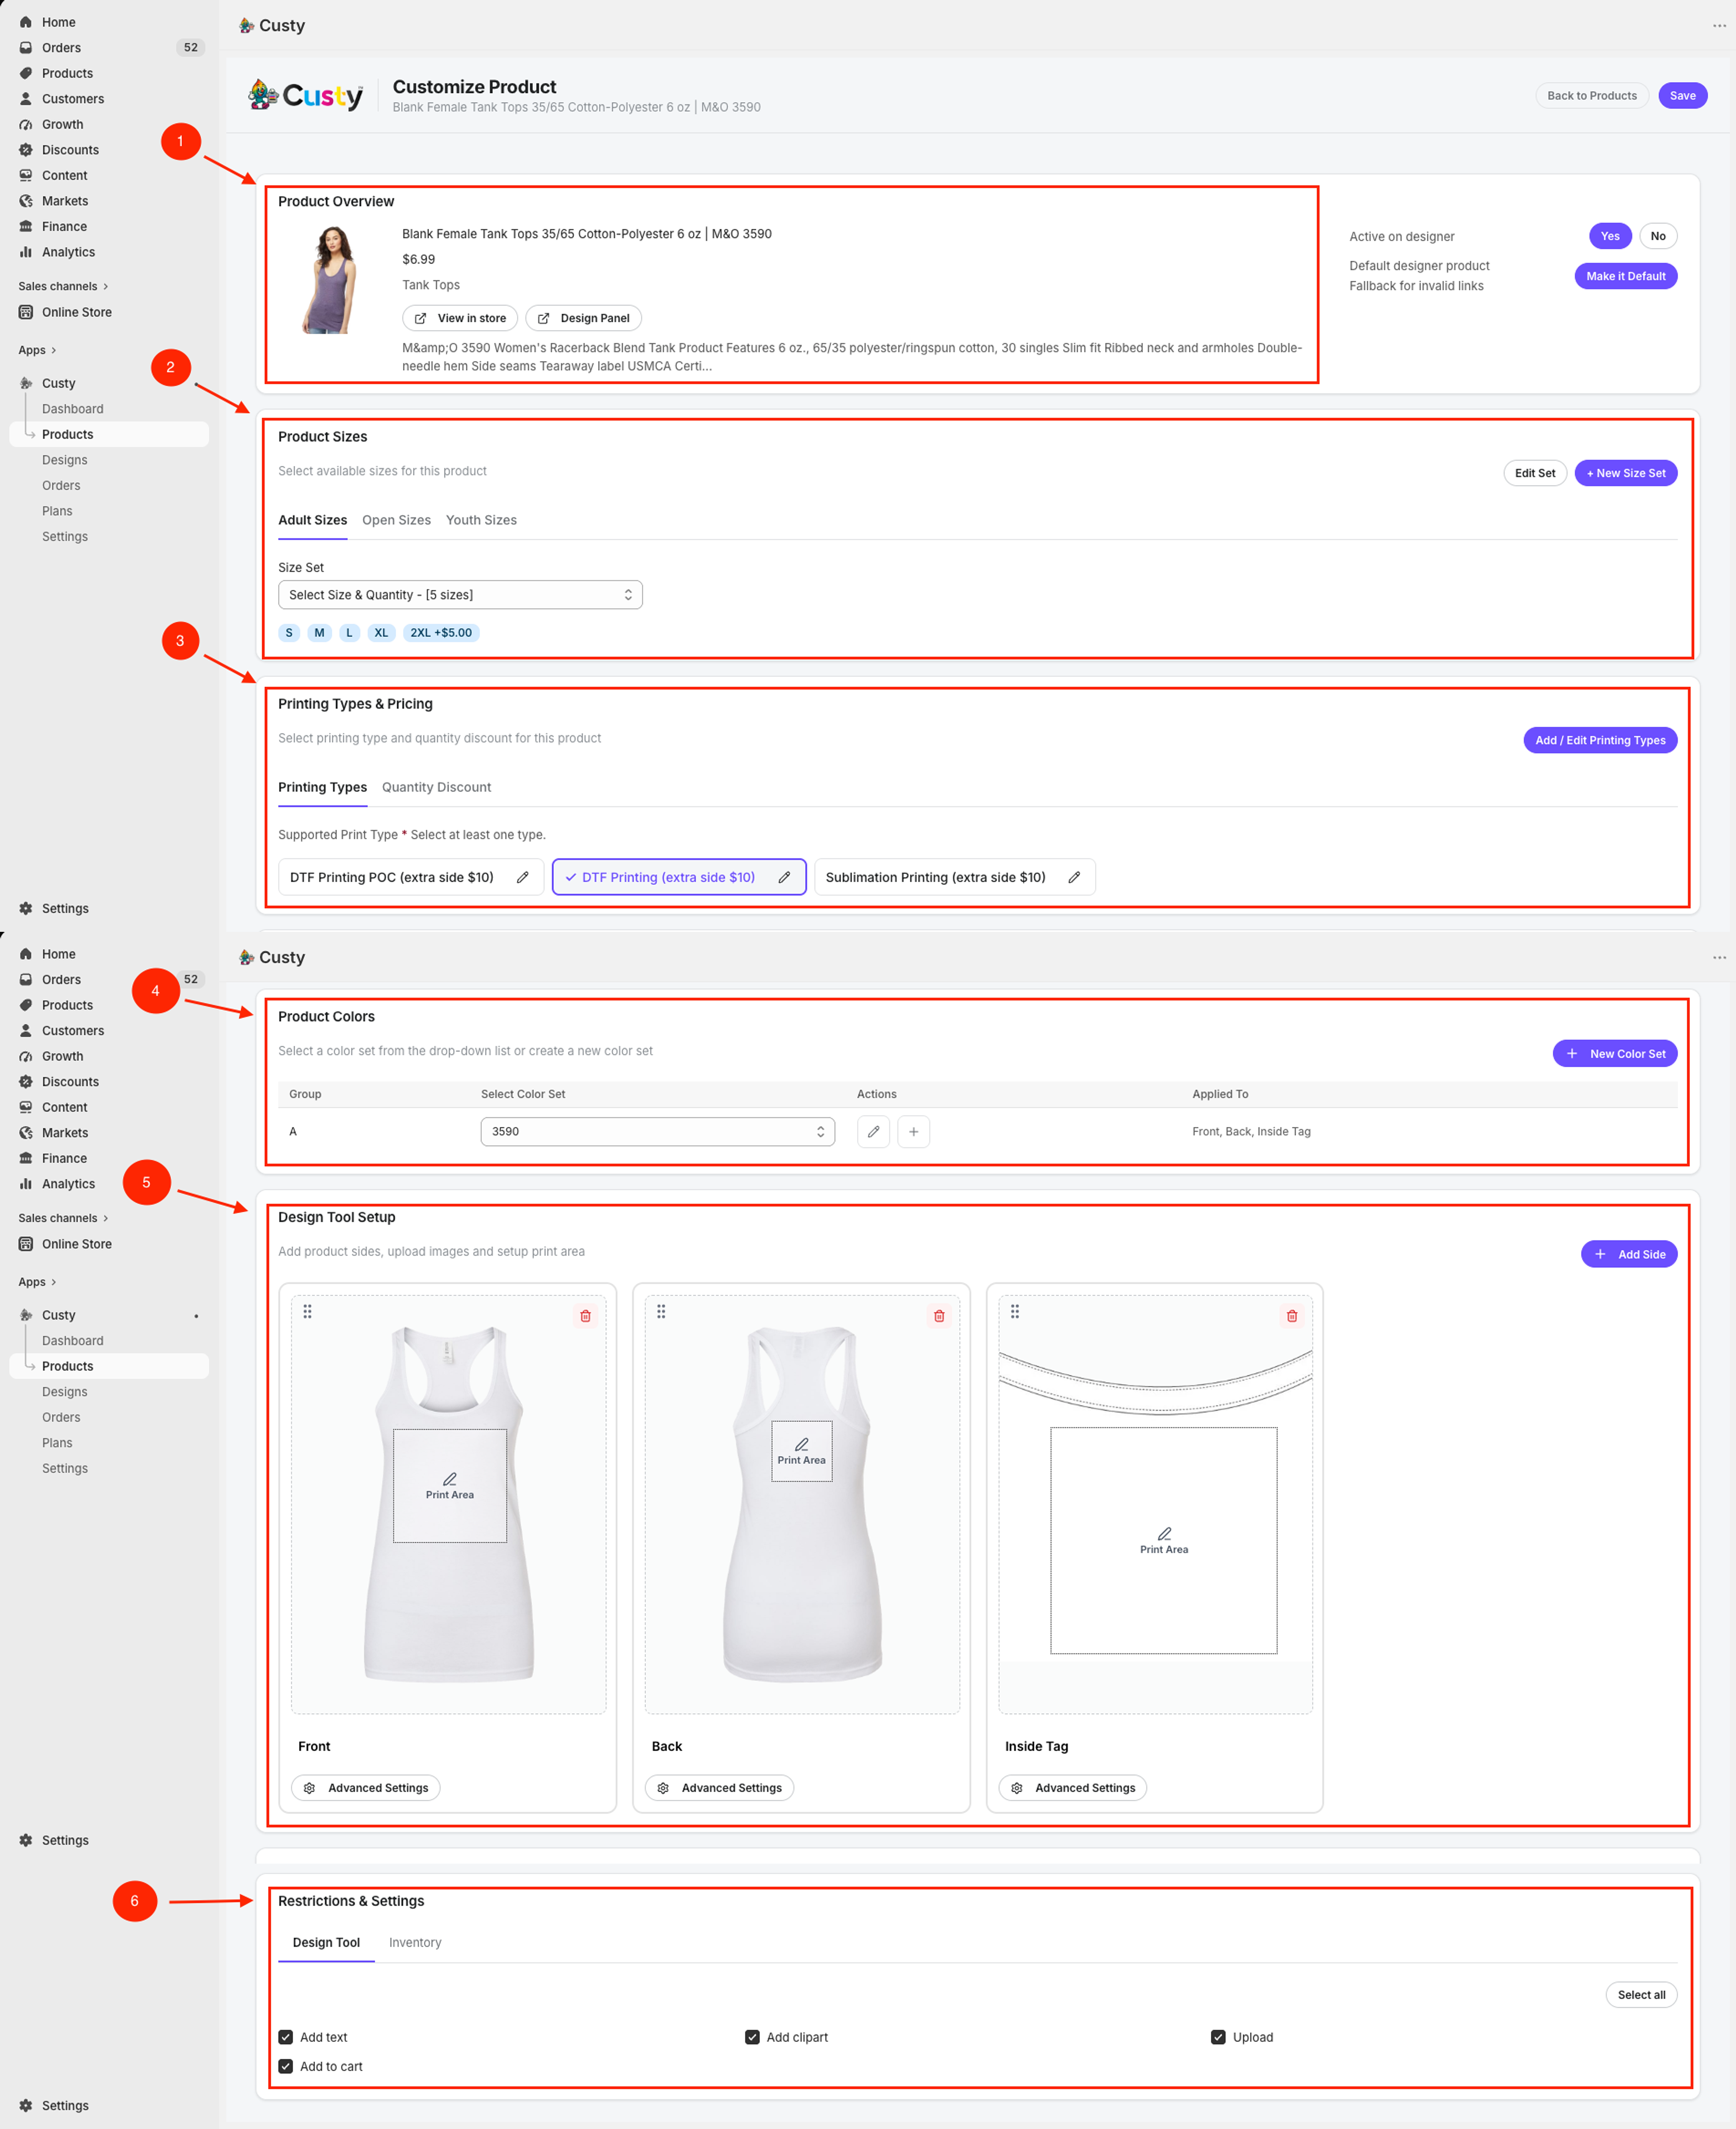 Full size
- 1
Product Overview
Photo and price from Shopify. Check you have the right product before you set options below.
- 2
Product Sizes
Pick a size set (or create one).
- 3
Printing Types & Pricing
Pick at least one printing type. Optional: a quantity discount list on Starter or higher.
- 4
Product Colors
Pick a color set (or create one).
- 5
Design Tool Setup
Add sides, upload photos, and set print areas (next steps).
- 6
Restrictions & Settings
Optional. Limit design tools or stock rules after the main setup.
Step 4a: Product Sizes
Under Product Sizes, choose which sizes shoppers can pick. Shoppers only see the sizes you enable here.
- Open the Size Set dropdown and pick a set (for example Adult Sizes).
- Click Edit Set to add or remove sizes in the set you selected.
- Click + New Size Set to build a new list and assign it to this product.
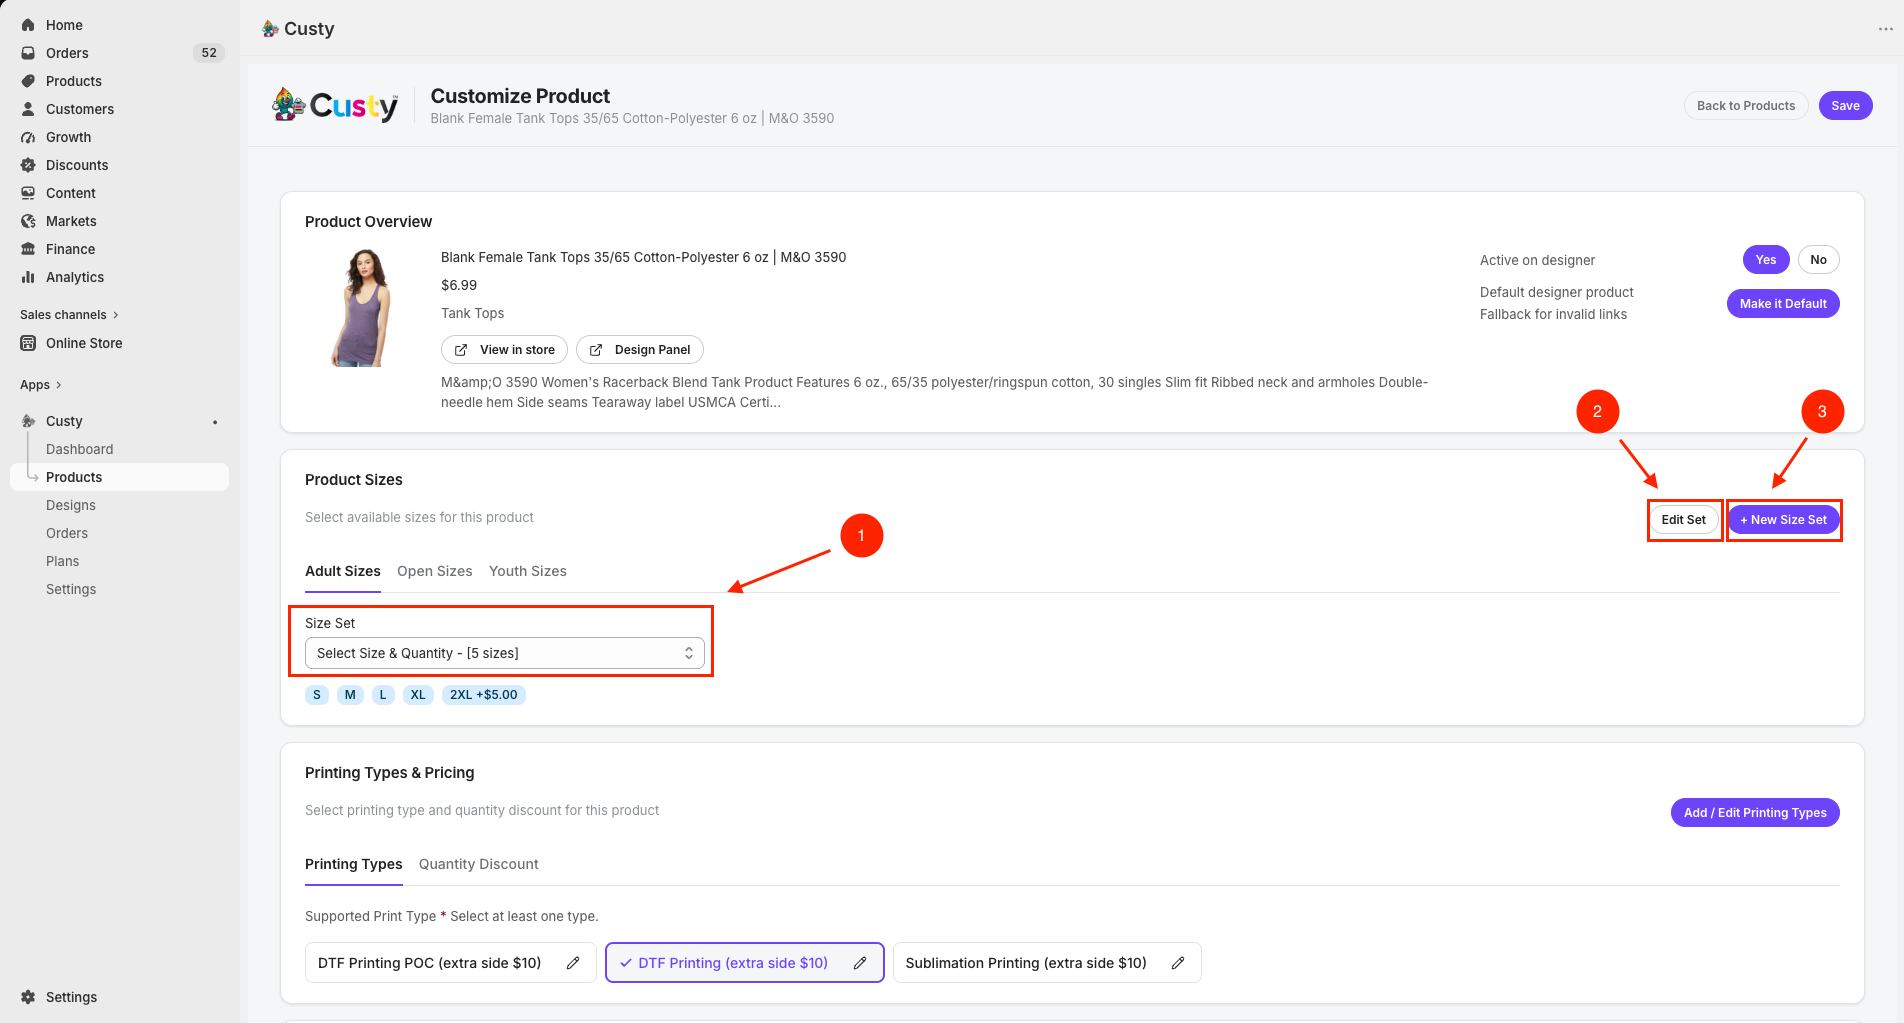 Full size
- 1
Size Set
Choose an existing size list for this product.
- 2
Edit Set
Change the sizes inside the selected set.
- 3
+ New Size Set
Create a new size list and use it on this product.
Step 4b: Printing Types & Pricing
Under Printing Types & Pricing, choose how this product can be printed. Pick at least one printing type (for example Screen Print or DTG).
- Select one or more printing types from the list.
- Click Add / Edit Printing Types if you need to create or change a printing method and its fees.
- Optional (Starter or higher): open Quantity Discount and pick a discount list, or leave No Discount.
Need help with fees?
See the Printing Types & Pricing guide for setup fees, color limits, and quantity discounts.
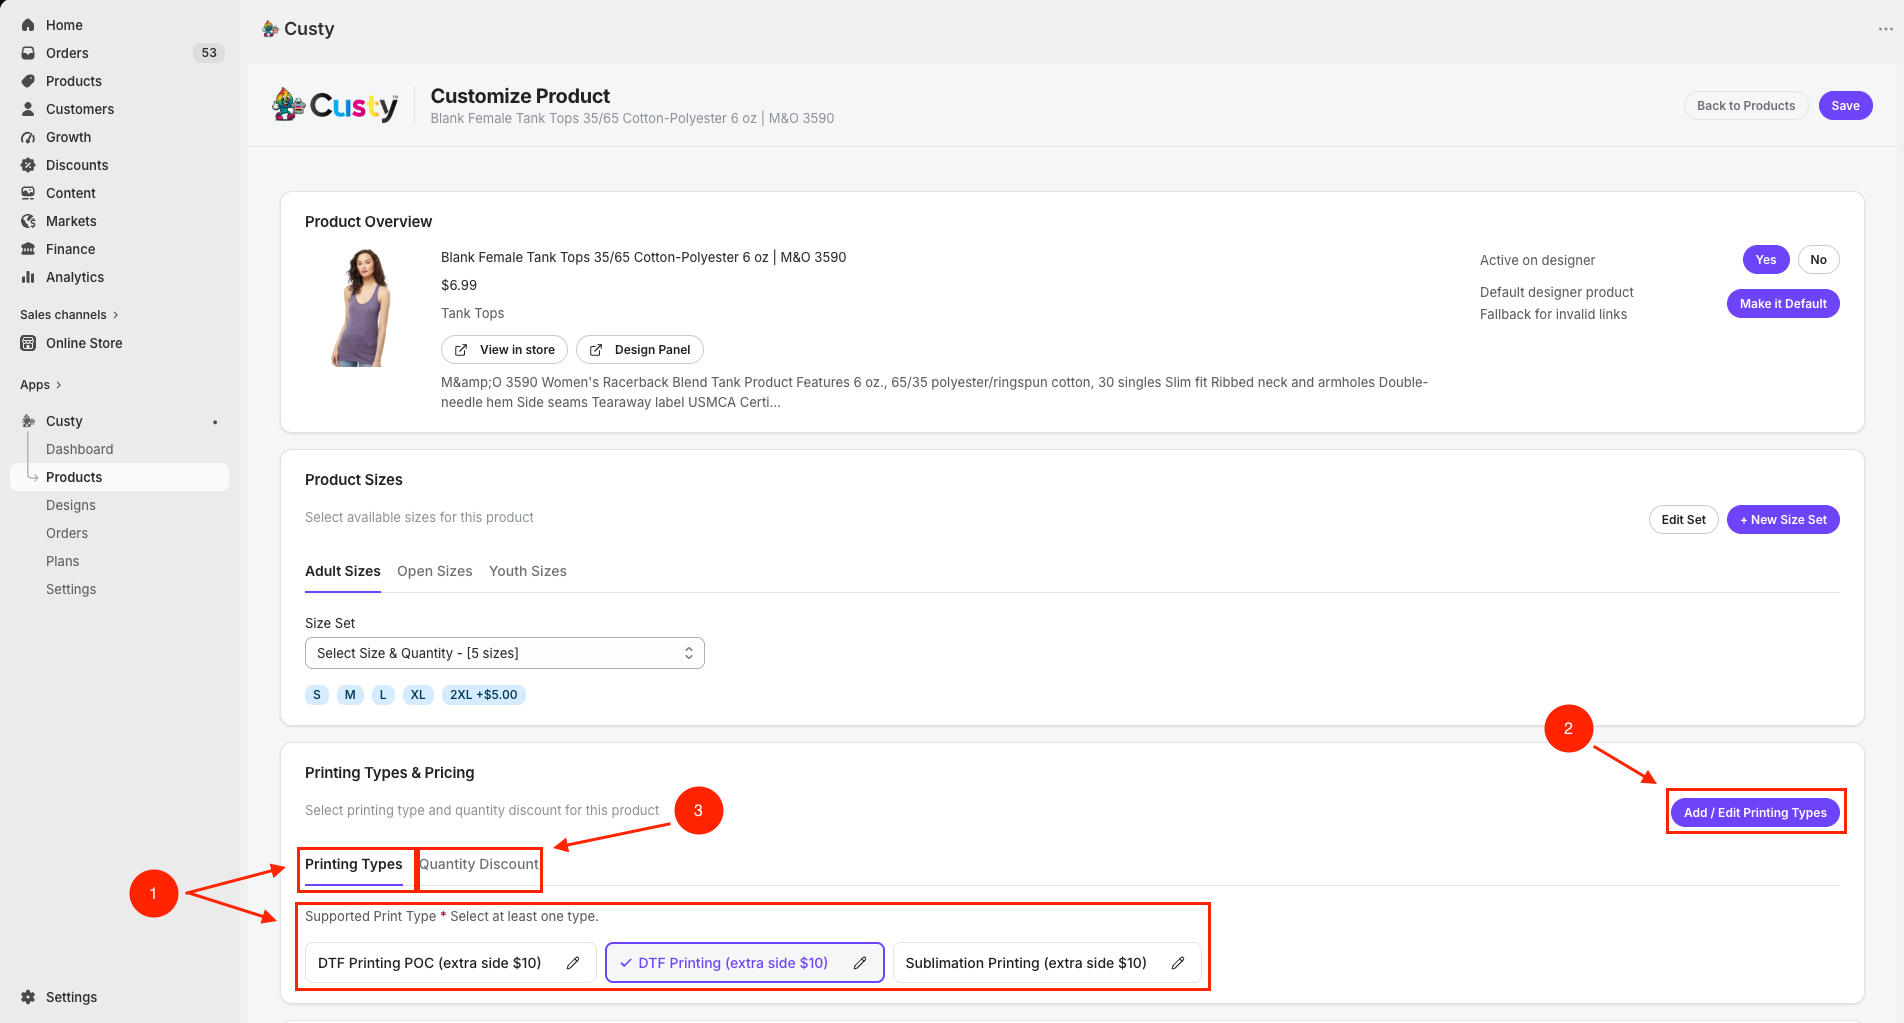 Full size
- 1
Printing Types
Select at least one method this product supports.
- 2
Add / Edit Printing Types
Create or edit printing methods and pricing rules.
- 3
Quantity Discount
Optional list for bulk discounts. Needs Starter or higher. On Free this tab stays locked.
Step 4c: Product Colors
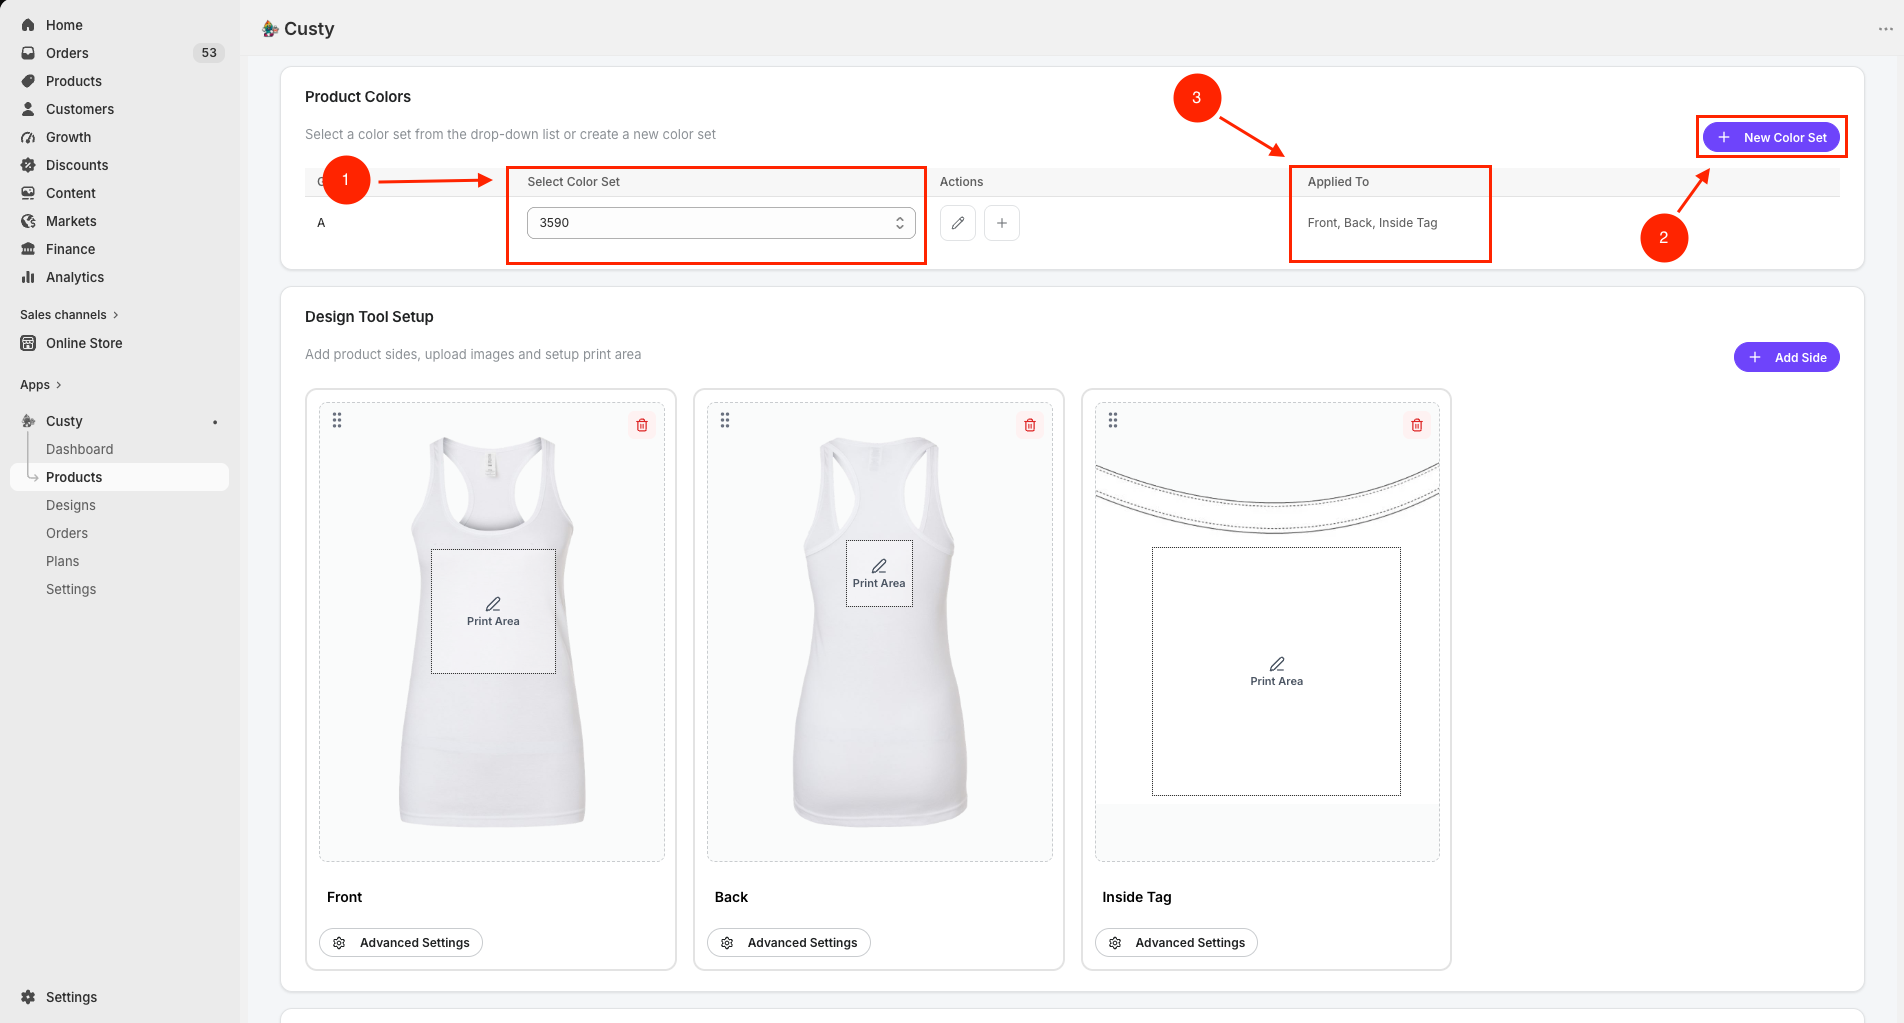
Under Product Colors, pick the color set shoppers will see in the design screen. They switch product color from that list.
- Open Select Color Set and choose a set.
- Click New Color Set if you need a new list (name, color code, optional swatch, optional extra price).
- Check Applied To so you know which sides use that color set.
 Full size
- 1
Select Color Set
Pick an existing color list for this product.
- 2
New Color Set
Create a new list of colors shoppers can choose.
- 3
Applied To
Shows which product sides use this color set.
Step 5: Design Tool Setup (sides and print areas)
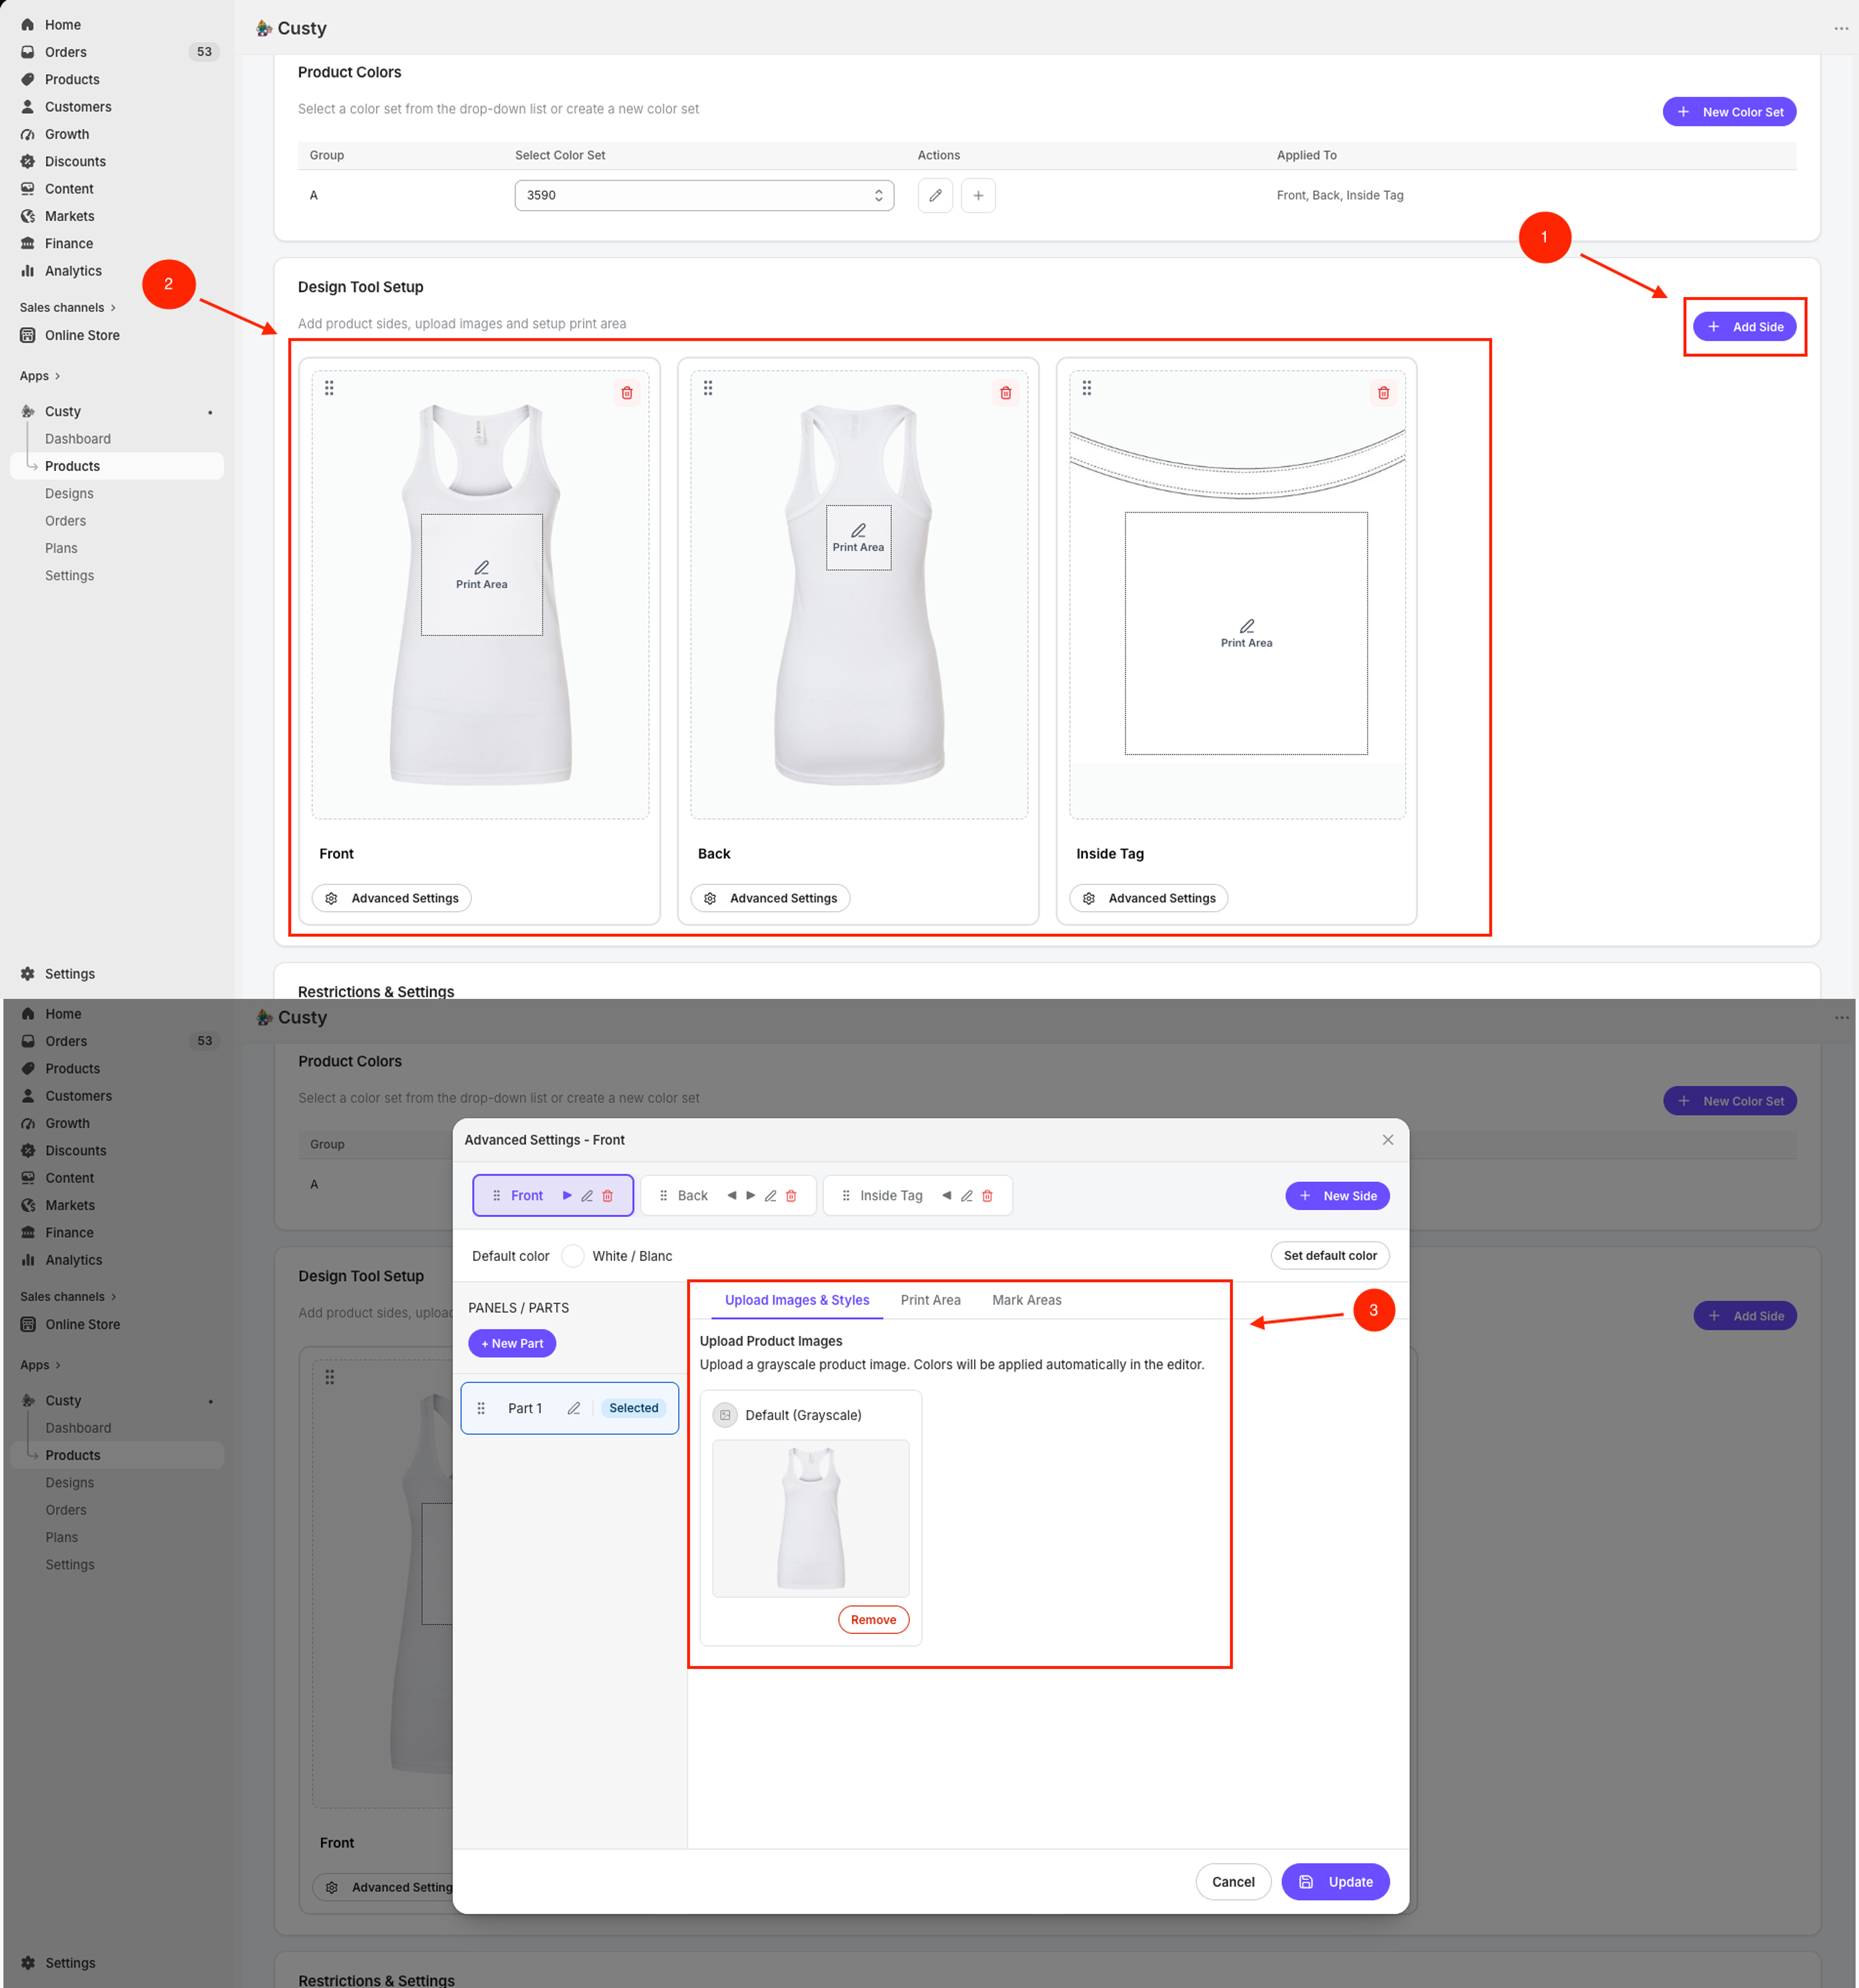
Scroll to Design Tool Setup. Here you add each side shoppers can design (Front, Back, and so on), upload a photo for that side, and set the print area.
Plan limits: Free allows 1 print side. Starter allows up to 6. Pro allows as many as you need.
- Click Add Side and give the side a clear name (Front, Back, Left Sleeve).
- Click Advanced Settings on the side you are working on to upload the photo and set the print area.
 Full size
- 1
Add Side
Add a new side. Rename it so you and your print team know which side it is.
- 2
Side list
Reorder or delete sides. The preview shows the print area box on the photo.
- 3
Advanced Settings
Open Advanced Settings on a side. Use Upload Images & Styles to add the product photo, then set the print area.
Step 5a: Advanced Settings (print area)
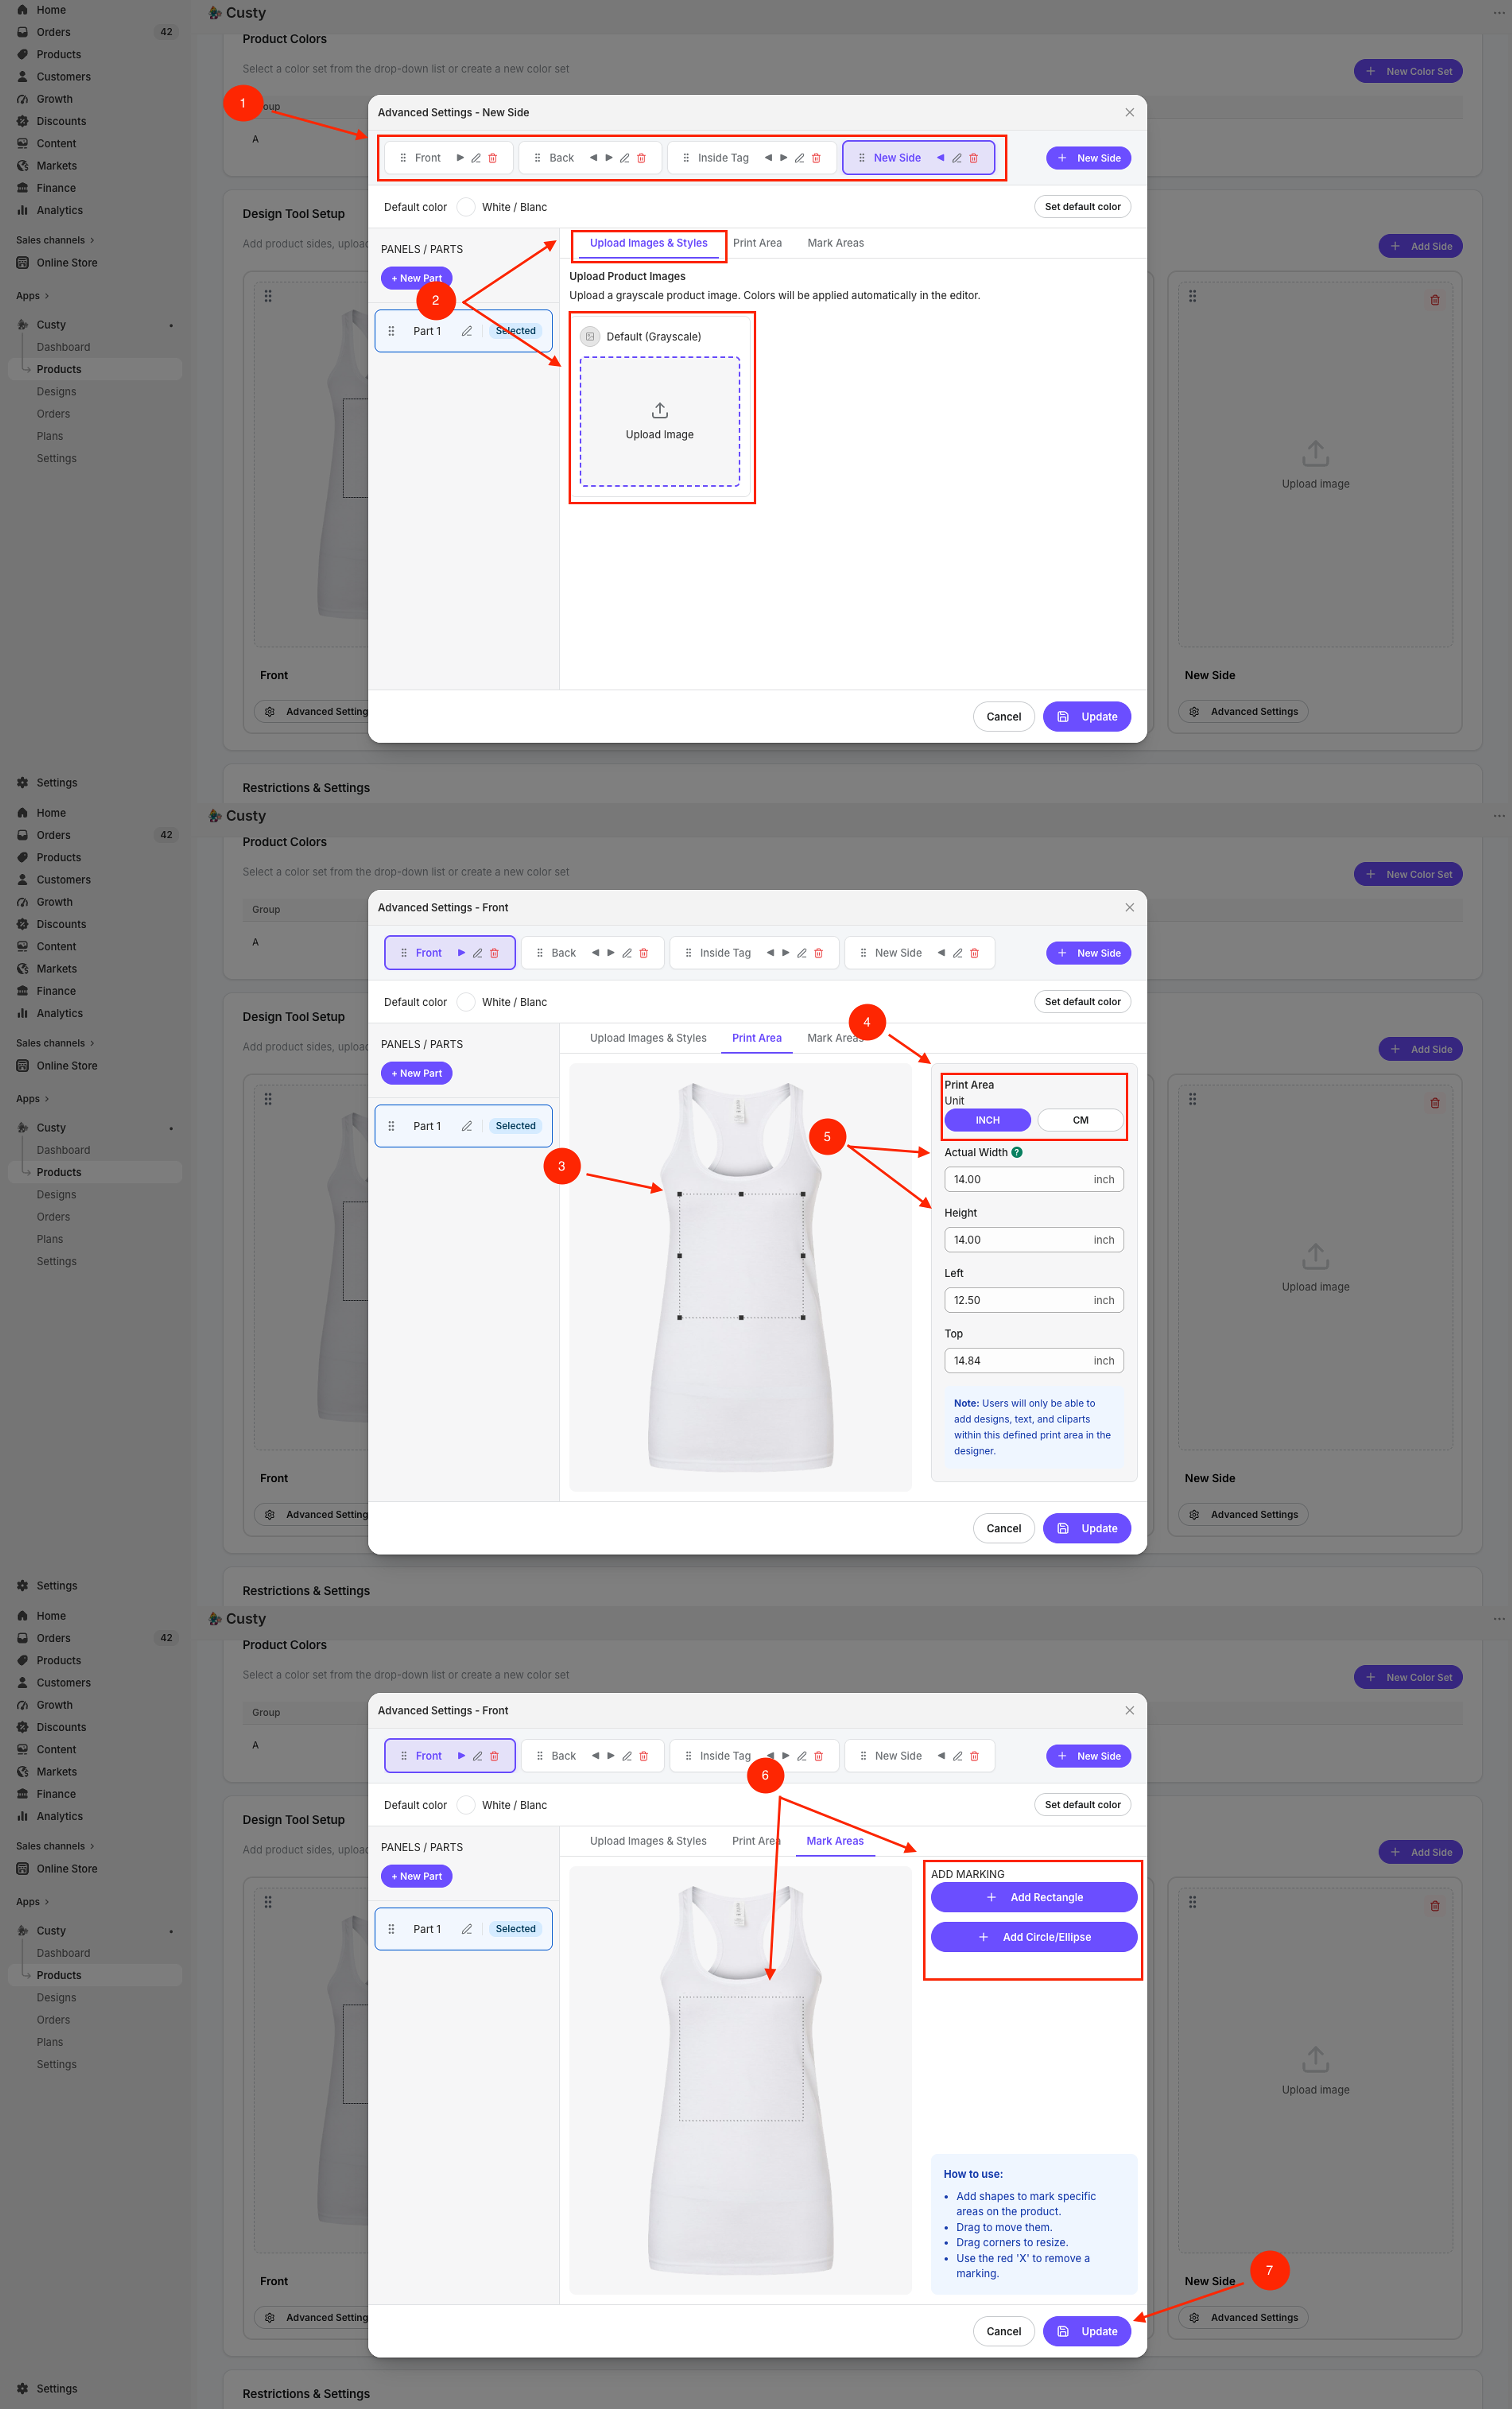
Advanced Settings is where you finish each side. Upload the product photo, draw the printable box, set real width and height, and optionally add mark areas as guides.
- Open the Upload Images & Styles tab and upload a clear photo for the side.
- Open the Print Area tab. Drag the box onto the printable part of the product.
- Choose INCH or CM. Enter Actual Width and Height so the design file matches real print size.
- Optional: open Mark Areas and add a rectangle or circle as a placement guide.
- Click Update to save this side, then go back and Save the whole product.
 Full size
- 1
Side tabs
Switch between Front, Back, and other sides you added.
- 2
Upload Images & Styles
Upload the product photo shoppers see while designing.
- 3
Print Area
Drag and resize the dashed box over the printable surface.
- 4
Unit (INCH / CM)
Use the same units you use when you measure for print.
- 5
Actual Width / Height
Real print size for the output file.
- 6
Mark Areas
Optional guides inside the print area. Printing still follows the print area.
- 7
Update
Save these Advanced Settings for this side.
Step 6: Restrictions & Settings (optional)
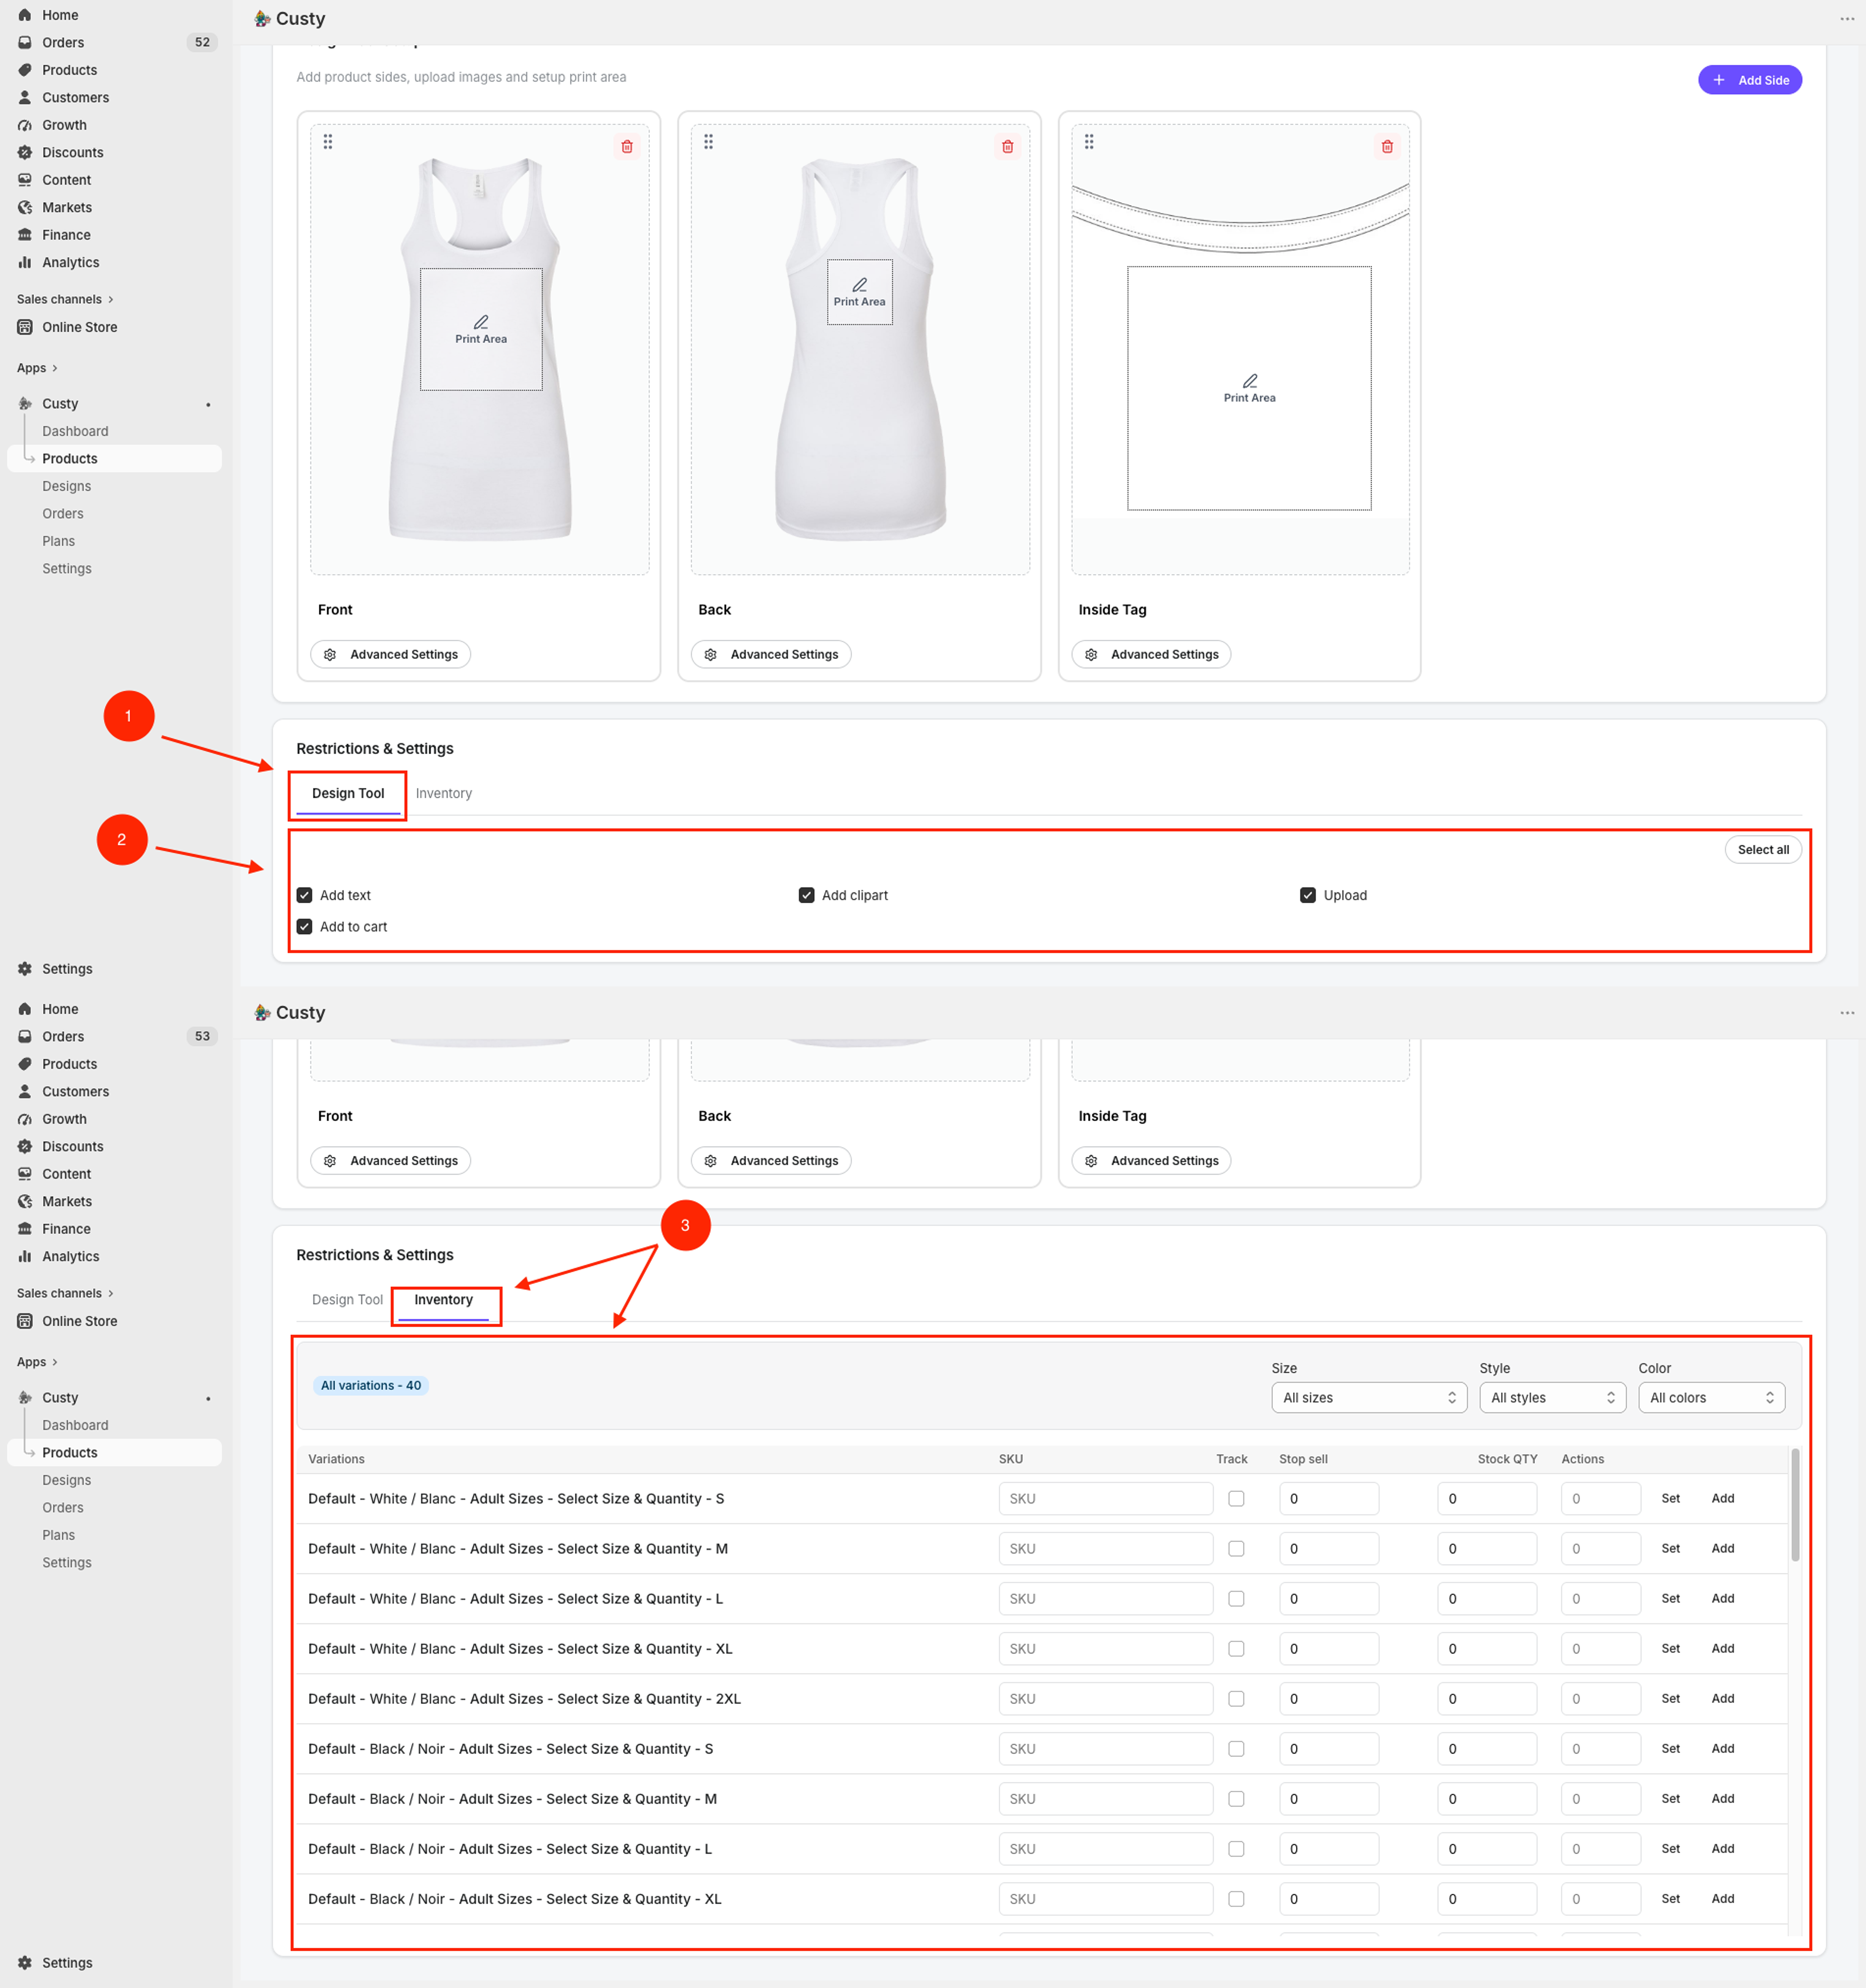
Scroll to Restrictions & Settings if you want to limit what shoppers can do on this product, or track stock.
- Under Design Tool, turn off tools you do not want (for example Add text, Add clipart, Upload, or Add to cart). Use Select all if you want every tool on.
- Under Inventory (Starter or higher), track stock by size, color, and style if you need to.
 Full size
- 1
Design Tool
Choose which design tools shoppers may use on this product.
- 2
Add text / Add clipart / Upload / Add to cart
Uncheck any tool you want to disable for this product.
- 3
Inventory
Optional stock rules by size, color, and style. Needs Starter or higher.
Step 7: Save and turn the designer on
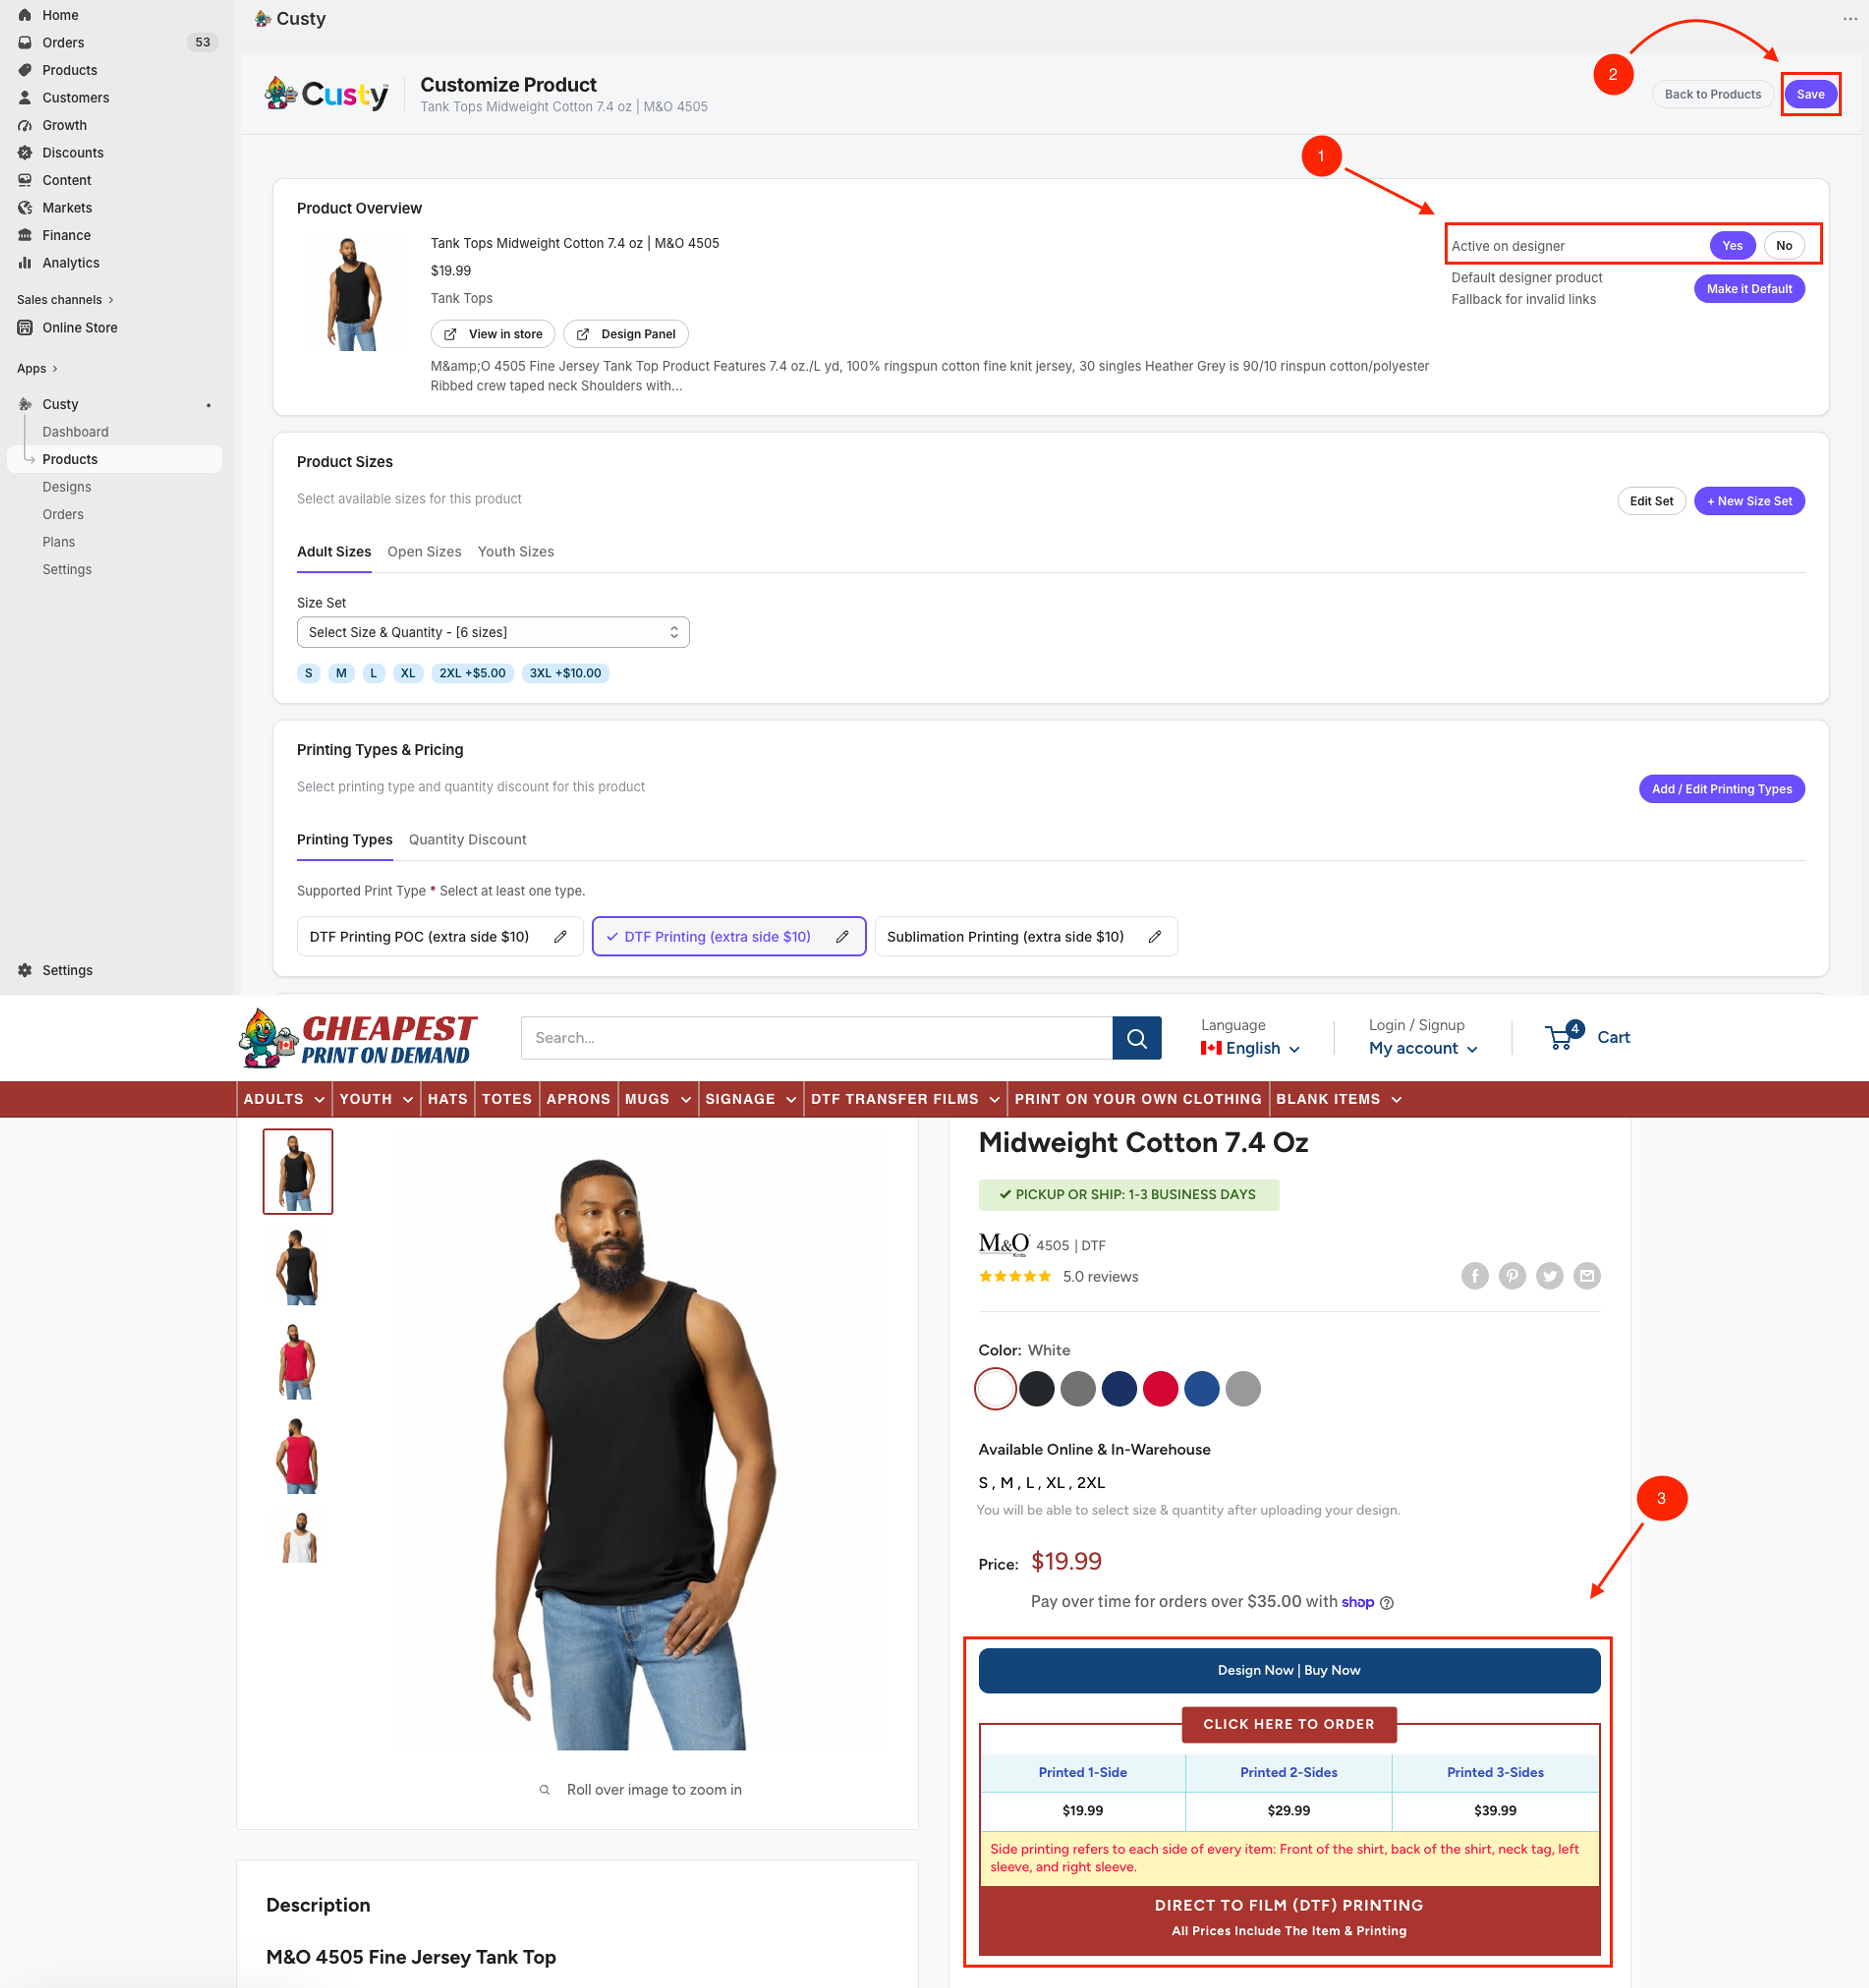
When the options look right, set Active on designer to Yes, then click Save. You should see a short Product saved message.
Custy does not use a separate Activate Now popup. Active on designer set to Yes, plus a successful Save, is what makes the product available in the design screen (after your theme shows Customize It).
- Set Active on designer to Yes.
- Click Save at the top of Customize Product.
- Optional: click View in store and confirm shoppers see the customize button on that product (often Customize It, or the label you set in the theme).
 Full size
- 1
Active on designer
Must be Yes for shoppers to open this product in the Design Lab.
- 2
Save
Saves the custom setup. Toast message: Product saved.
- 3
Live store button
On the product page, shoppers click the customize button (for example Customize It or Design Now) to open the Design Lab.
What to do next
Next, set up product sizes if you have not already, then set print areas so artwork stays in the right place.