
Overview of the Design Lab
The Design Lab is the screen where shoppers decorate your product. They click Customize It on your store, make a design, then add it to the cart.
You set up the product in Custy first. Shoppers cannot break your store by designing. If they make a mistake, they can Undo or CLEAR ALL and try again.
What shoppers can do
On this screen, shoppers can:
- 1Add words and change how the words look
- 2Upload their own logo or picture
- 3Add a ready-made picture from your art library
- 4Design the front, back, and other sides you set up
- 5Change the shirt (or product) color when you offer colors
- 6Look at a preview, save the design, or download a proof
- 7Pick sizes and how many, then add the item to the cart
The main screen
Think of the Design Lab like a work table. The product sits in the middle. Buttons sit around the edges.
Most people only need three things: Add Text, Upload image, or Add Graphic. Then they drag the design into place. Use the numbered notes on the picture below.
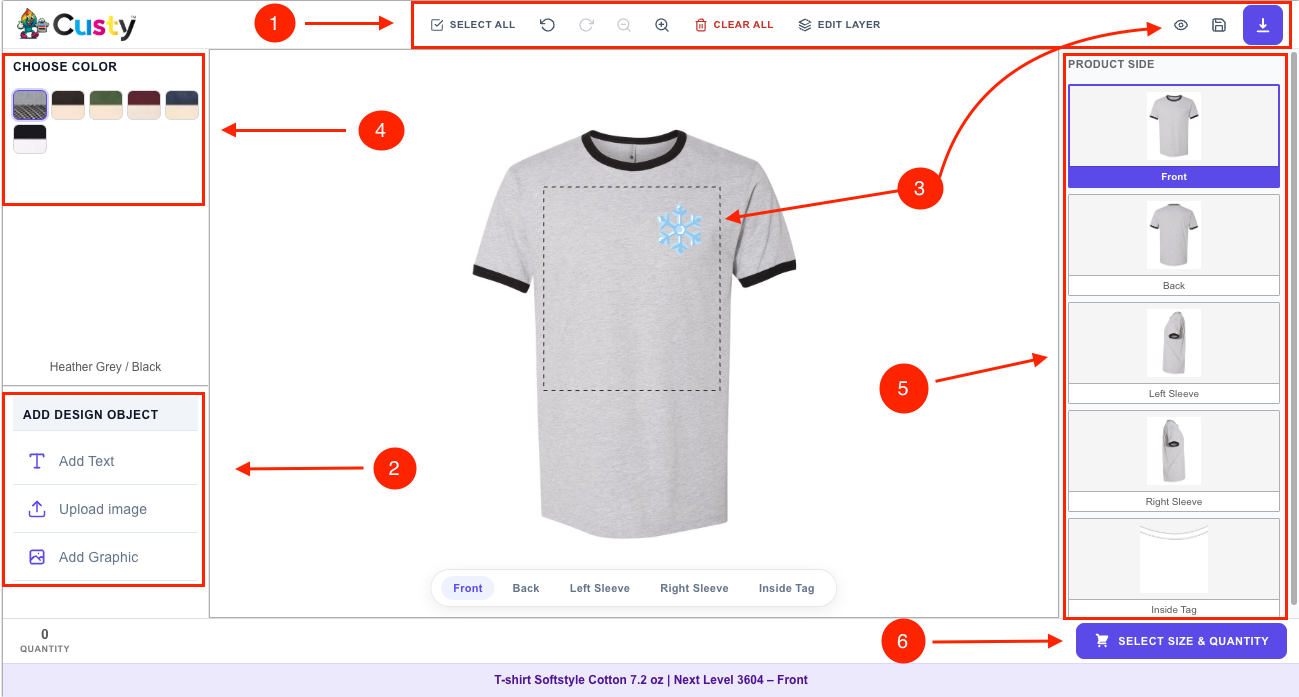 Full size
- 1
Top tools
SELECT ALL, Undo, Redo, Zoom, CLEAR ALL, EDIT LAYER, Preview, Save Design, and Download.
- 2
Add design
Add Text, Upload image, and Add Graphic. Those are the three main ways to decorate.
- 3
Product preview
The live product photo. The dashed box is where artwork may go (your print area).
- 4
Choose color
Color dots so shoppers can change the product color (when you offer colors).
- 5
Product side
Switch sides such as Front and Back.
- 6
Size and cart
SELECT SIZE & QUANTITY. Pick sizes and amounts, then add to cart.
Buttons along the top
These sit along the top of the Design Lab:
- SELECT ALL: grabs every design piece on this side so they can move together. When it is on, it says DESELECT.
- Undo: go back one step.
- Redo: bring that step back.
- Zoom out / Zoom in: make the product smaller or bigger on the screen.
- CLEAR ALL: remove every design from this side. They can click Undo if they clicked by mistake.
- EDIT LAYER: open a list of each piece on this side (see the next section).
- Preview (eye picture): open DESIGN PREVIEW to see all sides before buying.
- Save Design (disk picture): save the design to come back later.
- Download: save a proof picture of the design.
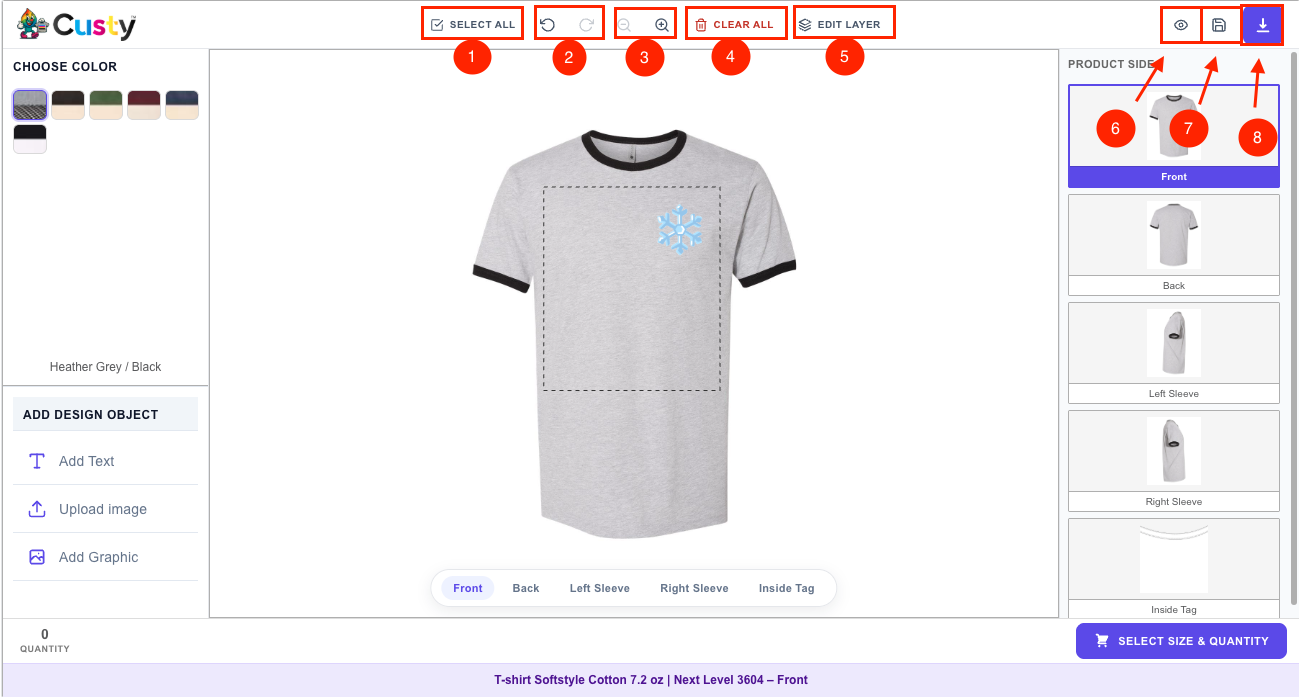 Full size
- 1
SELECT ALL
Select every design piece on this side.
- 2
Undo / Redo
Go back one step, or bring that step back.
- 3
Zoom
Zoom out and zoom in.
- 4
CLEAR ALL
Remove all designs from the current side.
- 5
EDIT LAYER
Open the list of design pieces.
- 6
Preview
Open DESIGN PREVIEW.
- 7
Save Design
Save the design for later.
- 8
Download
Download a proof of the design.
EDIT LAYER (the list of pieces)
Click EDIT LAYER. A list opens. It shows every word, upload, and graphic on the current side.
- Drag a row to change what sits on top.
- Or use the up and down arrows if you prefer.
- Delete one piece, or Clear All from this list.
- If nothing is on the side yet, it says No elements added yet.
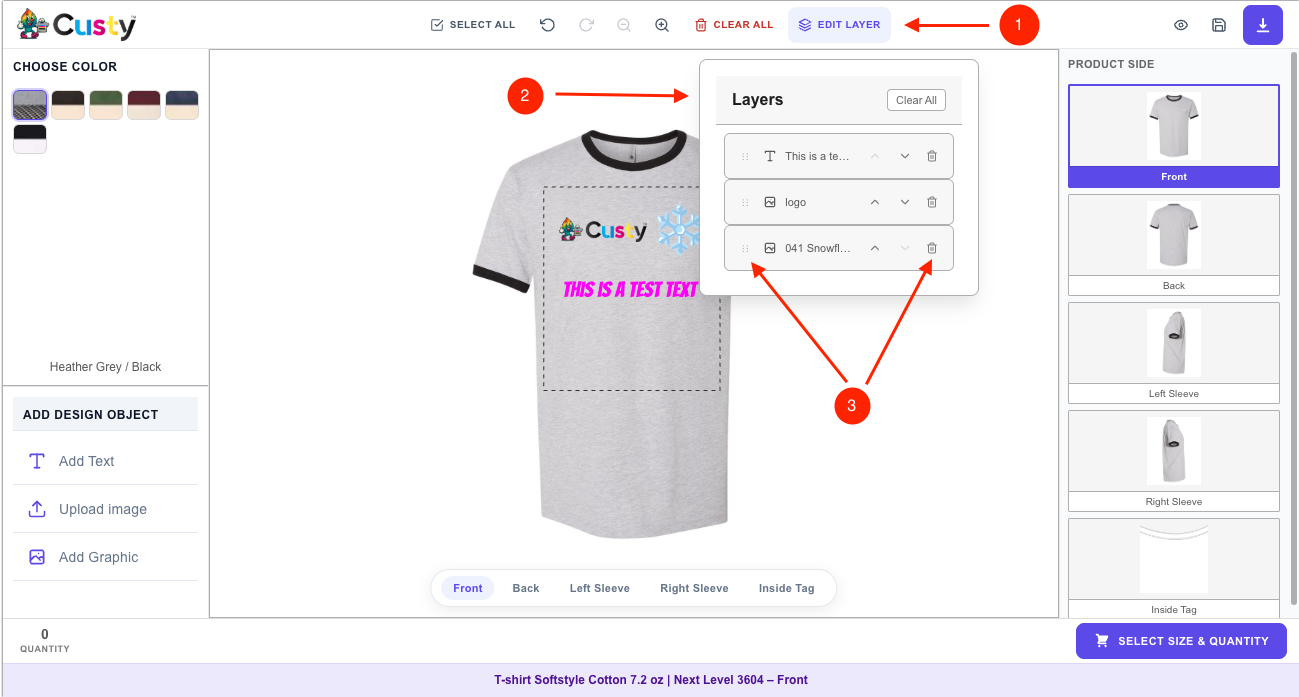 Full size
- 1
EDIT LAYER
Button that opens this list.
- 2
Layers list
Each text, image, and graphic on this side.
- 3
Reorder / Delete
Drag to reorder, or delete one piece.
CHOOSE COLOR
If you set colors on the product in Custy, shoppers see CHOOSE COLOR with colored dots. Click a color to change how the product looks on screen.
If you did not set colors, this section will not show. That is normal.
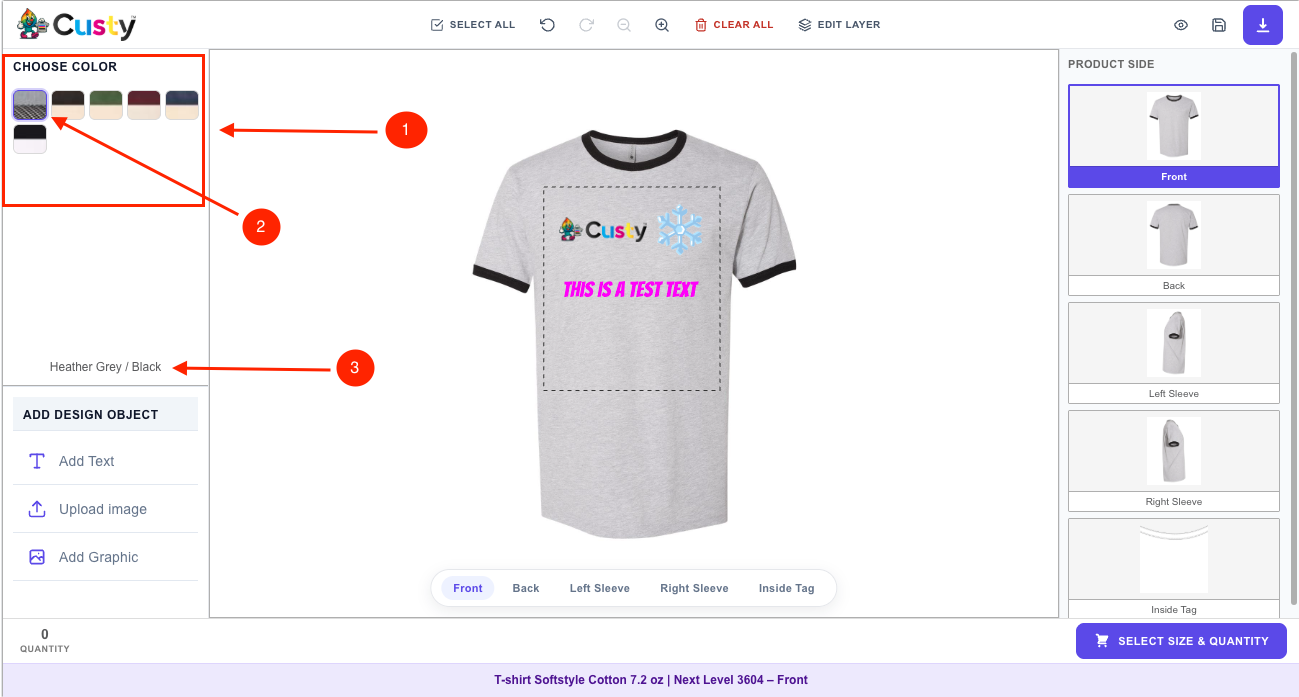 Full size
- 1
CHOOSE COLOR
Title for product colors.
- 2
Swatches
Click a color to change the product look.
- 3
Selected color name
Shows which color is active.
PRODUCT SIDE
PRODUCT SIDE shows each side you added (for example Front and Back). Shoppers click a side to design it. Under the product you may also see side buttons.
If a side is turned off for designing, they will see a message that this side is not enabled for customization. That means they cannot put art on that side. Your store is fine.
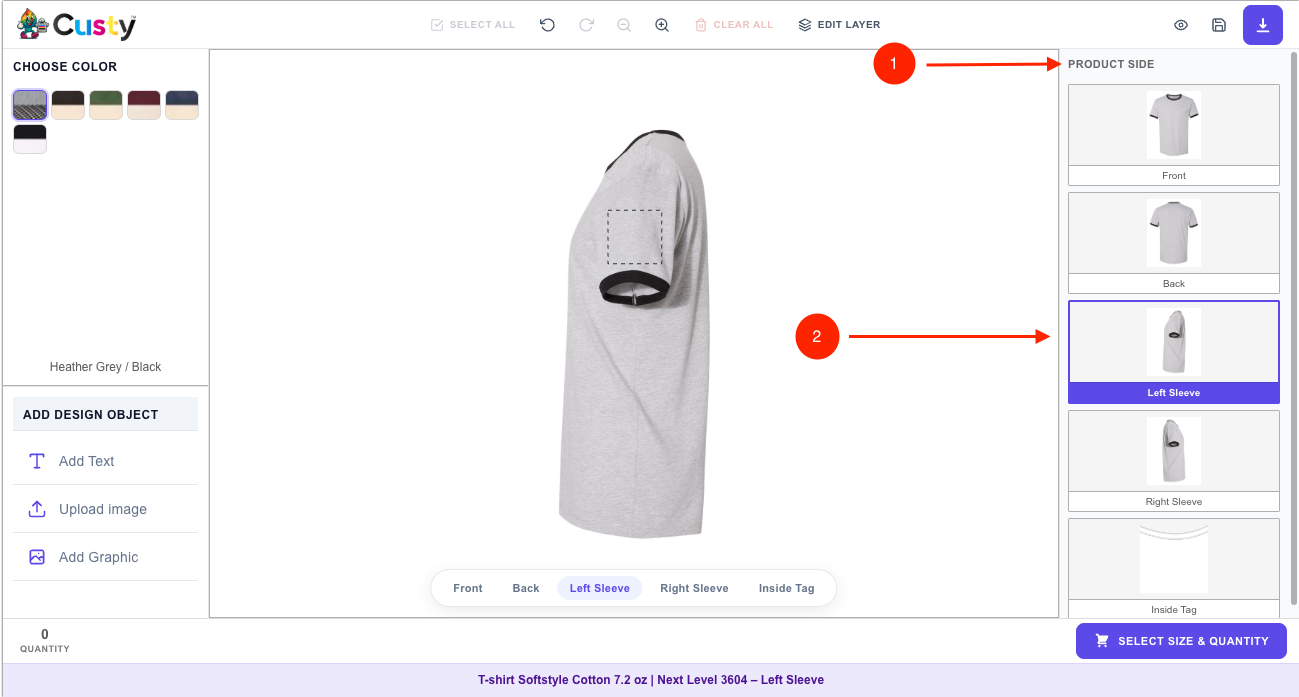 Full size
- 1
PRODUCT SIDE
List of sides the shopper can design.
- 2
Side thumbnail
Click to switch to that side.
Add Text
Under ADD DESIGN OBJECT, shoppers click Add Text. That button goes away and a small form opens on the left. The picture below shows that form after Add Text was already clicked.
They type words, pick a font and size, pick a text color, then click Add Text again to put the words on the product.
- Type in the box that says Enter your text...
- Pick a font (the list may say SELECT A FONT).
- Set the size and TEXT COLOR.
- Click Add Text to place it, or Cancel to close.
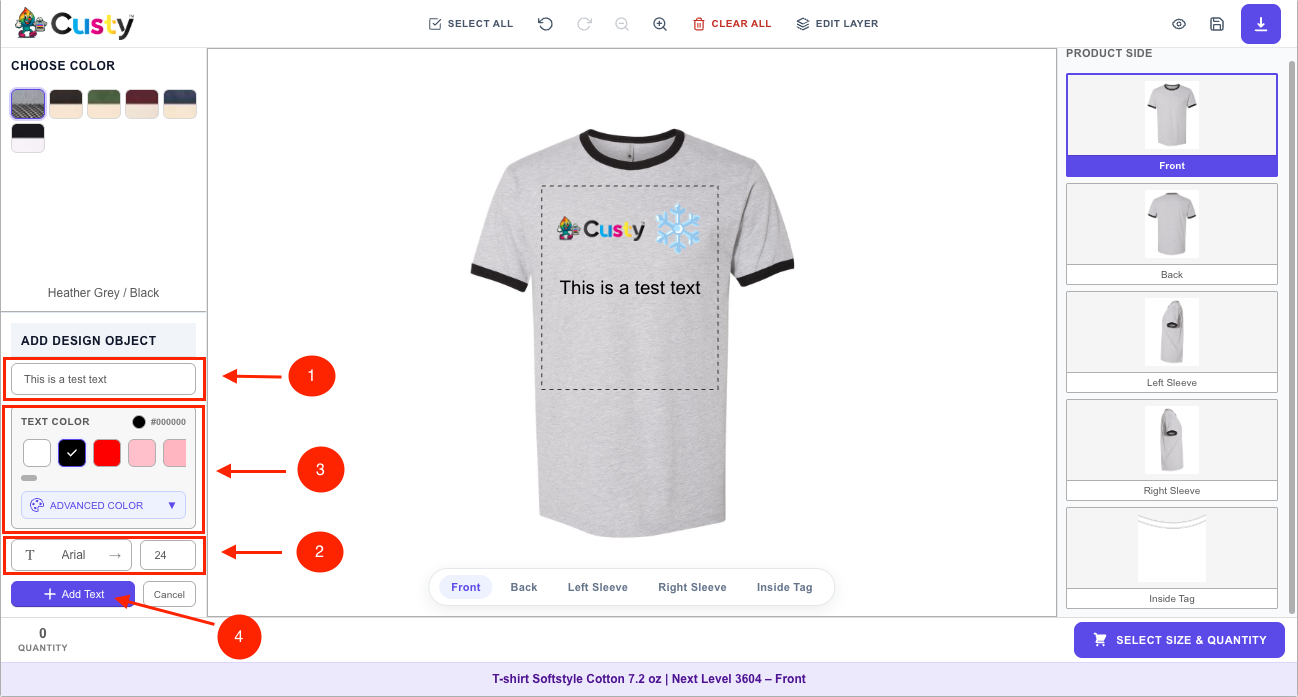 Full size
- 1
Text box
Where shoppers type their words.
- 2
Font and size
Choose font and font size.
- 3
TEXT COLOR
Pick a color for the text.
- 4
Add Text
Places the text on the product.
TEXT OPTIONS (after text is selected)
When a shopper clicks the text on the product, TEXT OPTIONS open on the right. This is where they change the words and how they look.
- CONTENT: Edit Text Content to change the words. Duplicate makes a copy. Remove deletes the text.
- PRINT & COLOR: pick PRINTING TYPE if you offer more than one way to print, and pick COLOR for the ink.
- Font tools: SELECT FONT, FONT SIZE, Bold, Italic, Underline.
- Size: WIDTH and HEIGHT. Flip H flips left-right. Flip V flips up-down.
- Advanced tools: letter spacing, line height, outline and shadow, rotate, and move left/center/right or top/middle/bottom.
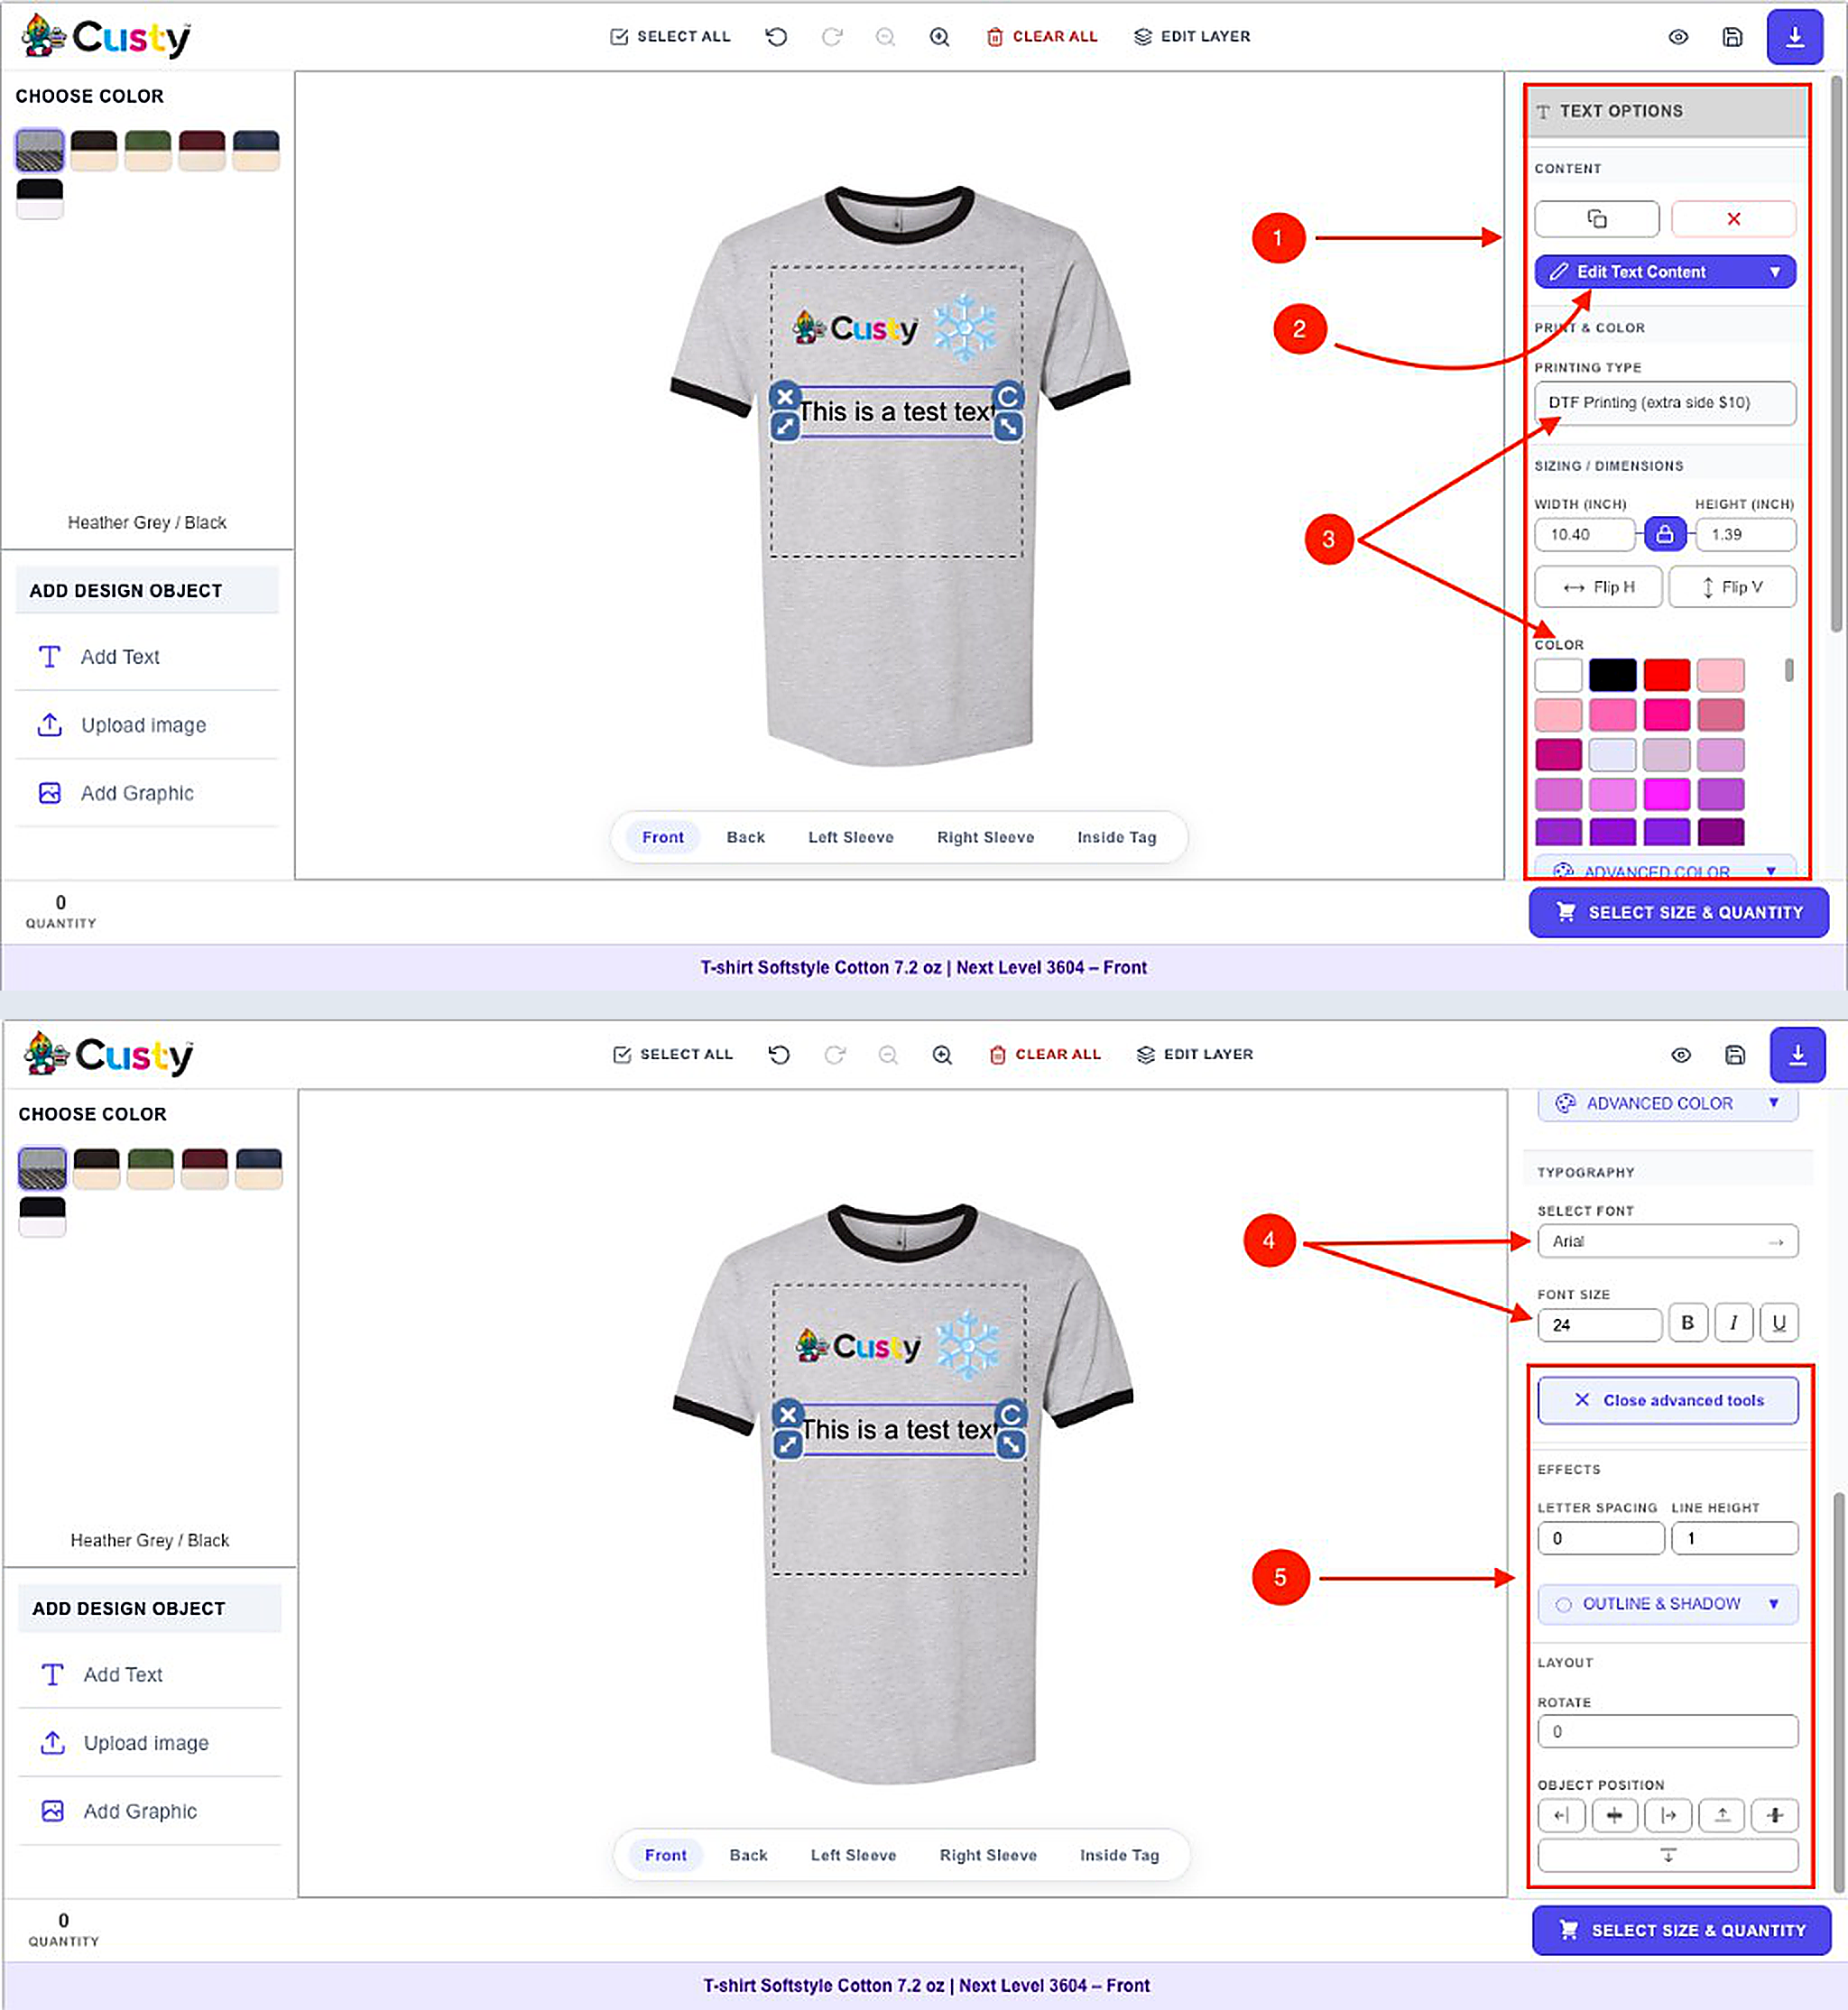 Full size
- 1
CONTENT
Duplicate or remove the text.
- 2
Edit Text Content
Change the words.
- 3
PRINTING TYPE / COLOR
Printing method and ink color.
- 4
Font and size
SELECT FONT, FONT SIZE, Bold, Italic, Underline.
- 5
Advanced tools
Spacing, outline, shadow, rotate, and position.
Upload image
Shoppers click Upload image. A window titled UPLOAD IMAGE opens.
- Choose Upload A File or From URL.
- Click Choose File (or paste a web link and click Load). Allowed file types: JPG, PNG, GIF, BMP, or WebP. Biggest size: 20MB.
- Optional: crop the picture, put it in a shape, add a photo effect, or remove the background.
- Click Continue (or Add Image) to put the picture on the product.
After the picture is on the product
Shoppers can click it to change size, flip, rotate, or printing type. Uploaded pictures keep their own colors. There is no color picker for uploads.
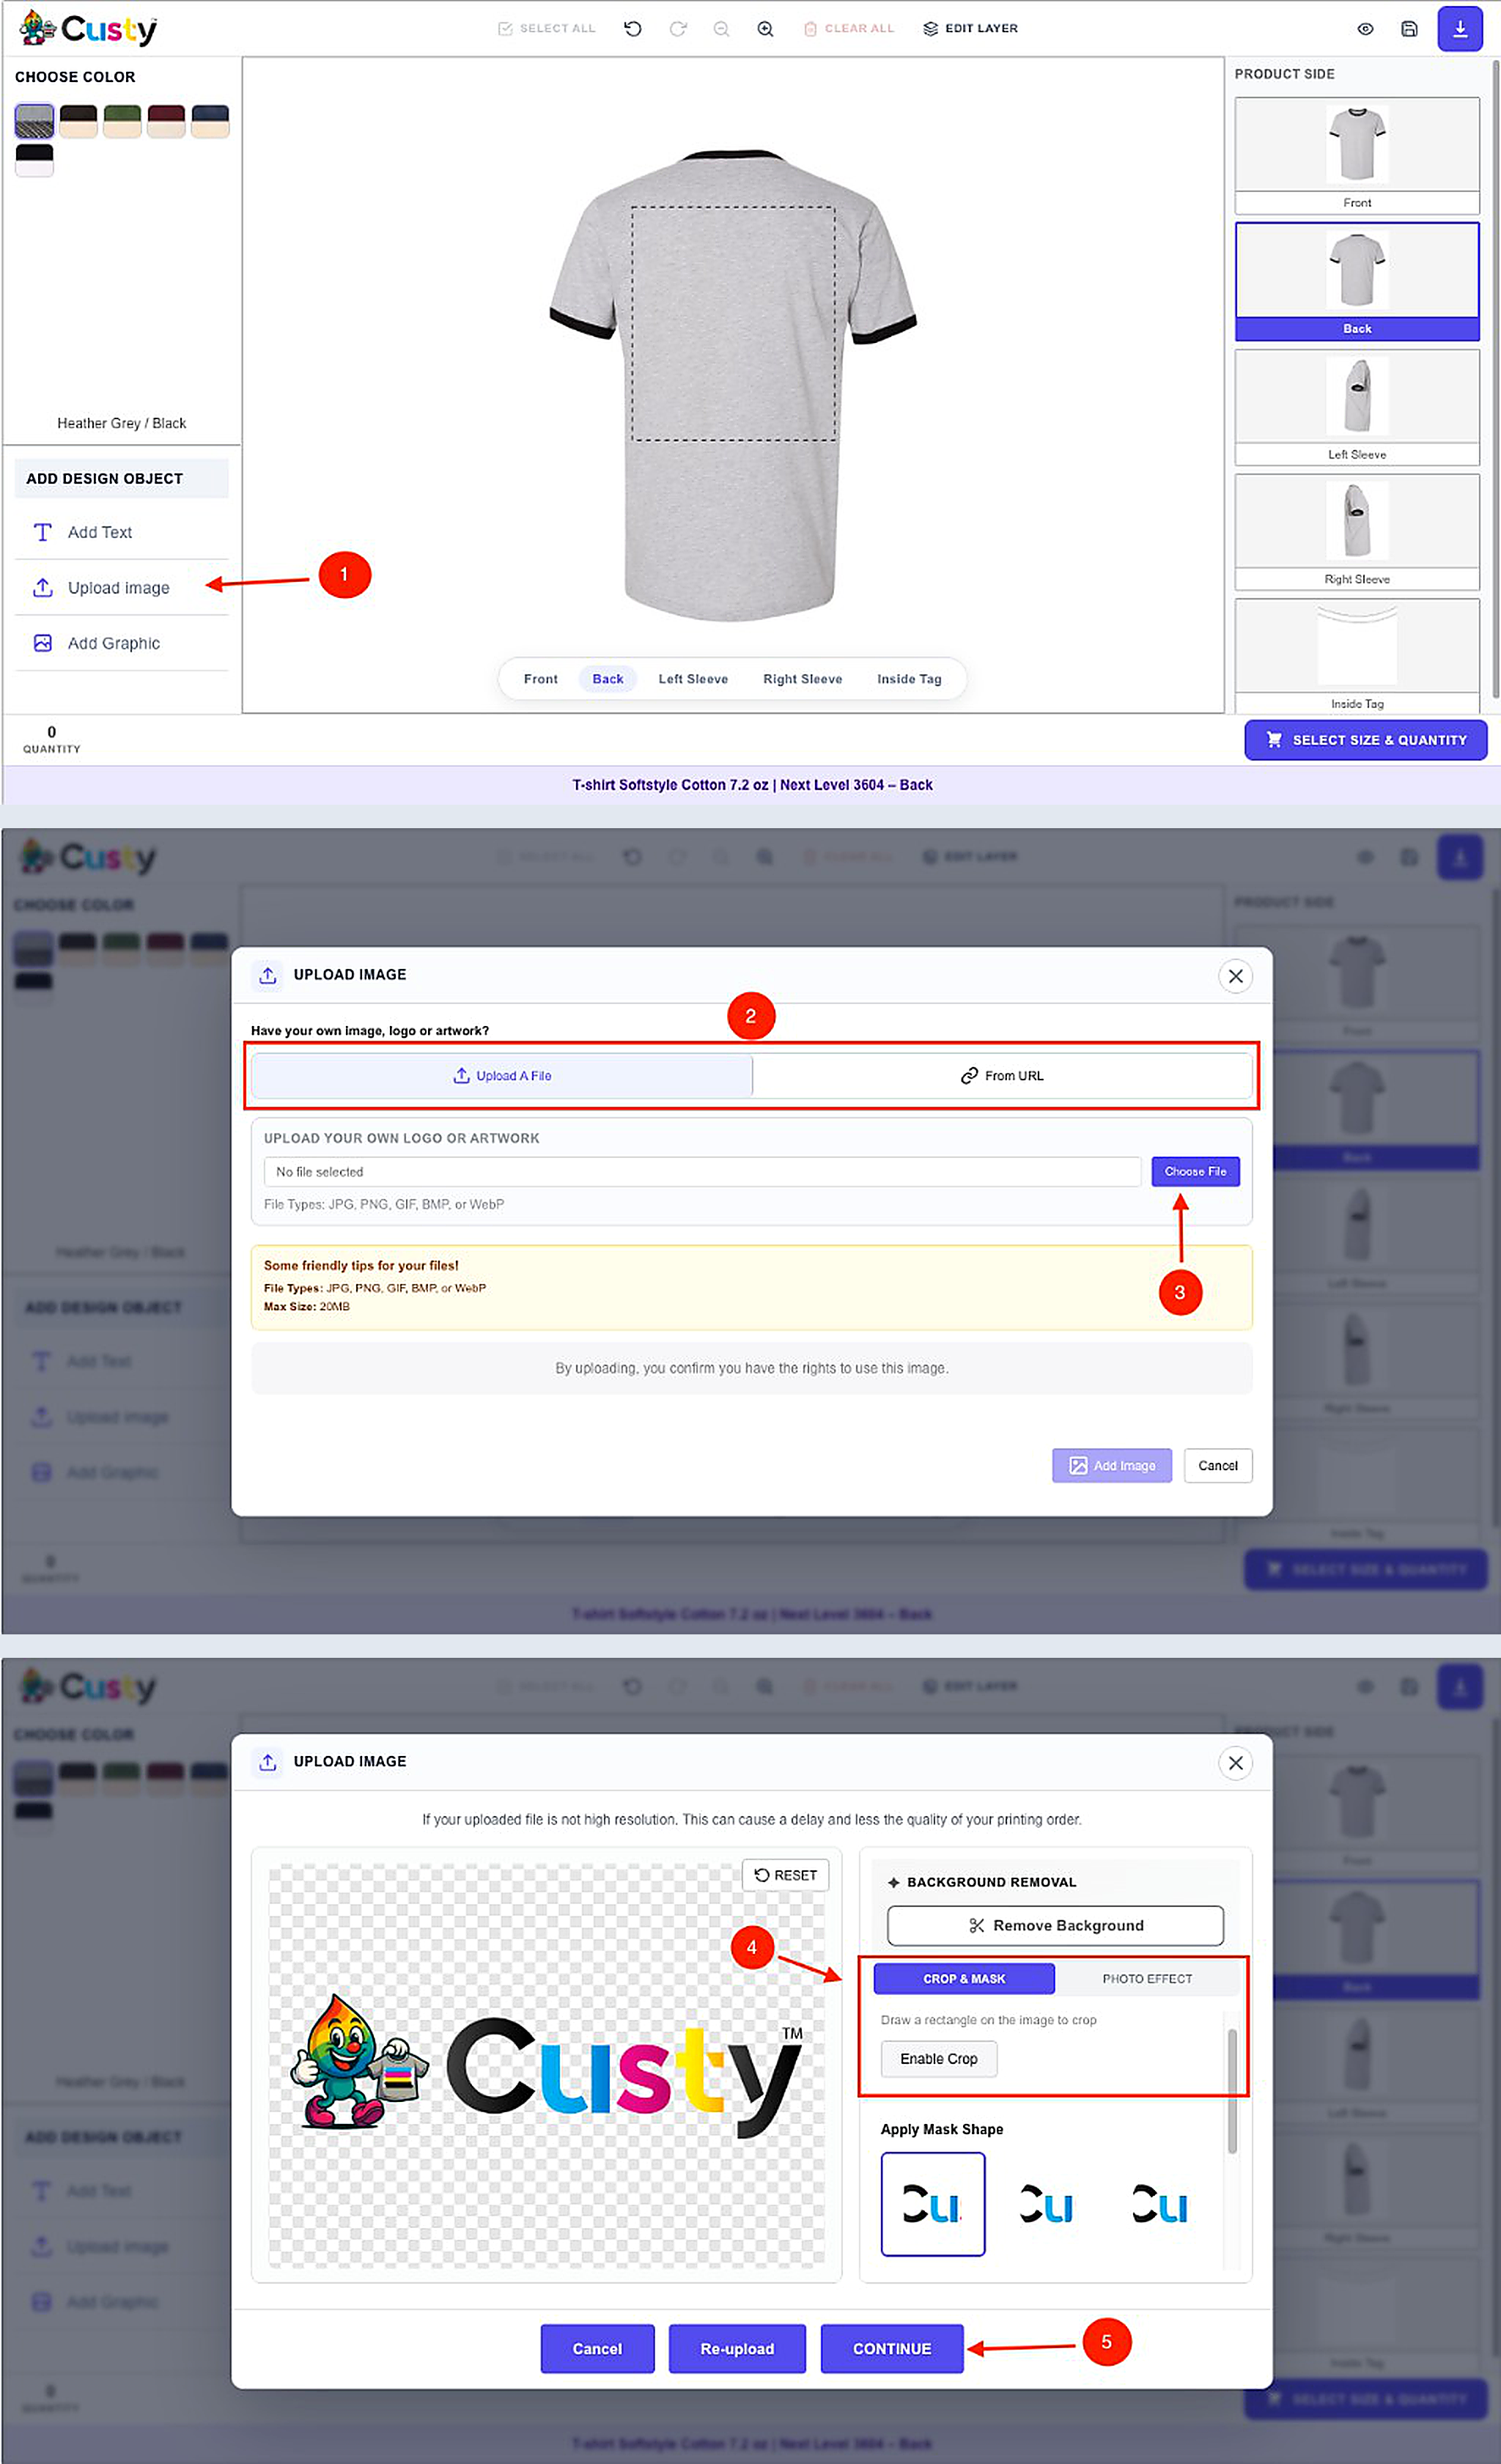 Full size
- 1
Upload image
Click this to open the upload window.
- 2
Upload A File / From URL
Two ways to add artwork.
- 3
Choose File
Pick a JPG, PNG, GIF, BMP, or WebP file.
- 4
Crop & Mask
Optional crop, shapes, and photo effects.
- 5
CONTINUE
Places the image on the product.
Add Graphic
Add Graphic opens your art library (the window says ADD GRAPHIC). Shoppers pick a group, search if they want, and click a graphic to put it on the product.
After it is on the product, they can change size, color (for library art), printing type, flip, and rotate, similar to text.
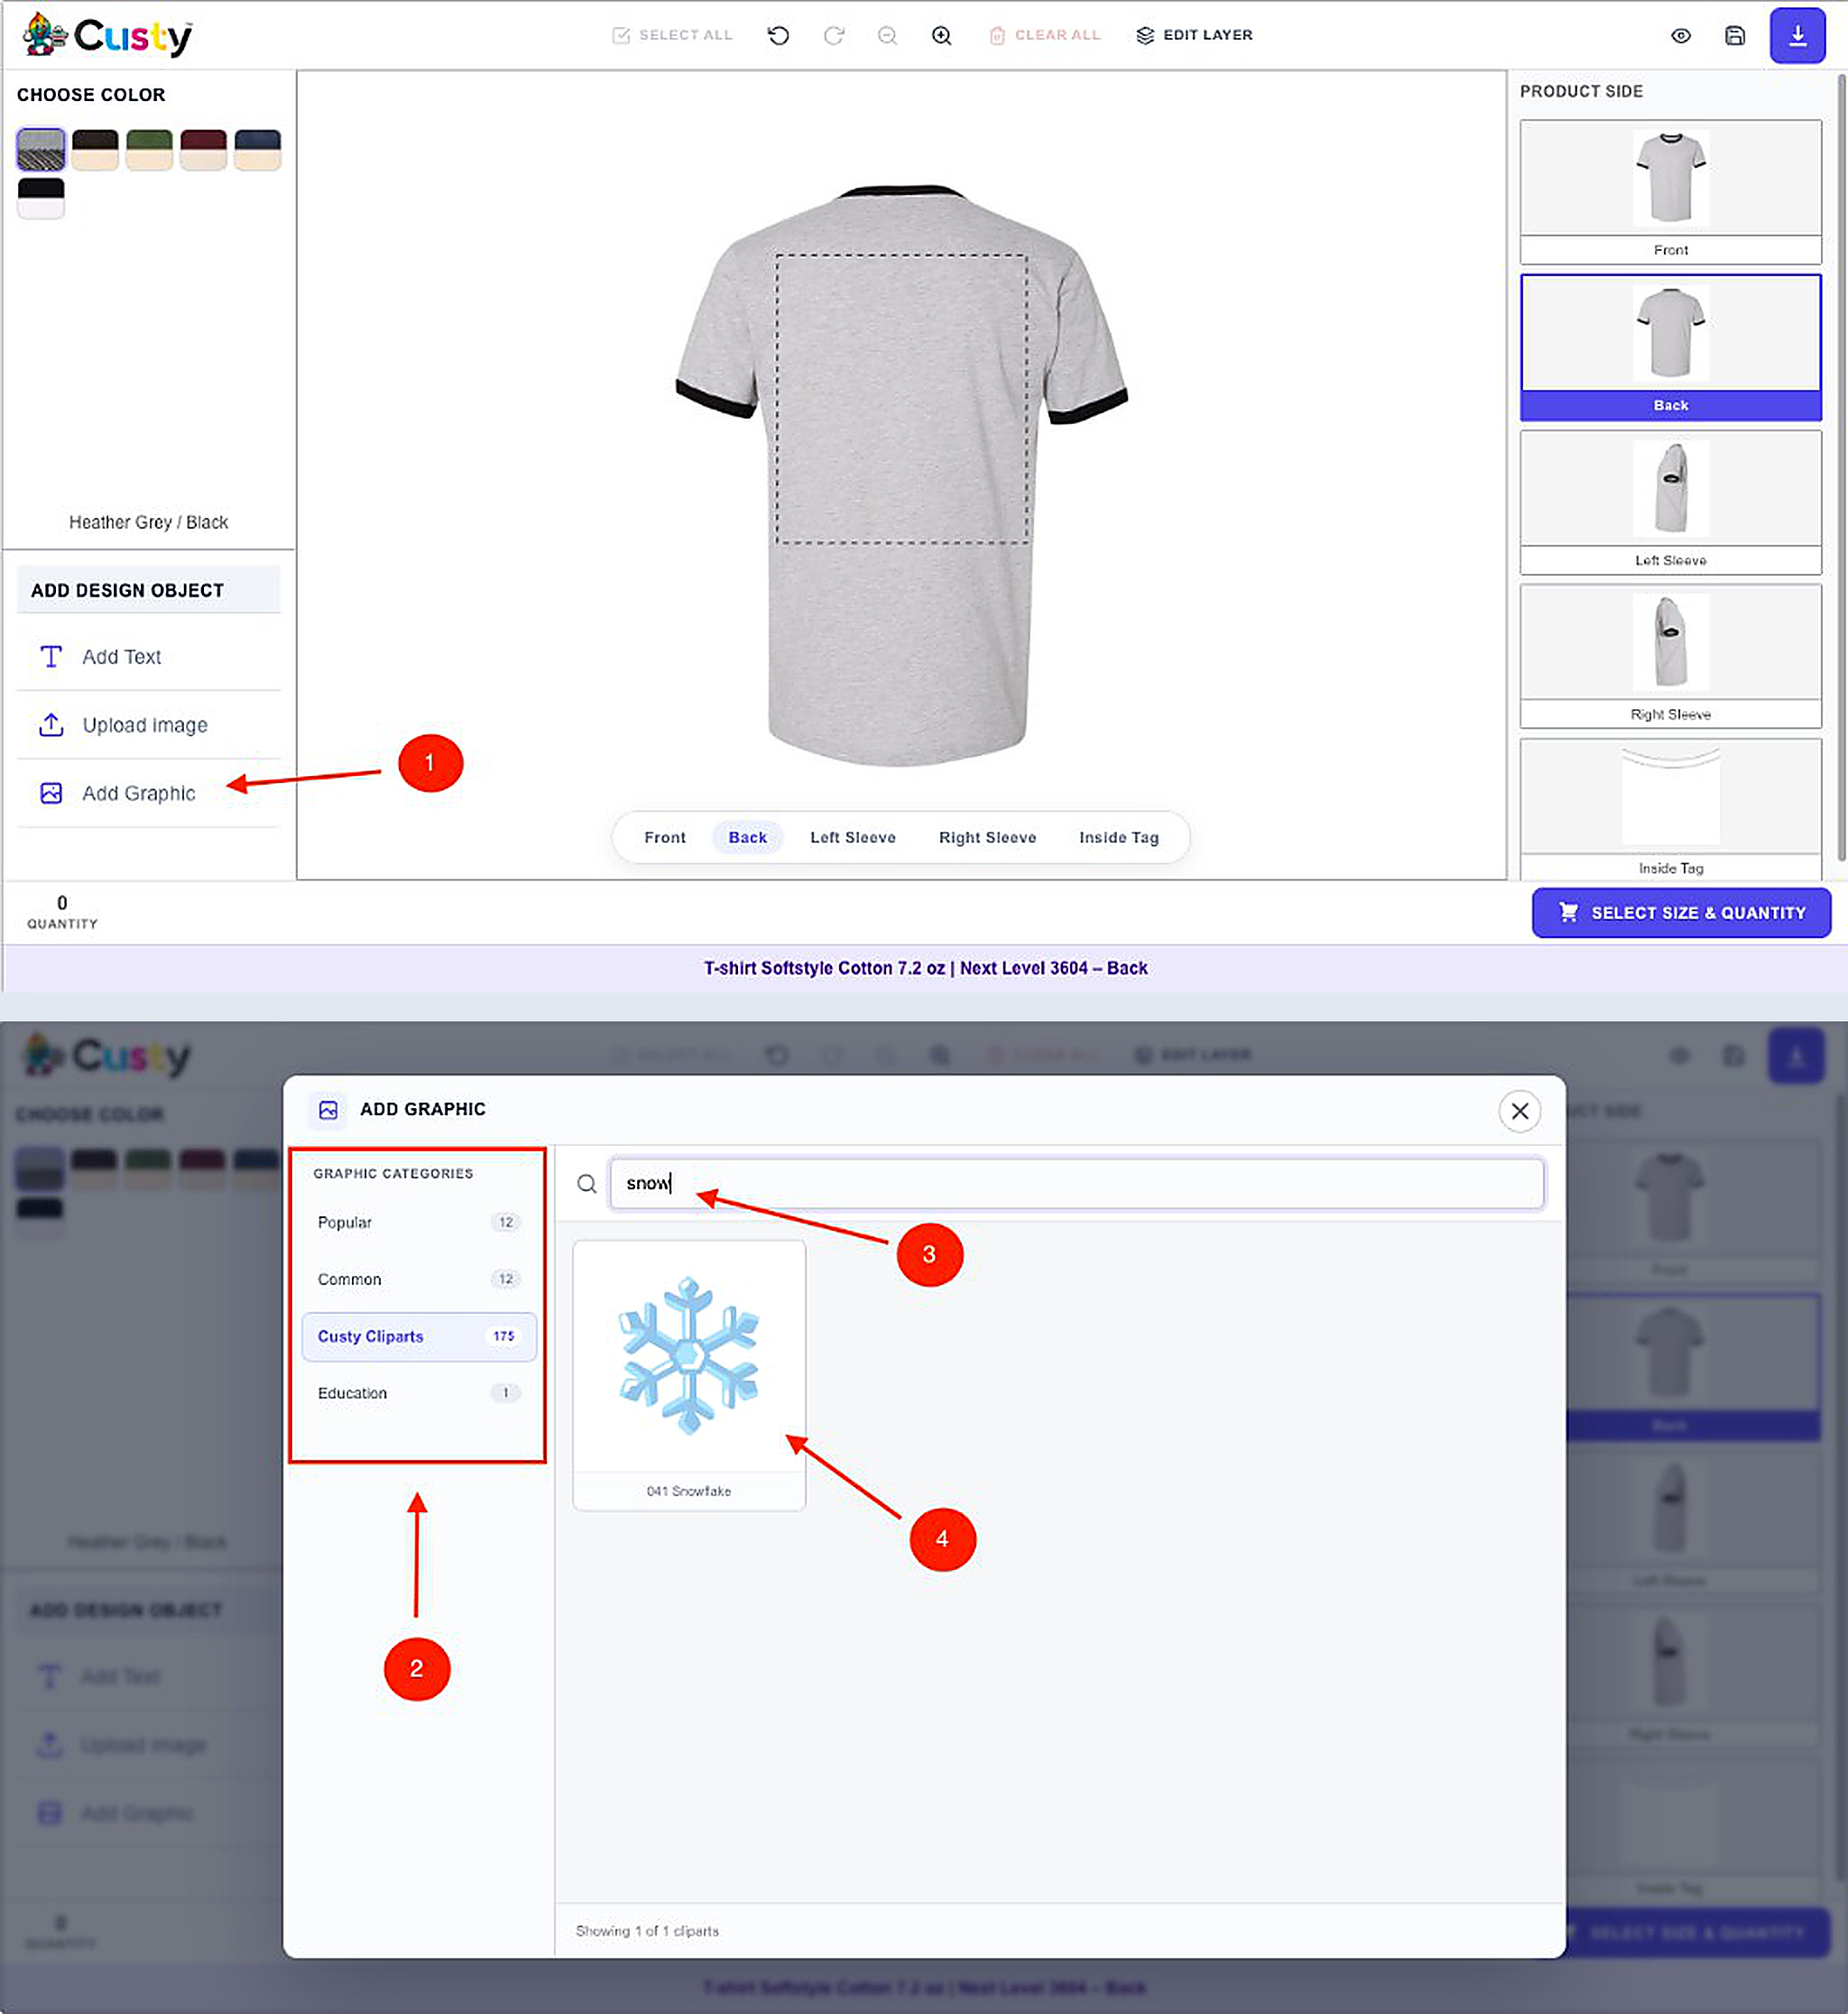 Full size
- 1
Add Graphic
Opens the art library.
- 2
GRAPHIC CATEGORIES
Groups of clipart.
- 3
Search
Search graphics by name.
- 4
Graphic tile
Click to place on the product.
Preview, Save Design, and Download
Preview opens DESIGN PREVIEW so shoppers can check every side before they buy. From there they can also download a proof.
Save Design asks for a name and email. After they save, they get a link they can Copy to open the design later. You can find saved designs under Orders in Custy.
The Download button on the top also saves a proof picture of the design.
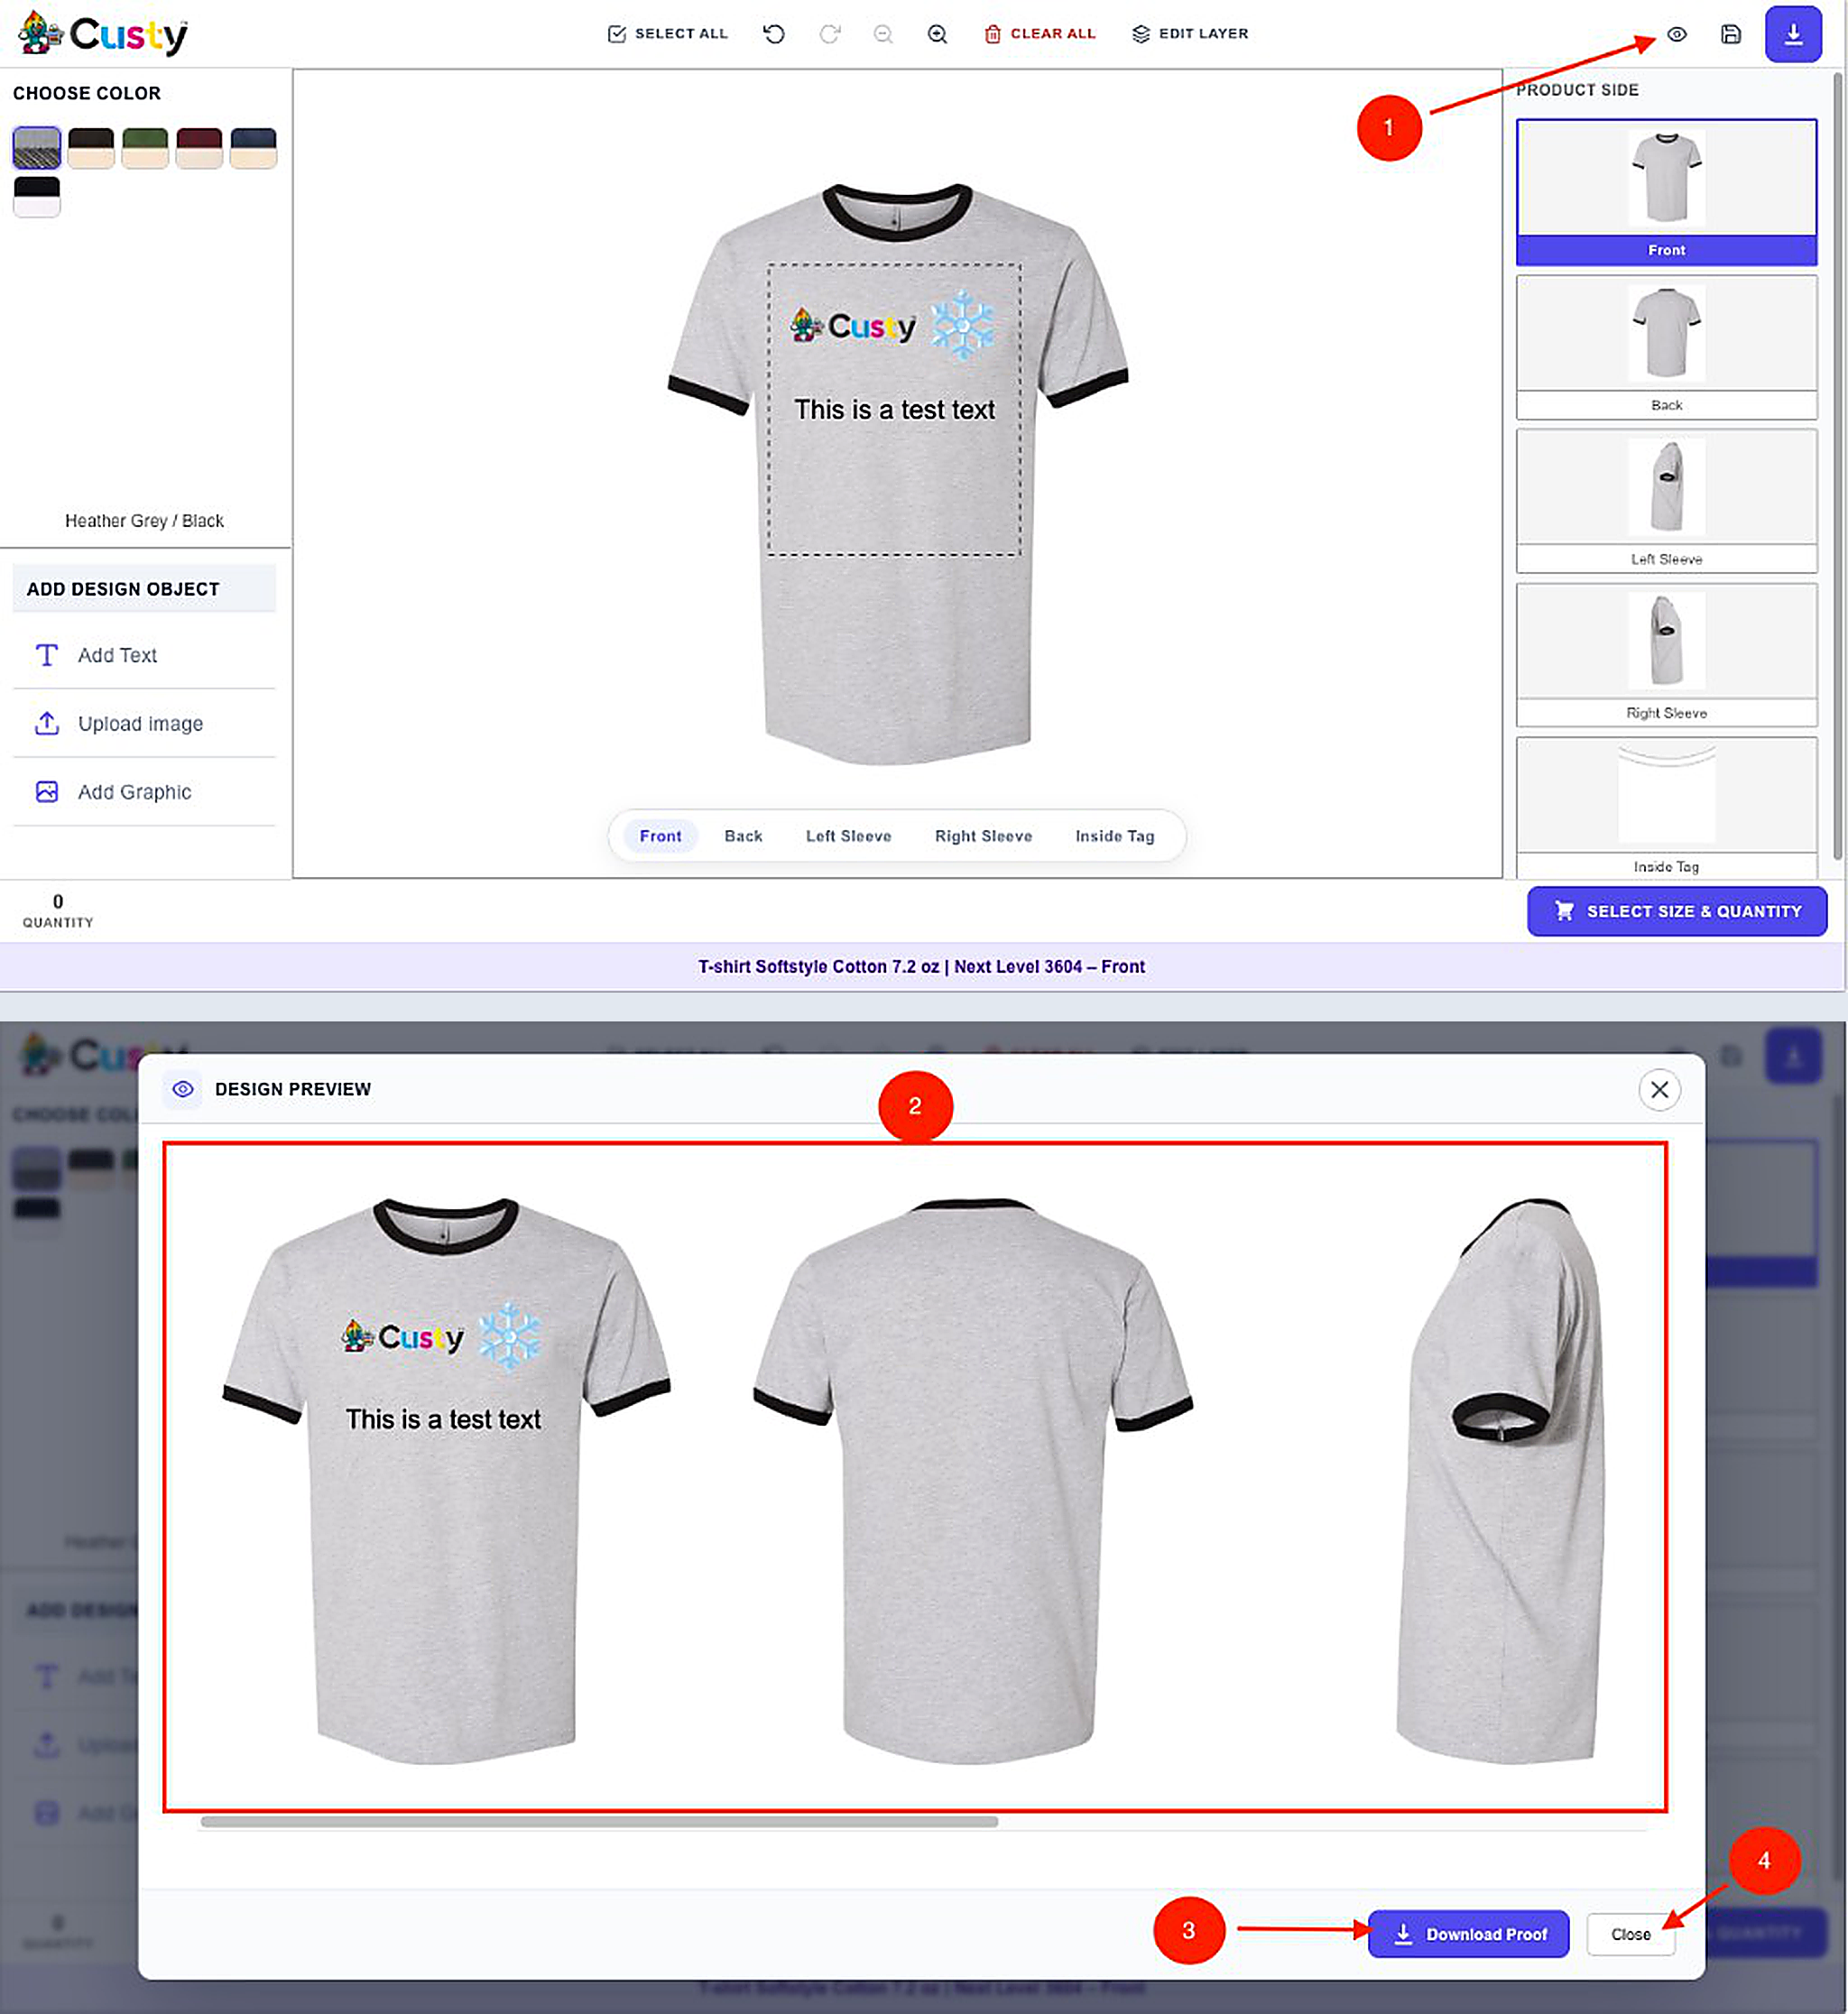 Full size
- 1
Preview
Eye button that opens this window.
- 2
Preview sides
See each side of the product.
- 3
Download Proof
Save a proof picture.
- 4
Close
Go back to designing.
SAVE YOUR DESIGN
Click the Save Design button on the top. Enter a design name and email, then click Save Design.
When it works, they see DESIGN SAVED with a link and a Copy button. There is no separate Share button. They share by copying that link. Your store is not changed by saving a design.
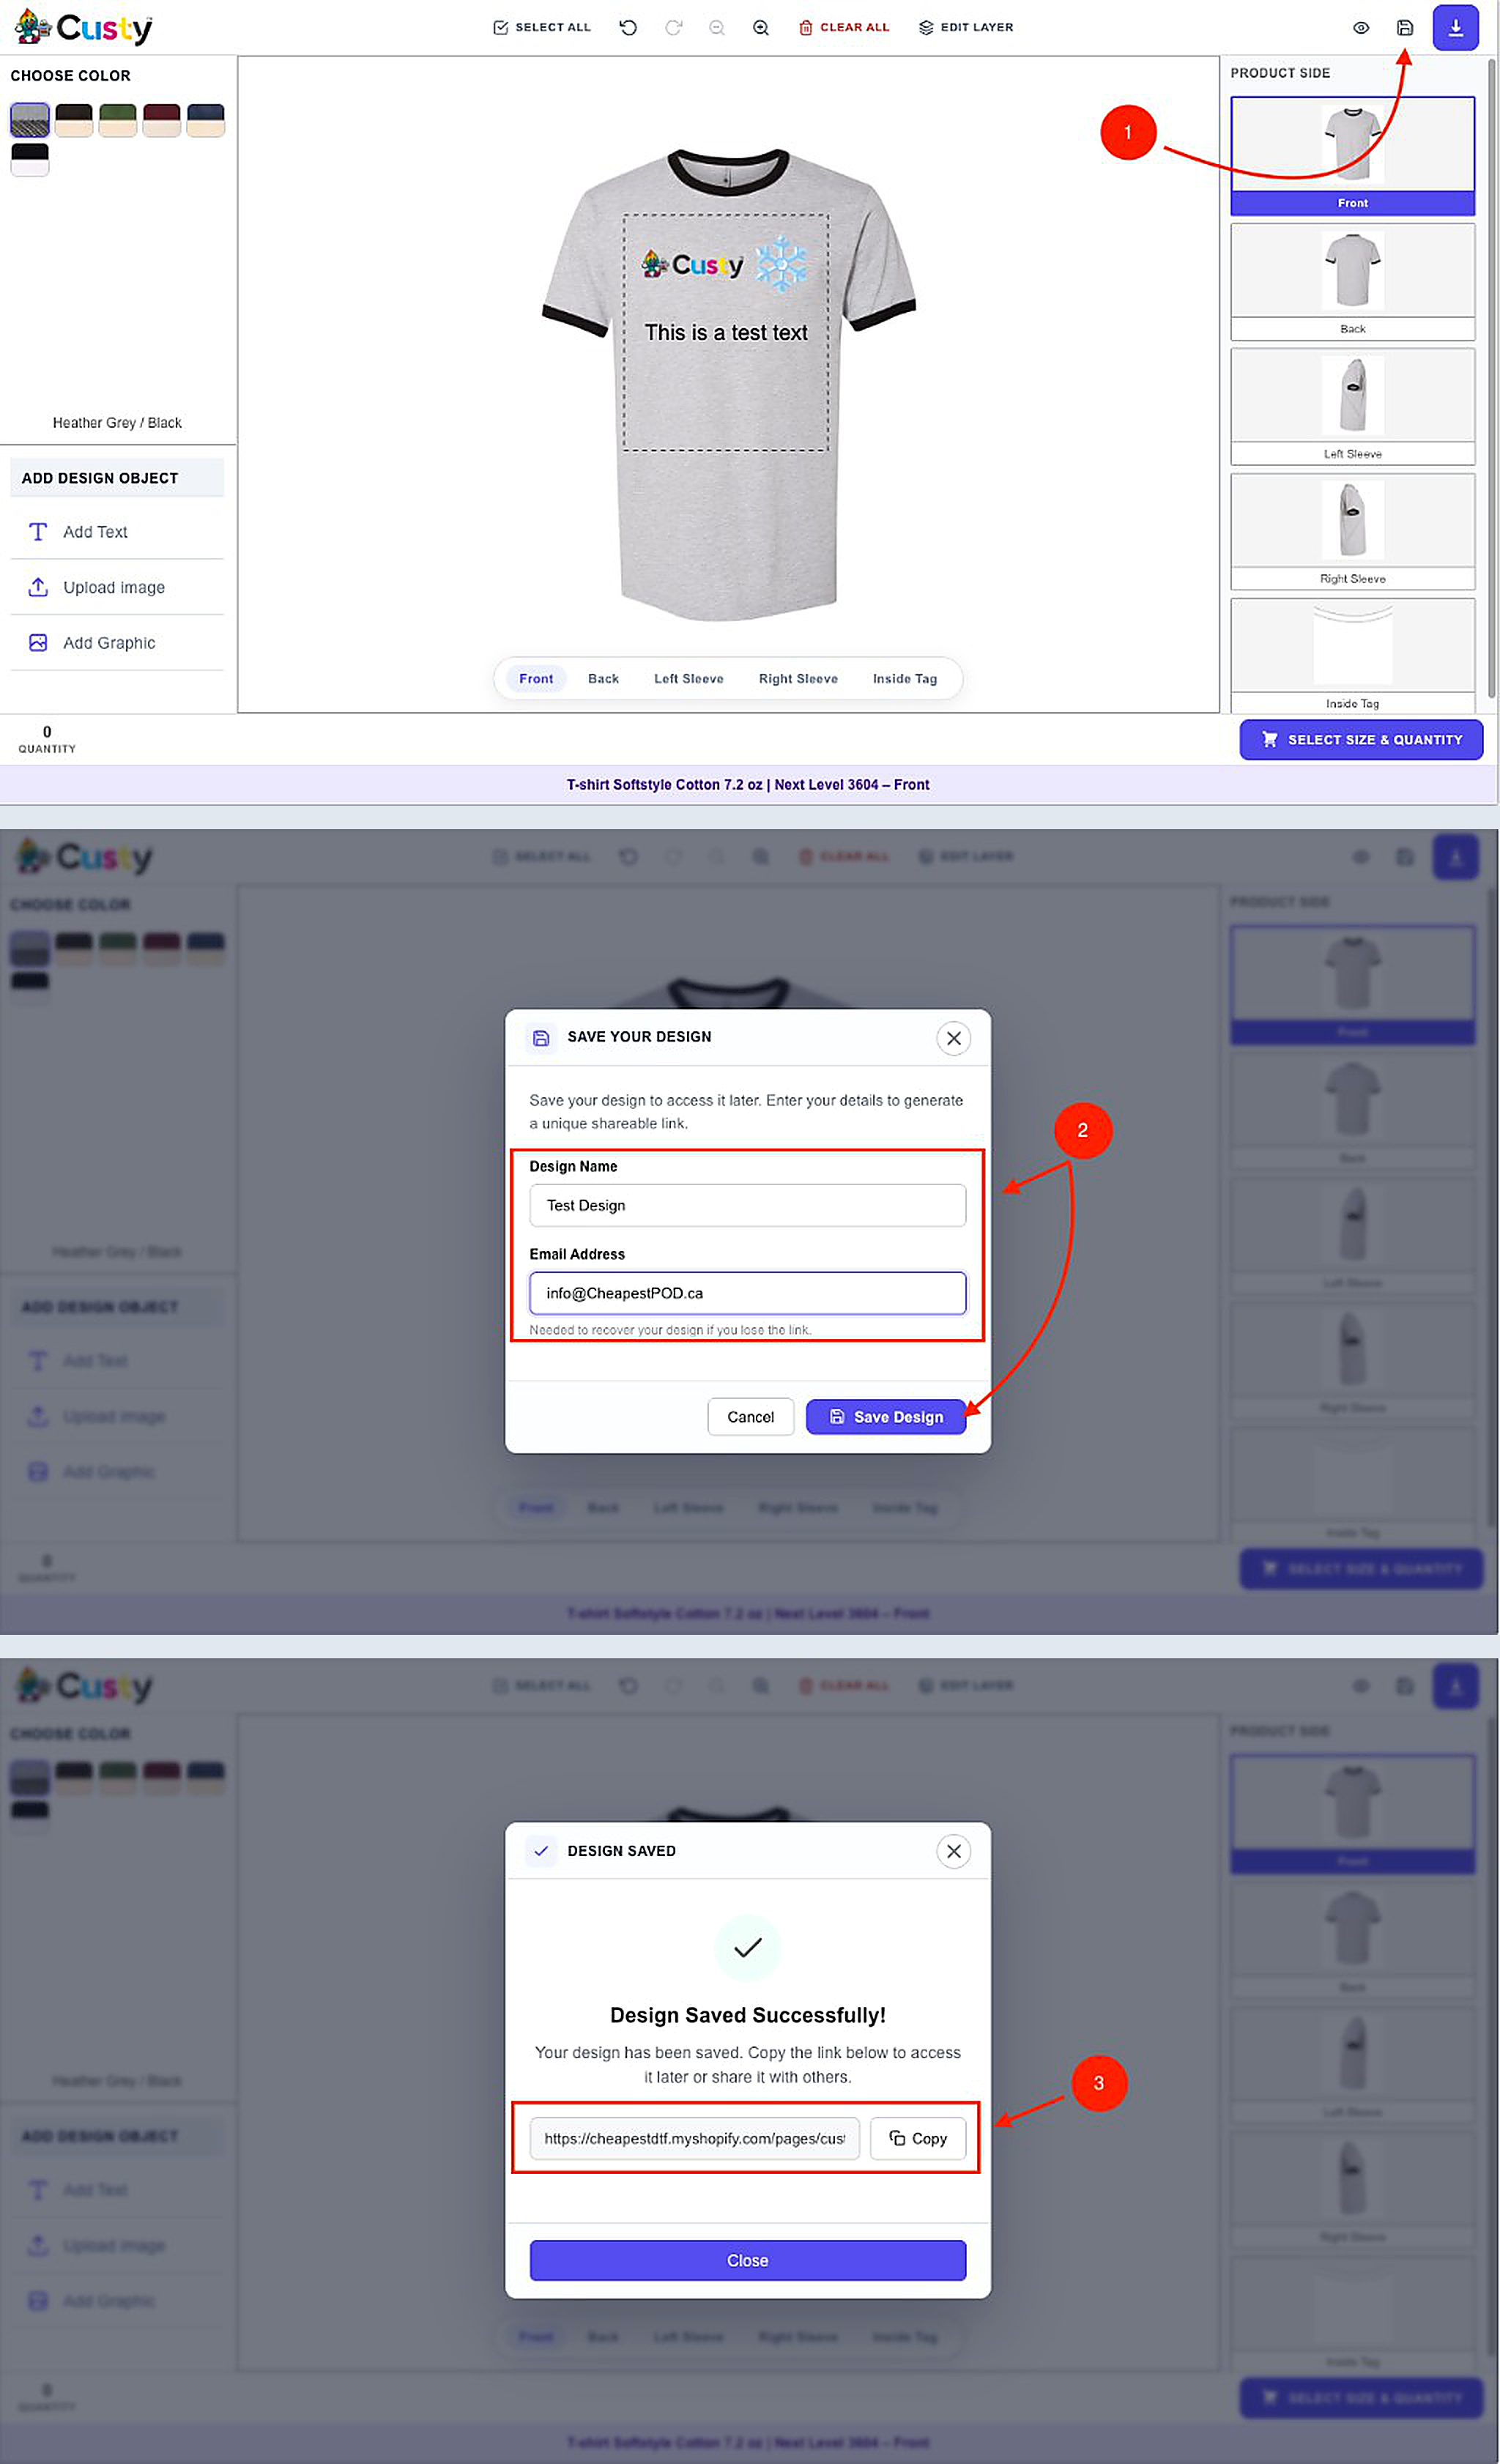 Full size
- 1
Save Design icon
Opens the save form from the top bar.
- 2
Name, email, and Save Design
Enter details, then click Save Design.
- 3
Copy link
After save, copy the link to open the design later or share it.
SELECT SIZE & QUANTITY and Add to Cart
At the bottom, shoppers click SELECT SIZE & QUANTITY. A window opens. They pick sizes and how many of each, see the totals, then click ADD TO CART.
CONTINUE DESIGNING takes them back to the design screen. On a phone, they may see CHECKOUT. That opens the same size and quantity window.
If they try to add to cart with no design, a friendly reminder asks them to Add Design or Continue Anyway. Nothing is broken.
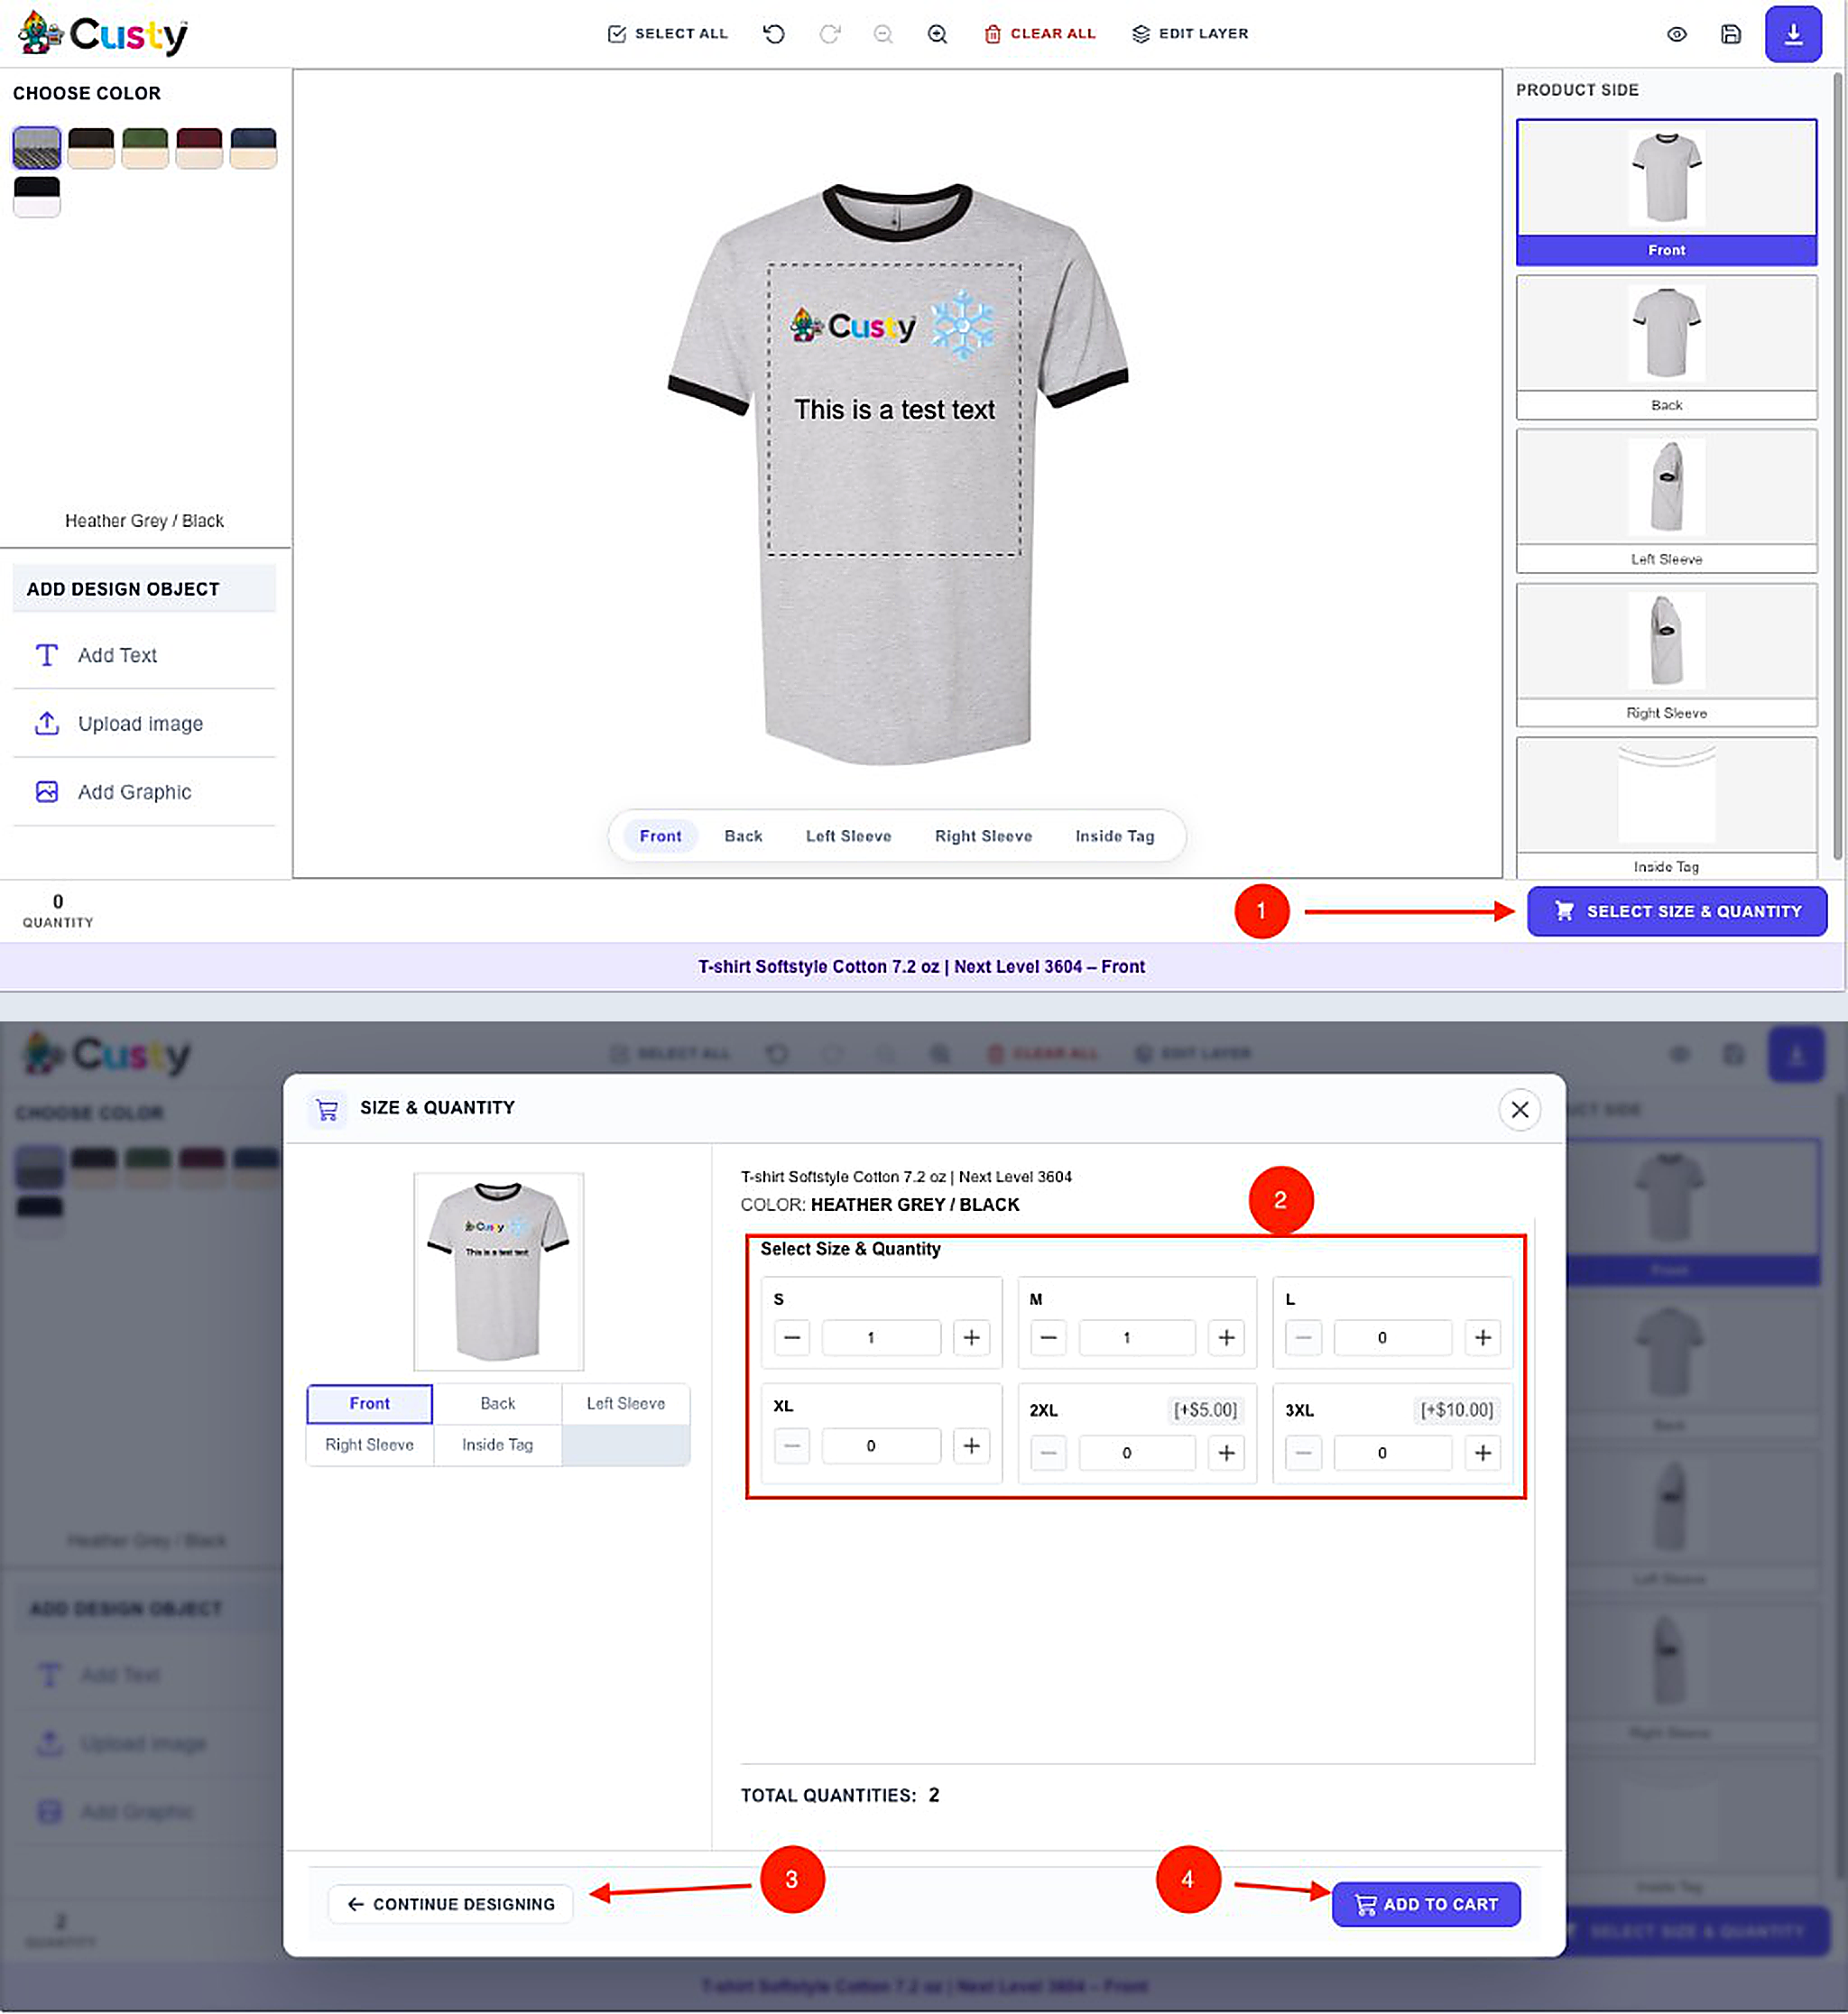 Full size
- 1
SELECT SIZE & QUANTITY
Footer button that opens this window.
- 2
Size and quantity
Pick each size and how many of that size.
- 3
CONTINUE DESIGNING
Go back to the design screen.
- 4
ADD TO CART
Send the customized product to the Shopify cart.
Helpful warnings
Sometimes the Design Lab shows a warning. That protects your print quality. It does not mean your store is broken.
You can turn these warnings off in Custy Settings for your store, so shoppers do not see them. Open Settings and check the warning options (such as low-quality picture and outside the print area).
- 1Design is outside the print area. Move the art inside the dashed box
- 2Picture looks soft or low quality. Upload a larger, clearer file, or make the picture smaller on the product
- 3Too many colors for this printing type. Use fewer colors to match the limit you set