
How to Set Up Product Colors?
With Custy you can offer shoppers a list of product colors, and charge a little more for premium colors if you want. Shoppers pick a color in the Design Lab.
You can build color sets once and reuse them on many products. Changing a color set does not delete your Shopify products.
Two places to work with colors
You will use colors in two spots. Both use the same color sets.
- 1Products → Create Colors tab: build and edit shared color sets for the whole store
- 2Customize Product → Product Colors: pick which color set this one product uses
Step 1: Open Create Colors
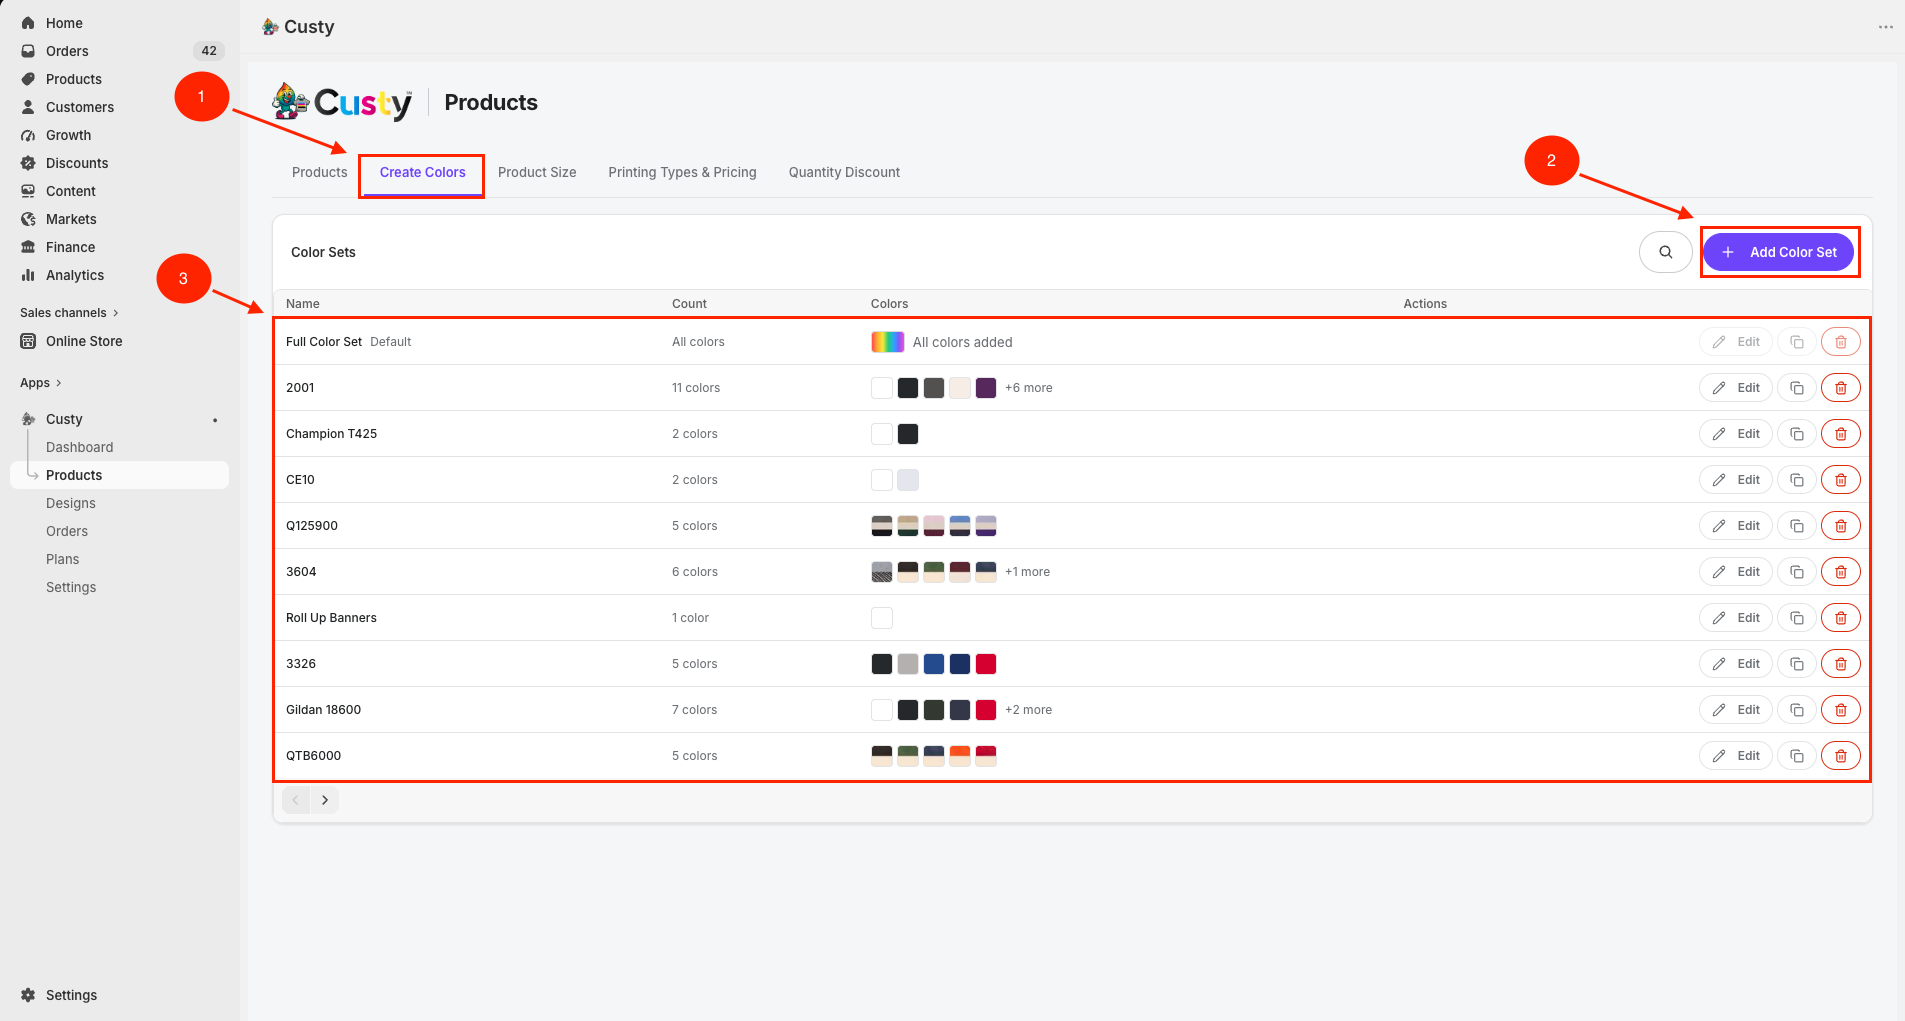
In Custy, click Products on the left. At the top, click the Create Colors tab. This is where you manage shared color sets.
 Full size
- 1
Create Colors
Top tab for shared color catalogs (next to Products and Product Size).
- 2
Add Color Set
Create a new color list from scratch.
- 3
Color set list
Each row shows the set name, swatches, and actions (Edit, copy, Delete).
Step 2: Create a new color set
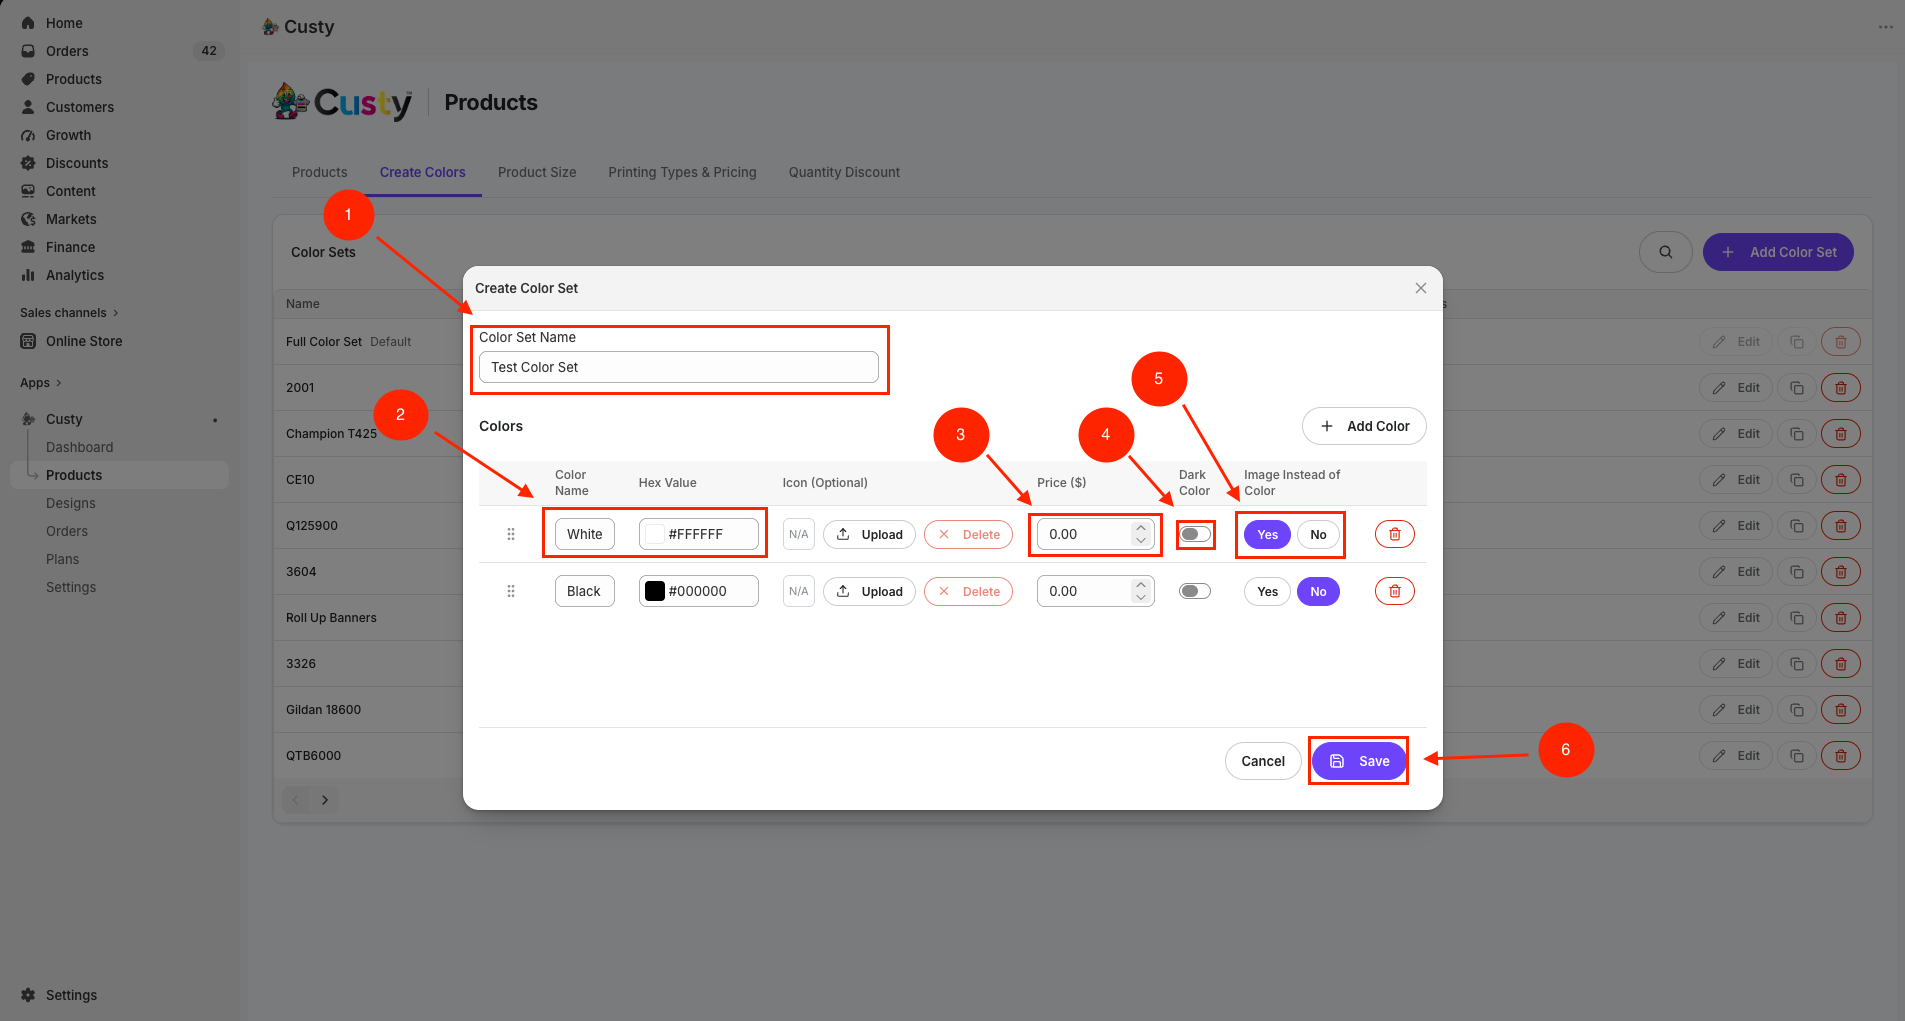
Click Add Color Set. The Create Color Set window opens.
- Enter a Color Set Name (for example Tee Basics or Mug Solids).
- Under Colors, click Add Color for each color you sell.
- Fill in Color Name, Hex Value (6 digits, no #), optional Icon, Price ($), Dark Color, and Image Instead of Color.
- Drag rows to reorder. Use the trash icon to remove a color.
- Click Save.
 Full size
- 1
Color Set Name
A clear name you will recognize when assigning this set to products.
- 2
Color Name / Hex Value
What shoppers see, plus the 6-digit hex used to tint the mockup.
- 3
Price ($)
Optional add-on when shoppers pick this color. Use 0.00 if there is no extra charge.
- 4
Dark Color
Turn on for dark garments so printing prices that use light/dark rules can apply.
- 5
Image Instead of Color
Choose Yes when you will upload a full photo for that color instead of tinting grayscale.
- 6
Save
Creates the color set. On edit, this button says Update.
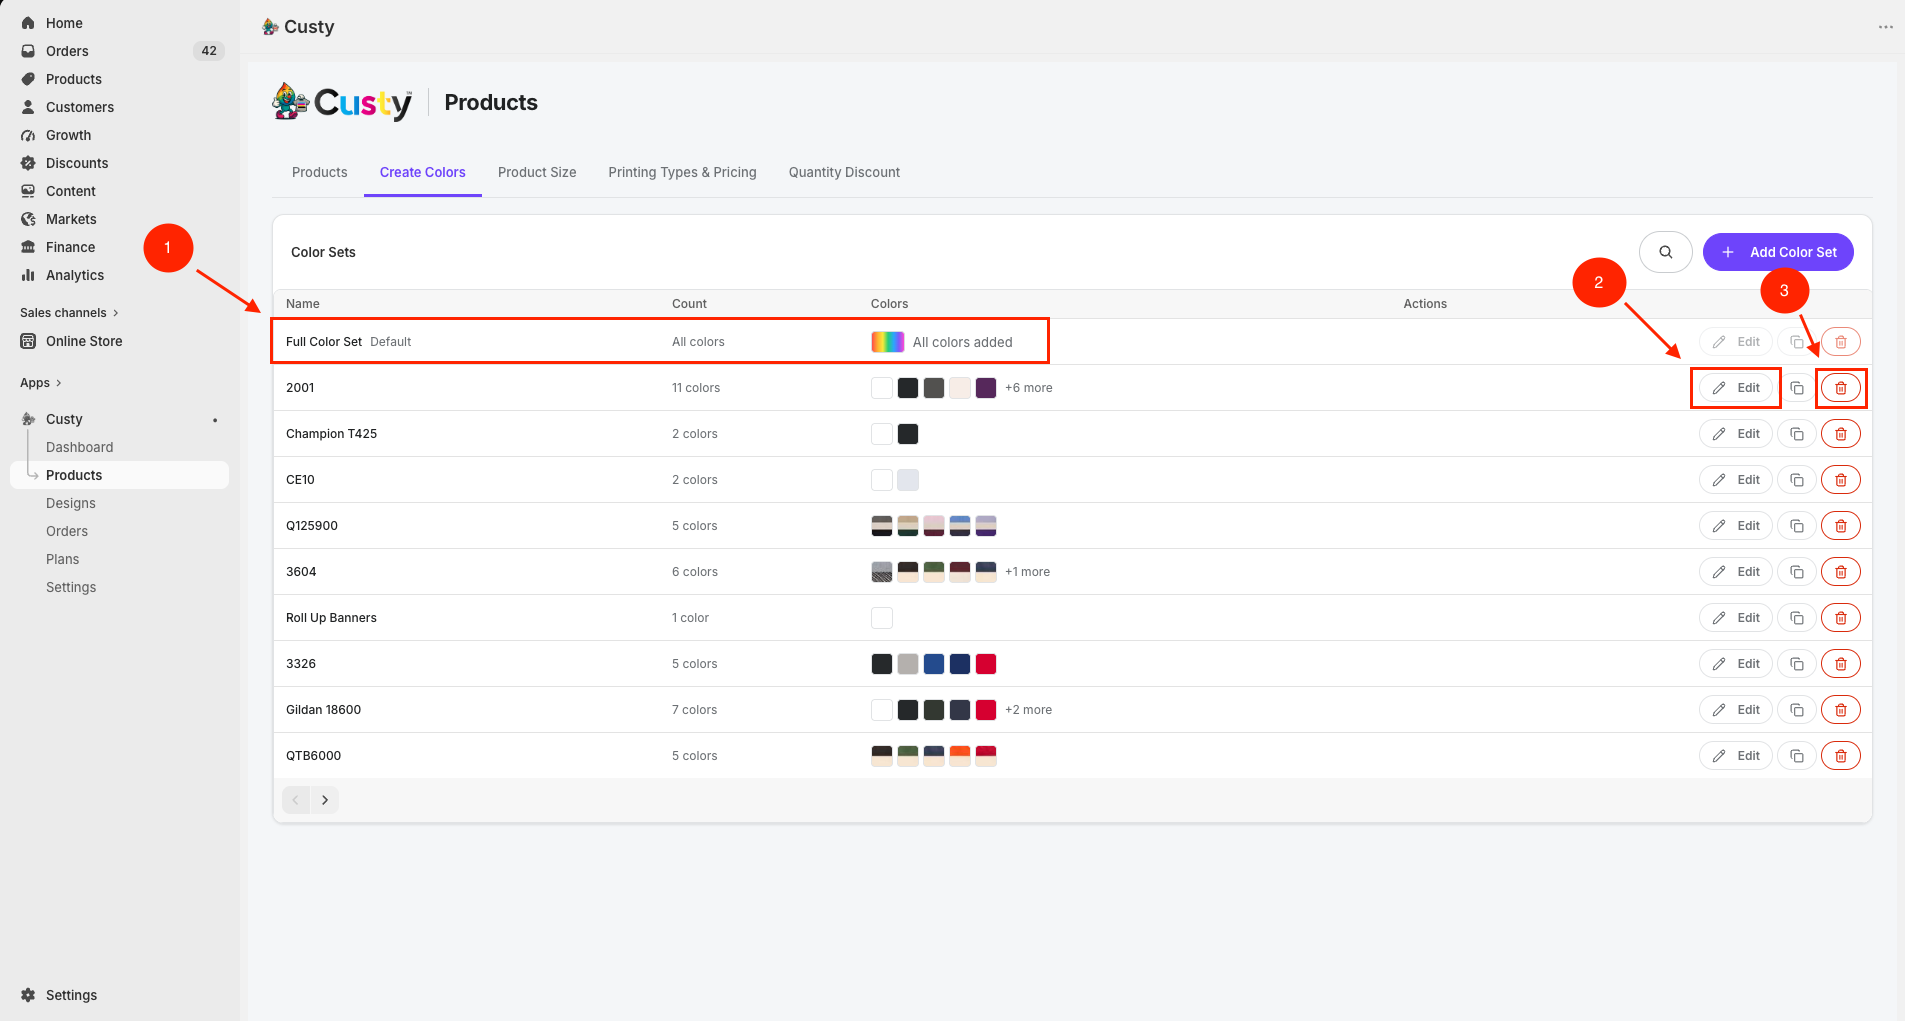
Full Color Set (built in)
Custy includes a system set named Full Color Set. It is marked Default in the list. Shoppers get a free color picker instead of a fixed swatch list.
You cannot edit Full Color Set
Edit, copy, and Delete stay disabled for Full Color Set. Build your own set when you want a fixed list of store colors.
Step 3: Edit, copy, or delete a color set
On the Create Colors list, use the row actions:
- Edit: open Edit Color Set, change names or prices, then click Update.
- Duplicate (copy icon): makes {name} (Copy) so you can tweak a new list without changing the original.
- Delete: confirm Delete color set. You cannot delete Full Color Set.
 Full size
- 1
Default badge
Marks the system Full Color Set.
- 2
Edit
Change the set name, colors, or prices (not available on Full Color Set).
- 3
Delete
Removes a custom set. Confirm in the dialog before it is gone.
Step 4: Assign a color set on Customize Product
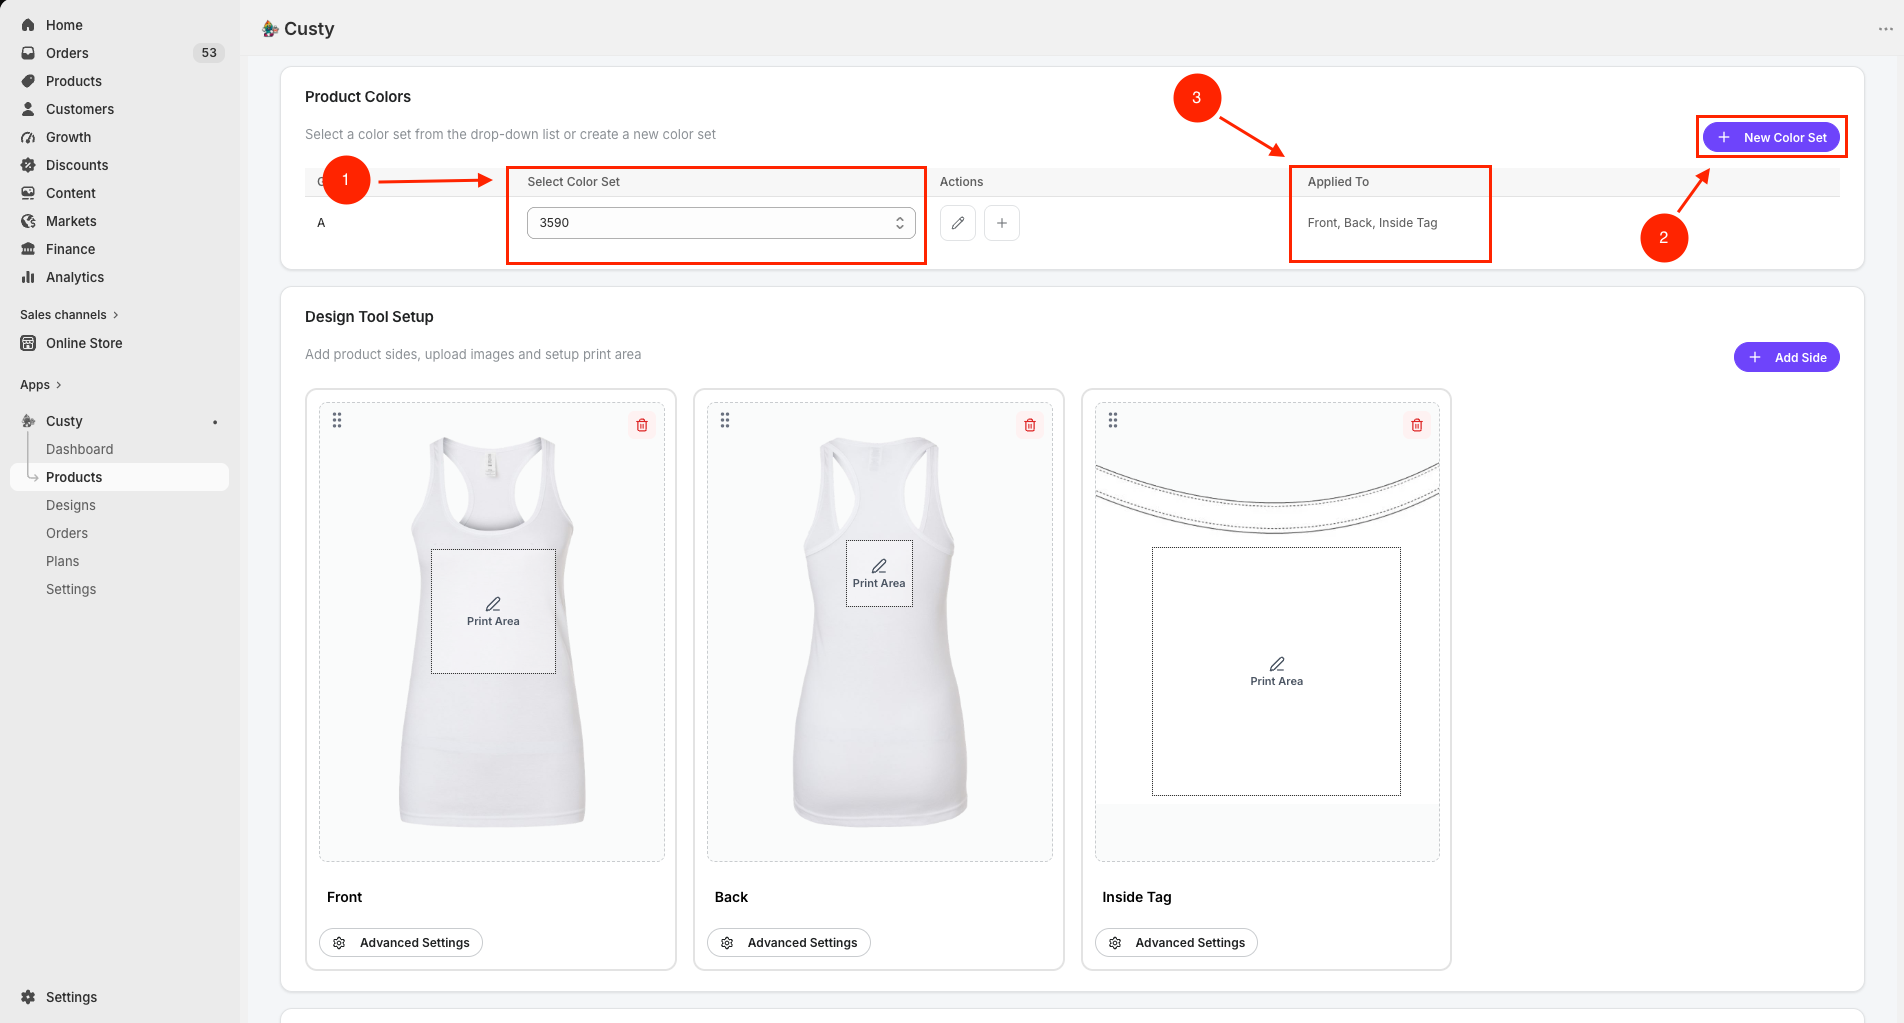
Open the product (Make it customizable or Edit). Scroll to Product Colors.
- Open Select Color Set and pick a set (or leave Select color set empty).
- Optional: click New Color Set (or the + icon) to create a set here.
- Optional: click the pencil to edit the selected custom set.
- Check Applied To for the side names on this product (for example Front, Back).
Default color
The starting color shoppers see is set in Advanced Settings (Design Tool Setup), not in this table. Open Advanced Settings, click Set default color, pick a color, then Save.
 Full size
- 1
Select Color Set
Choose an existing color list for this product.
- 2
New Color Set
Create a new list of colors shoppers can choose.
- 3
Applied To
Shows which product sides exist on this product.
Step 5: Mark colors that need their own photo
Some colors look better as a real photo (camo, heather, prints) instead of tinting a grayscale mockup. For those colors, turn on Image Instead of Color in the color set first. Then you will upload a matching photo on the product.
- Open Create Colors (or edit the set from Product Colors with the pencil).
- Find the color row (for example Black Heather or Camo).
- Under Image Instead of Color, click Yes.
- Leave No on colors you want Custy to tint from grayscale with the hex code.
- Click Update (or Save if you are creating the set).
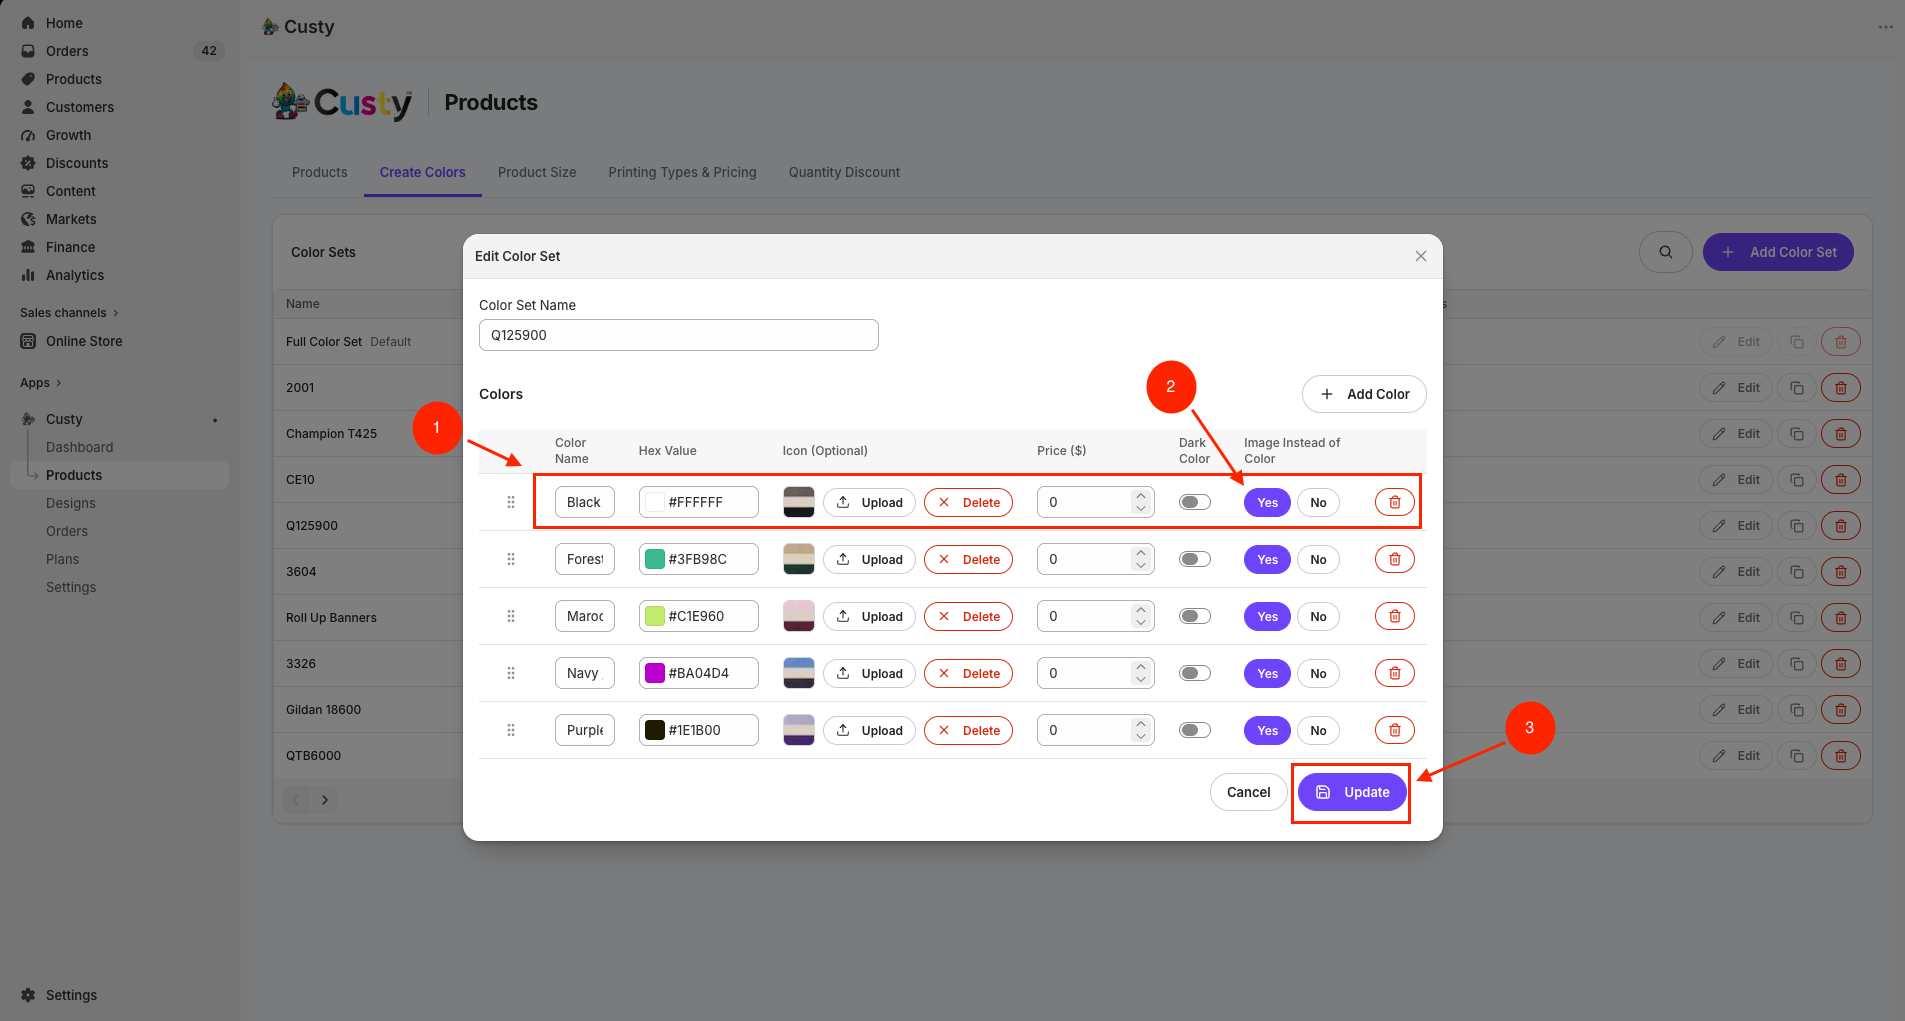 Full size
- 1
Color row
The color that should show a real photo in the Design Lab.
- 2
Image Instead of Color
Click Yes for a photo. Click No to tint the grayscale mockup with the hex.
- 3
Update / Save
Save the color set before you upload photos on the product.
Step 5a: Open Upload Images & Styles
Photos are uploaded per product side, not on the color set screen. After the color set is assigned to the product, open Advanced Settings for each side that shoppers can design.
- On Customize Product, scroll to Design Tool Setup.
- On the side you want (Front, Back, and so on), click Advanced Settings.
- Open the Upload Images & Styles tab.
Do this for each side
If Front and Back both need color photos, repeat the upload steps for each side.
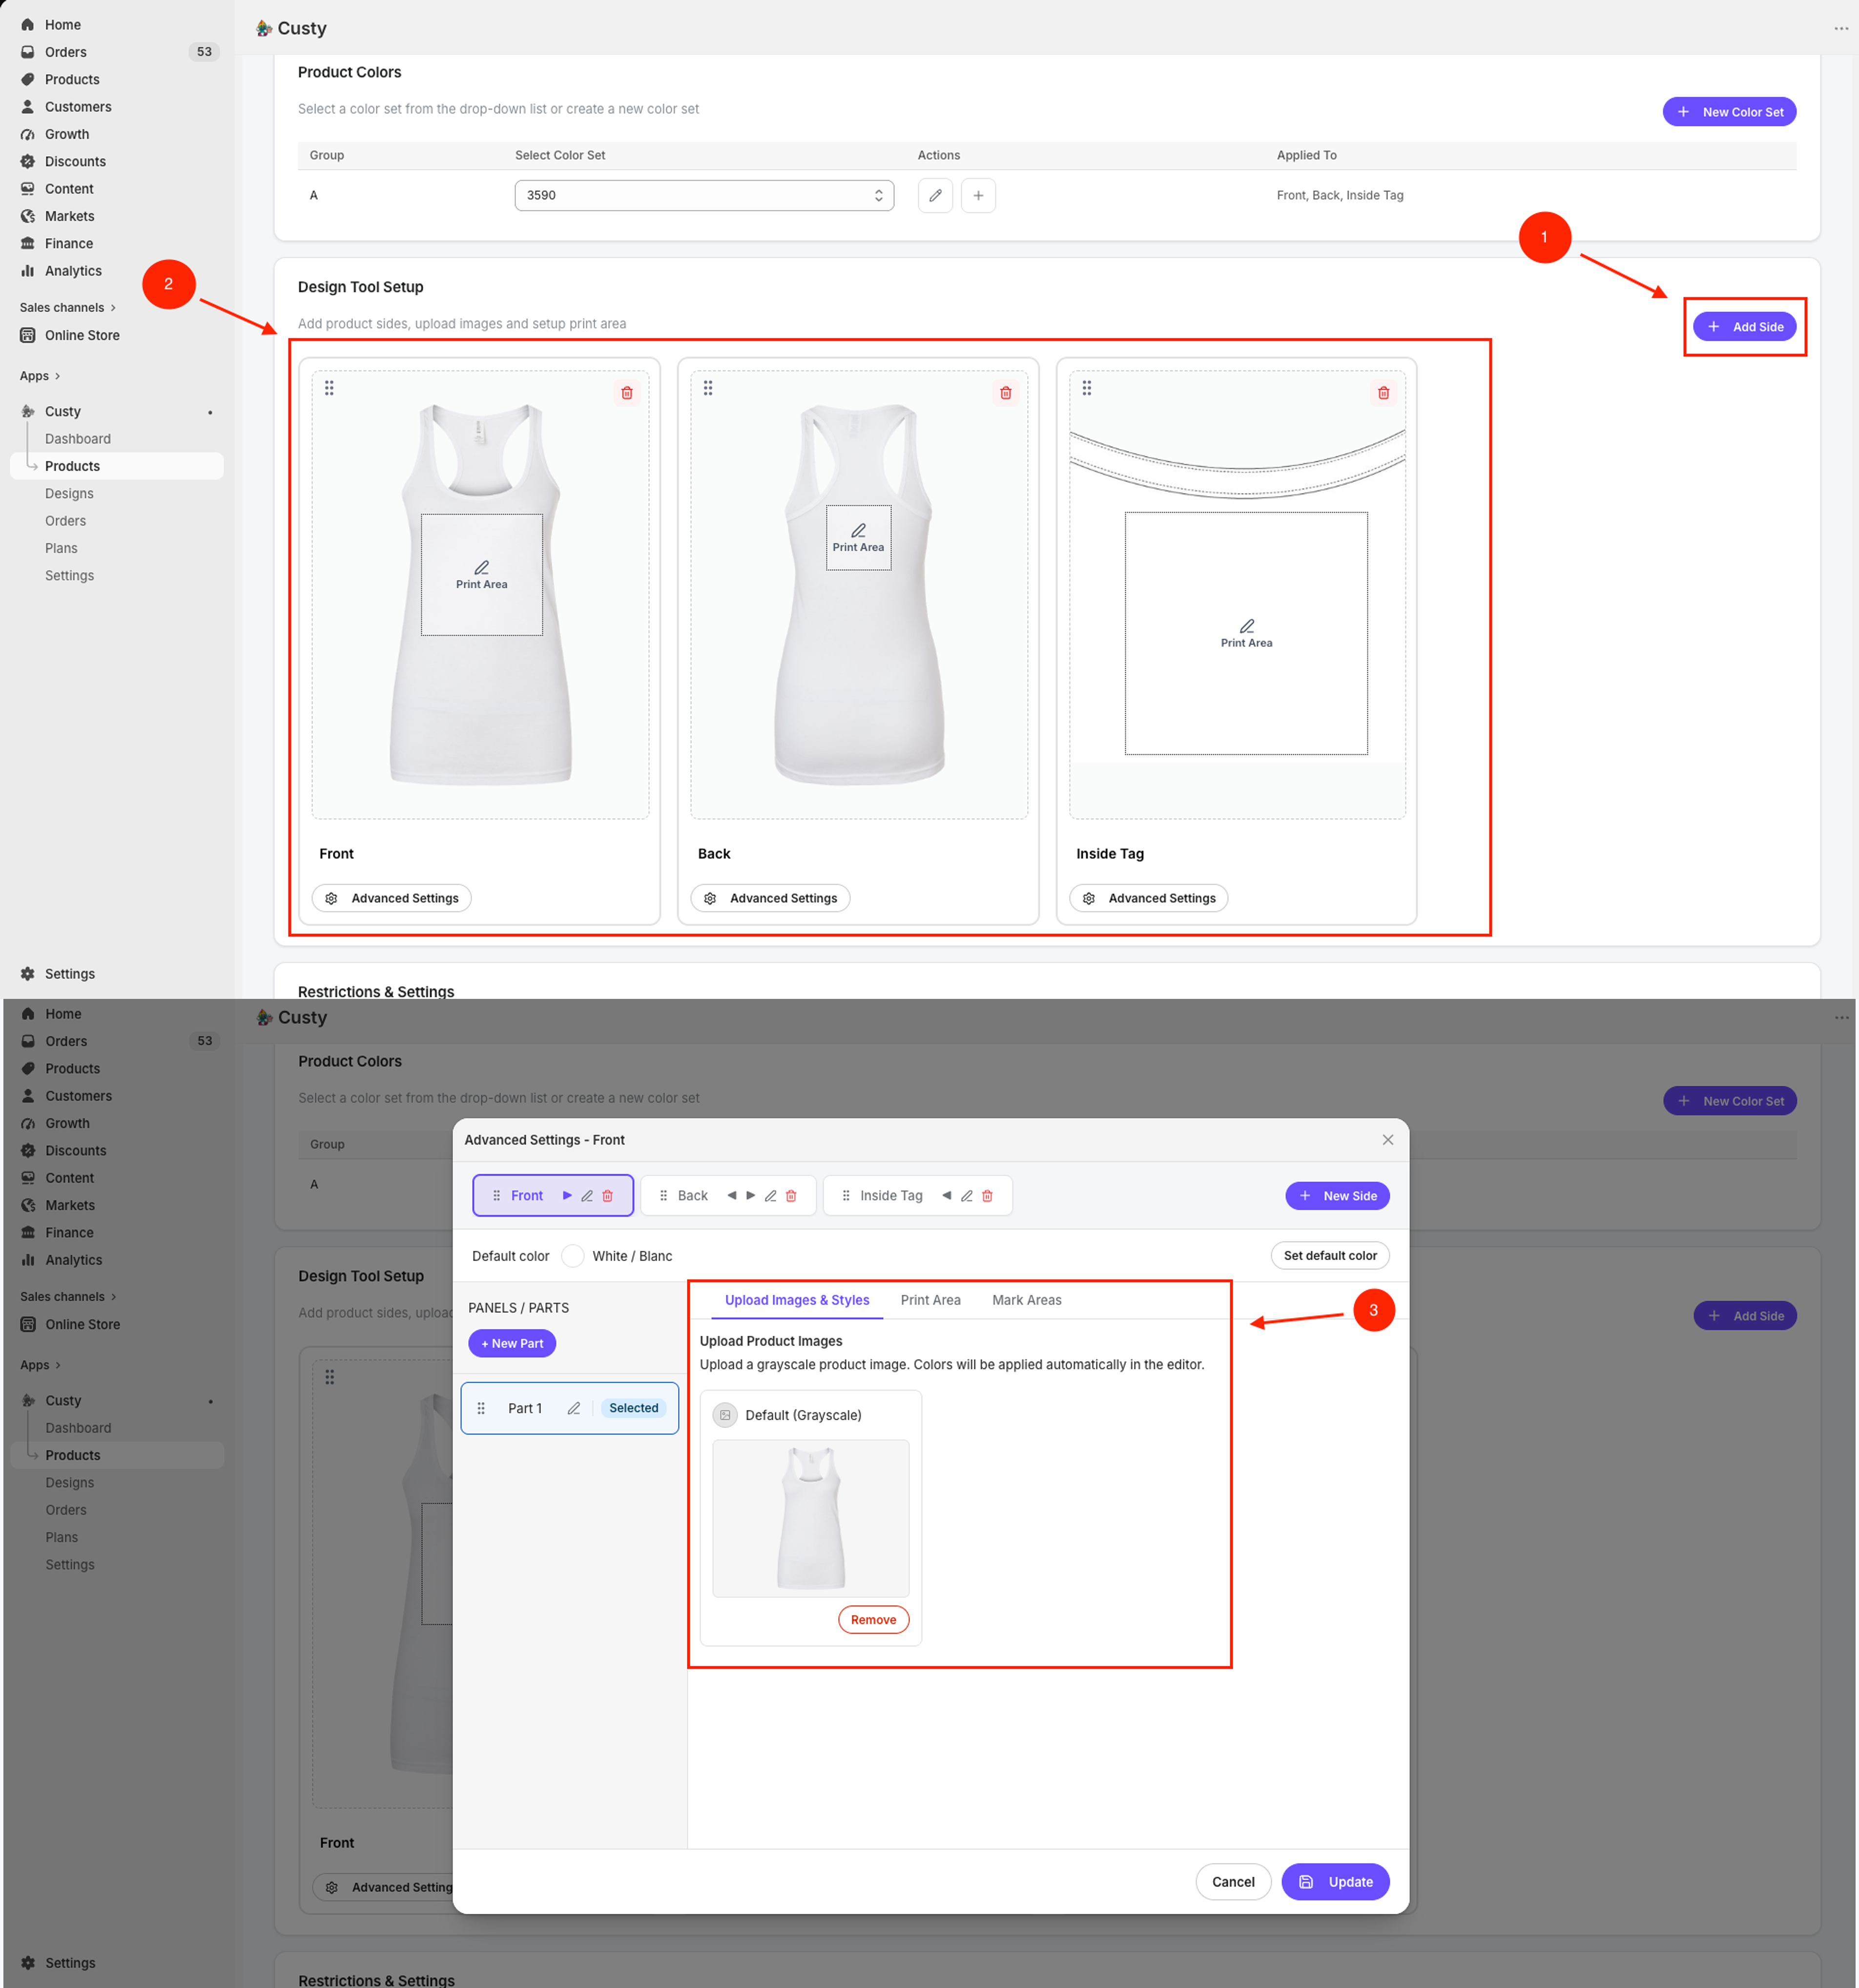 Full size
- 1
Design Tool Setup
Your product sides live here.
- 2
Advanced Settings
Click this on the side you are setting up.
- 3
Upload Images & Styles
Tab where you add grayscale and per-color photos.
Step 5b: Upload Default (Grayscale) for tintable colors
For every color still set to Image Instead of Color = No, Custy needs one grayscale mockup. It recolors that photo with the hex when shoppers pick a color.
- On Upload Images & Styles, find the card Default (Grayscale).
- Click Upload Image and choose a clear product photo (solid look, good lighting; a light/gray base works best for tinting).
- Wait until the preview shows. Use Remove if you need to replace it.
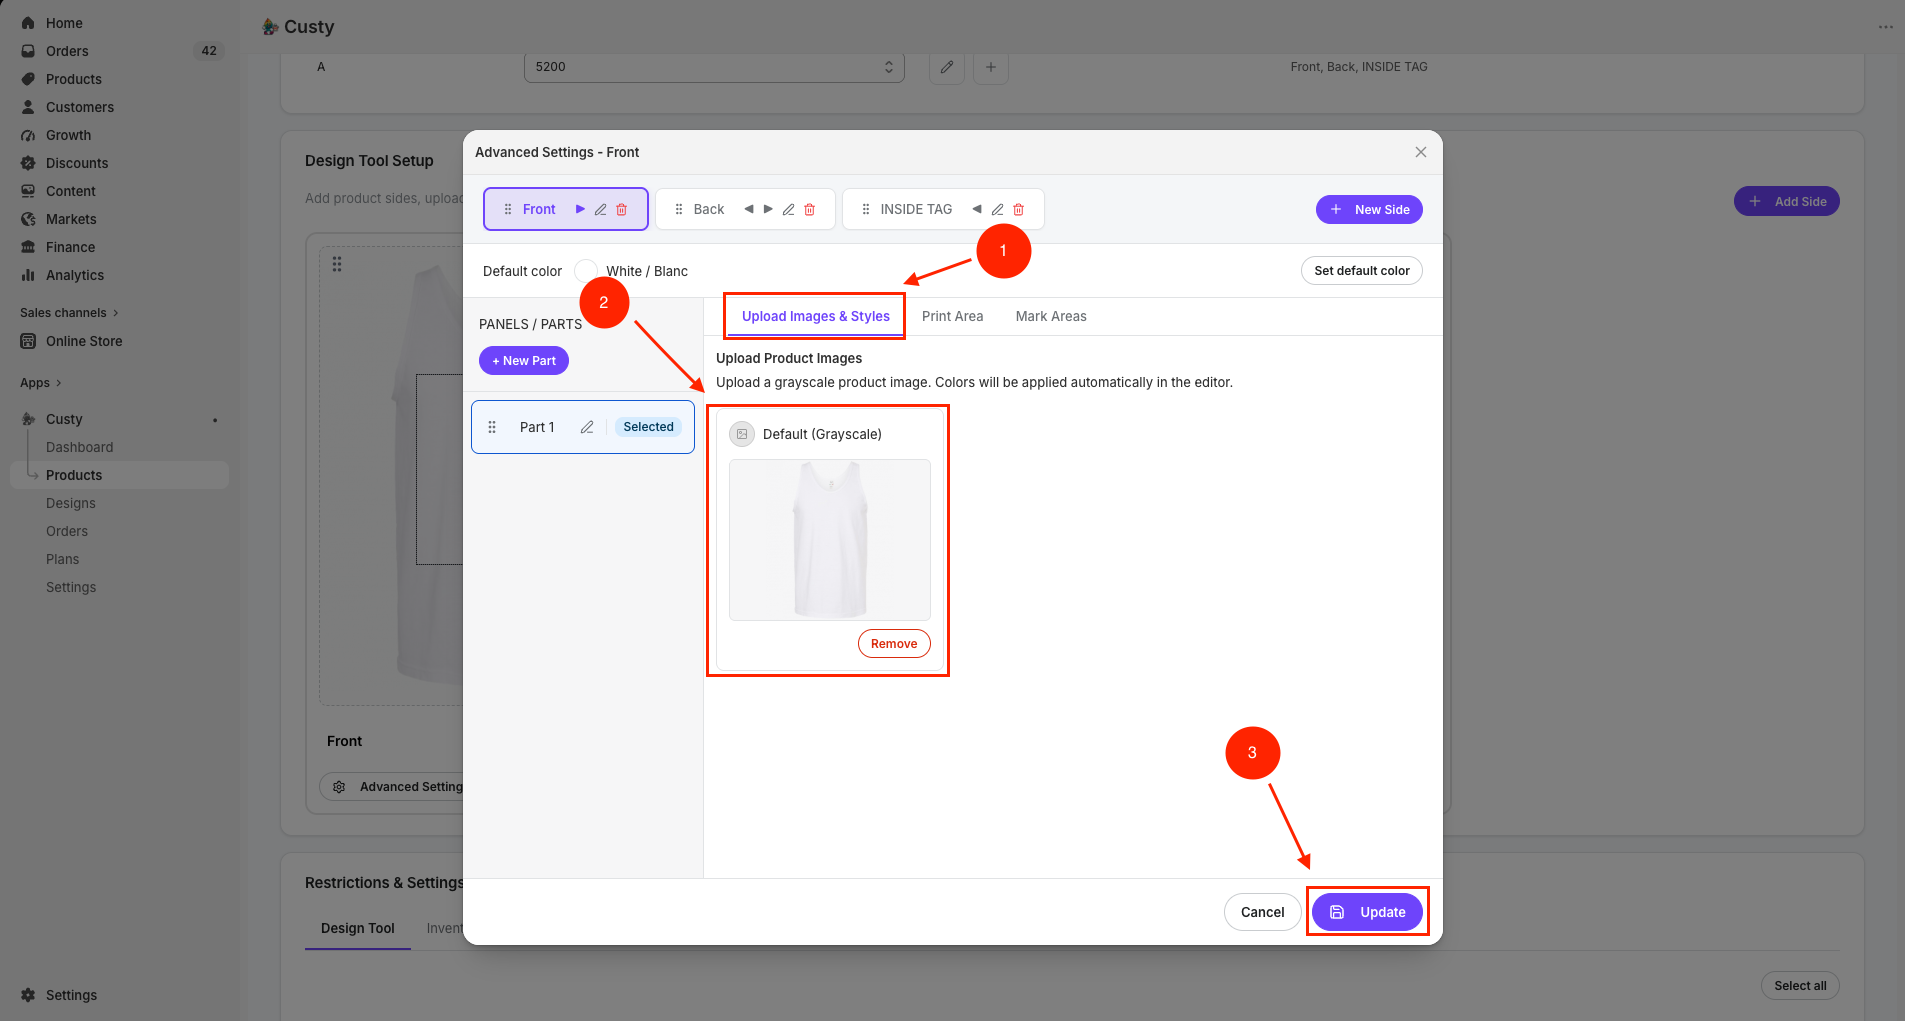 Full size
- 1
Upload Images & Styles
Stay on this tab while you add photos.
- 2
Default (Grayscale)
One shared photo for all colors that use hex tinting (Image Instead = No).
- 3
Upload Image
Click to add or replace the grayscale mockup.
Step 5c: Upload a photo for each Image Instead color
After you marked colors as Yes, Advanced Settings shows a card for each of those colors (named like the color, for example Black or Camo). Upload the real product photo for that color.
- Confirm the product still uses this color set under Product Colors.
- In Advanced Settings → Upload Images & Styles, find the card named after the color (not Default Grayscale).
- Click Upload Image on that card and choose the photo of the product in that color.
- Repeat for every color that has Image Instead of Color = Yes.
- Click Update at the bottom of Advanced Settings to save this side.
- Back on Customize Product, click Save if you still need to save the whole product.
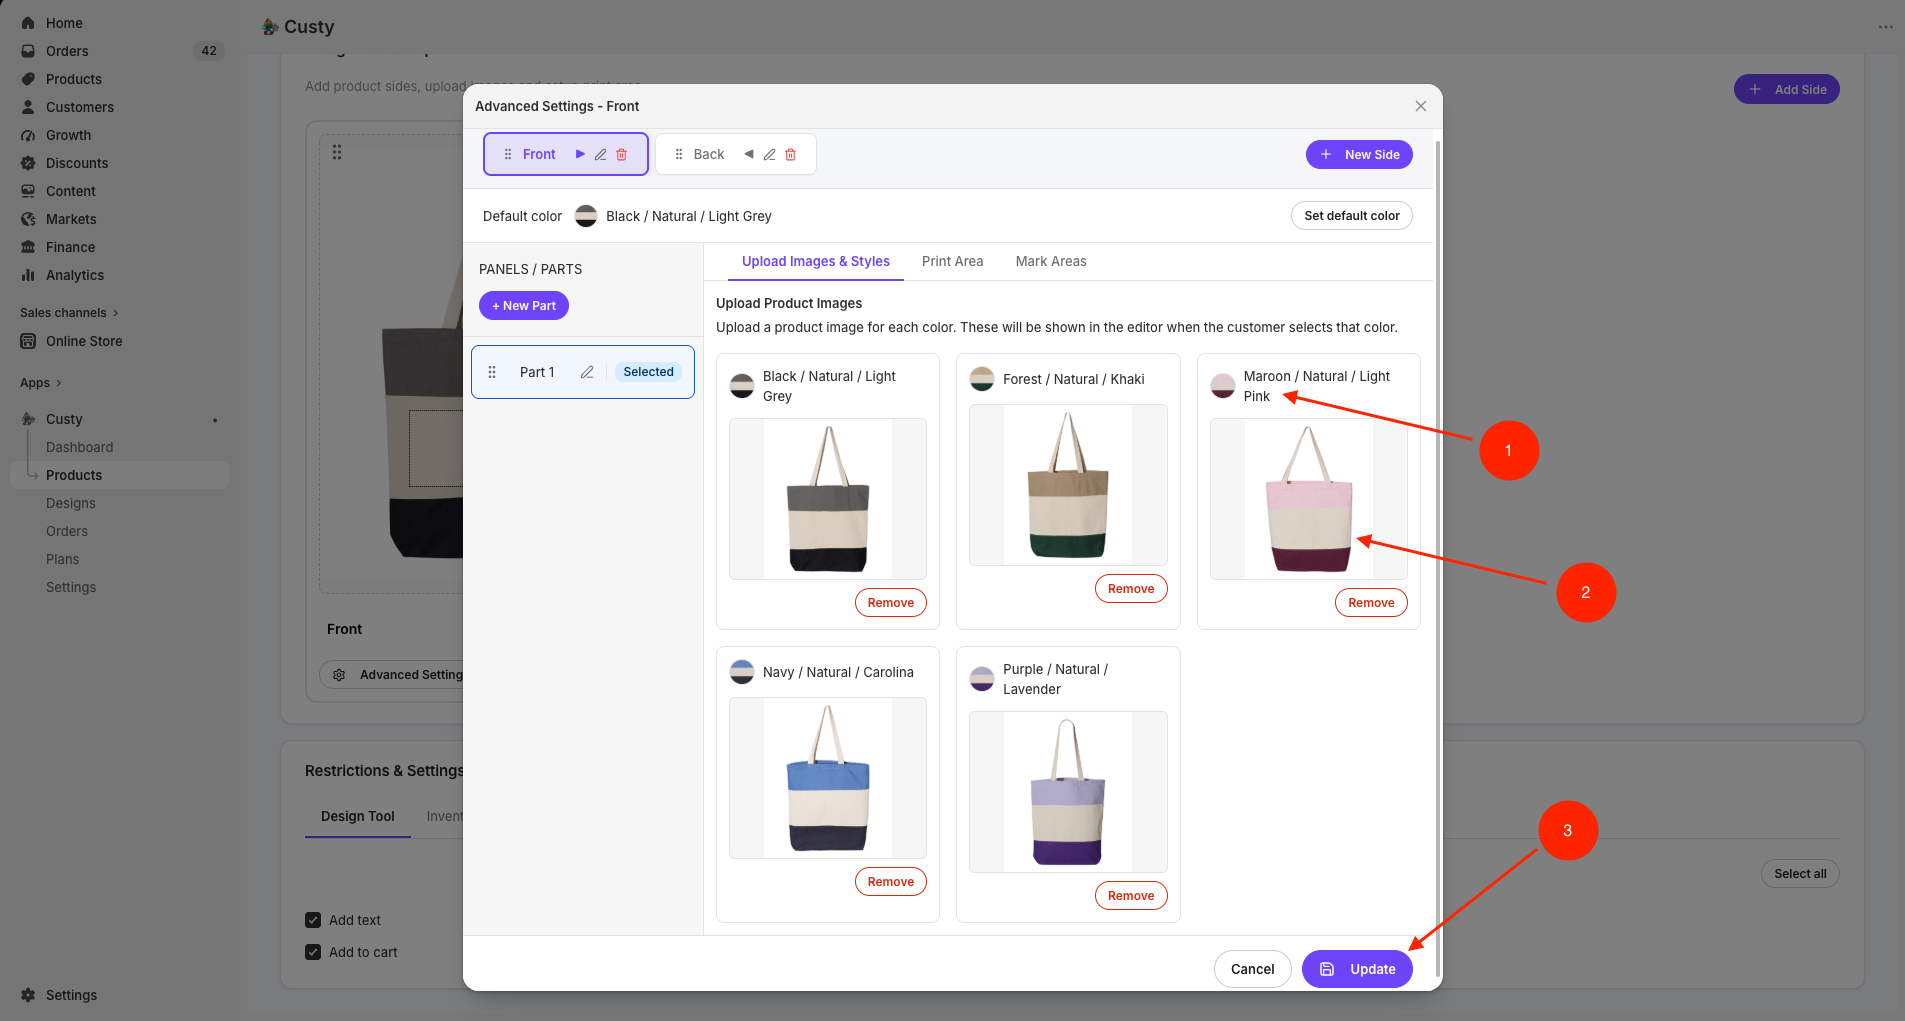 Full size
- 1
Color name card
Appears for each color with Image Instead of Color = Yes.
- 2
Upload Image
Add the real product photo for that color.
- 3
Update
Save Advanced Settings for this side when the photos look right.
What to do next
Next, prepare and upload product photos if you have not yet, or finish print areas and printing fees. Then set Active on designer to Yes and click Save on the product.