
How to Create Custom Product Images?
The product image is the starting canvas for every customization. It is what shoppers see when they design their own version of your product in the Design Lab.
A clear, well-prepared image helps shoppers understand how their design will look. Without a good base image, they may be confused or unhappy with the result.
How to prepare your product image
Before you upload, prepare the image to match how you want colors to work. Custy gives you two options. You can mix both in one color set.
Two ways to set up your product image
- 1Option 1: Default (Grayscale) (recommended for solid colors). Upload one grayscale mockup. Custy tints it with each color hex from your color set.
- 2Option 2: Image Instead of Color. Upload your own photo for specific colors (camo, heather, prints) so shoppers see a realistic preview for those colors.
Your own custom image (Image Instead of Color)
You can use any product photo, with or without a background. Keep the same width and height for every color photo on that side so the print area stays lined up.
Editing tip
Use any photo editor you like (Photoshop, GIMP, or an online tool) to crop, remove backgrounds, or make a grayscale version.
Step 1: Open Products
In Custy, click Products on the left. This is your store product list.
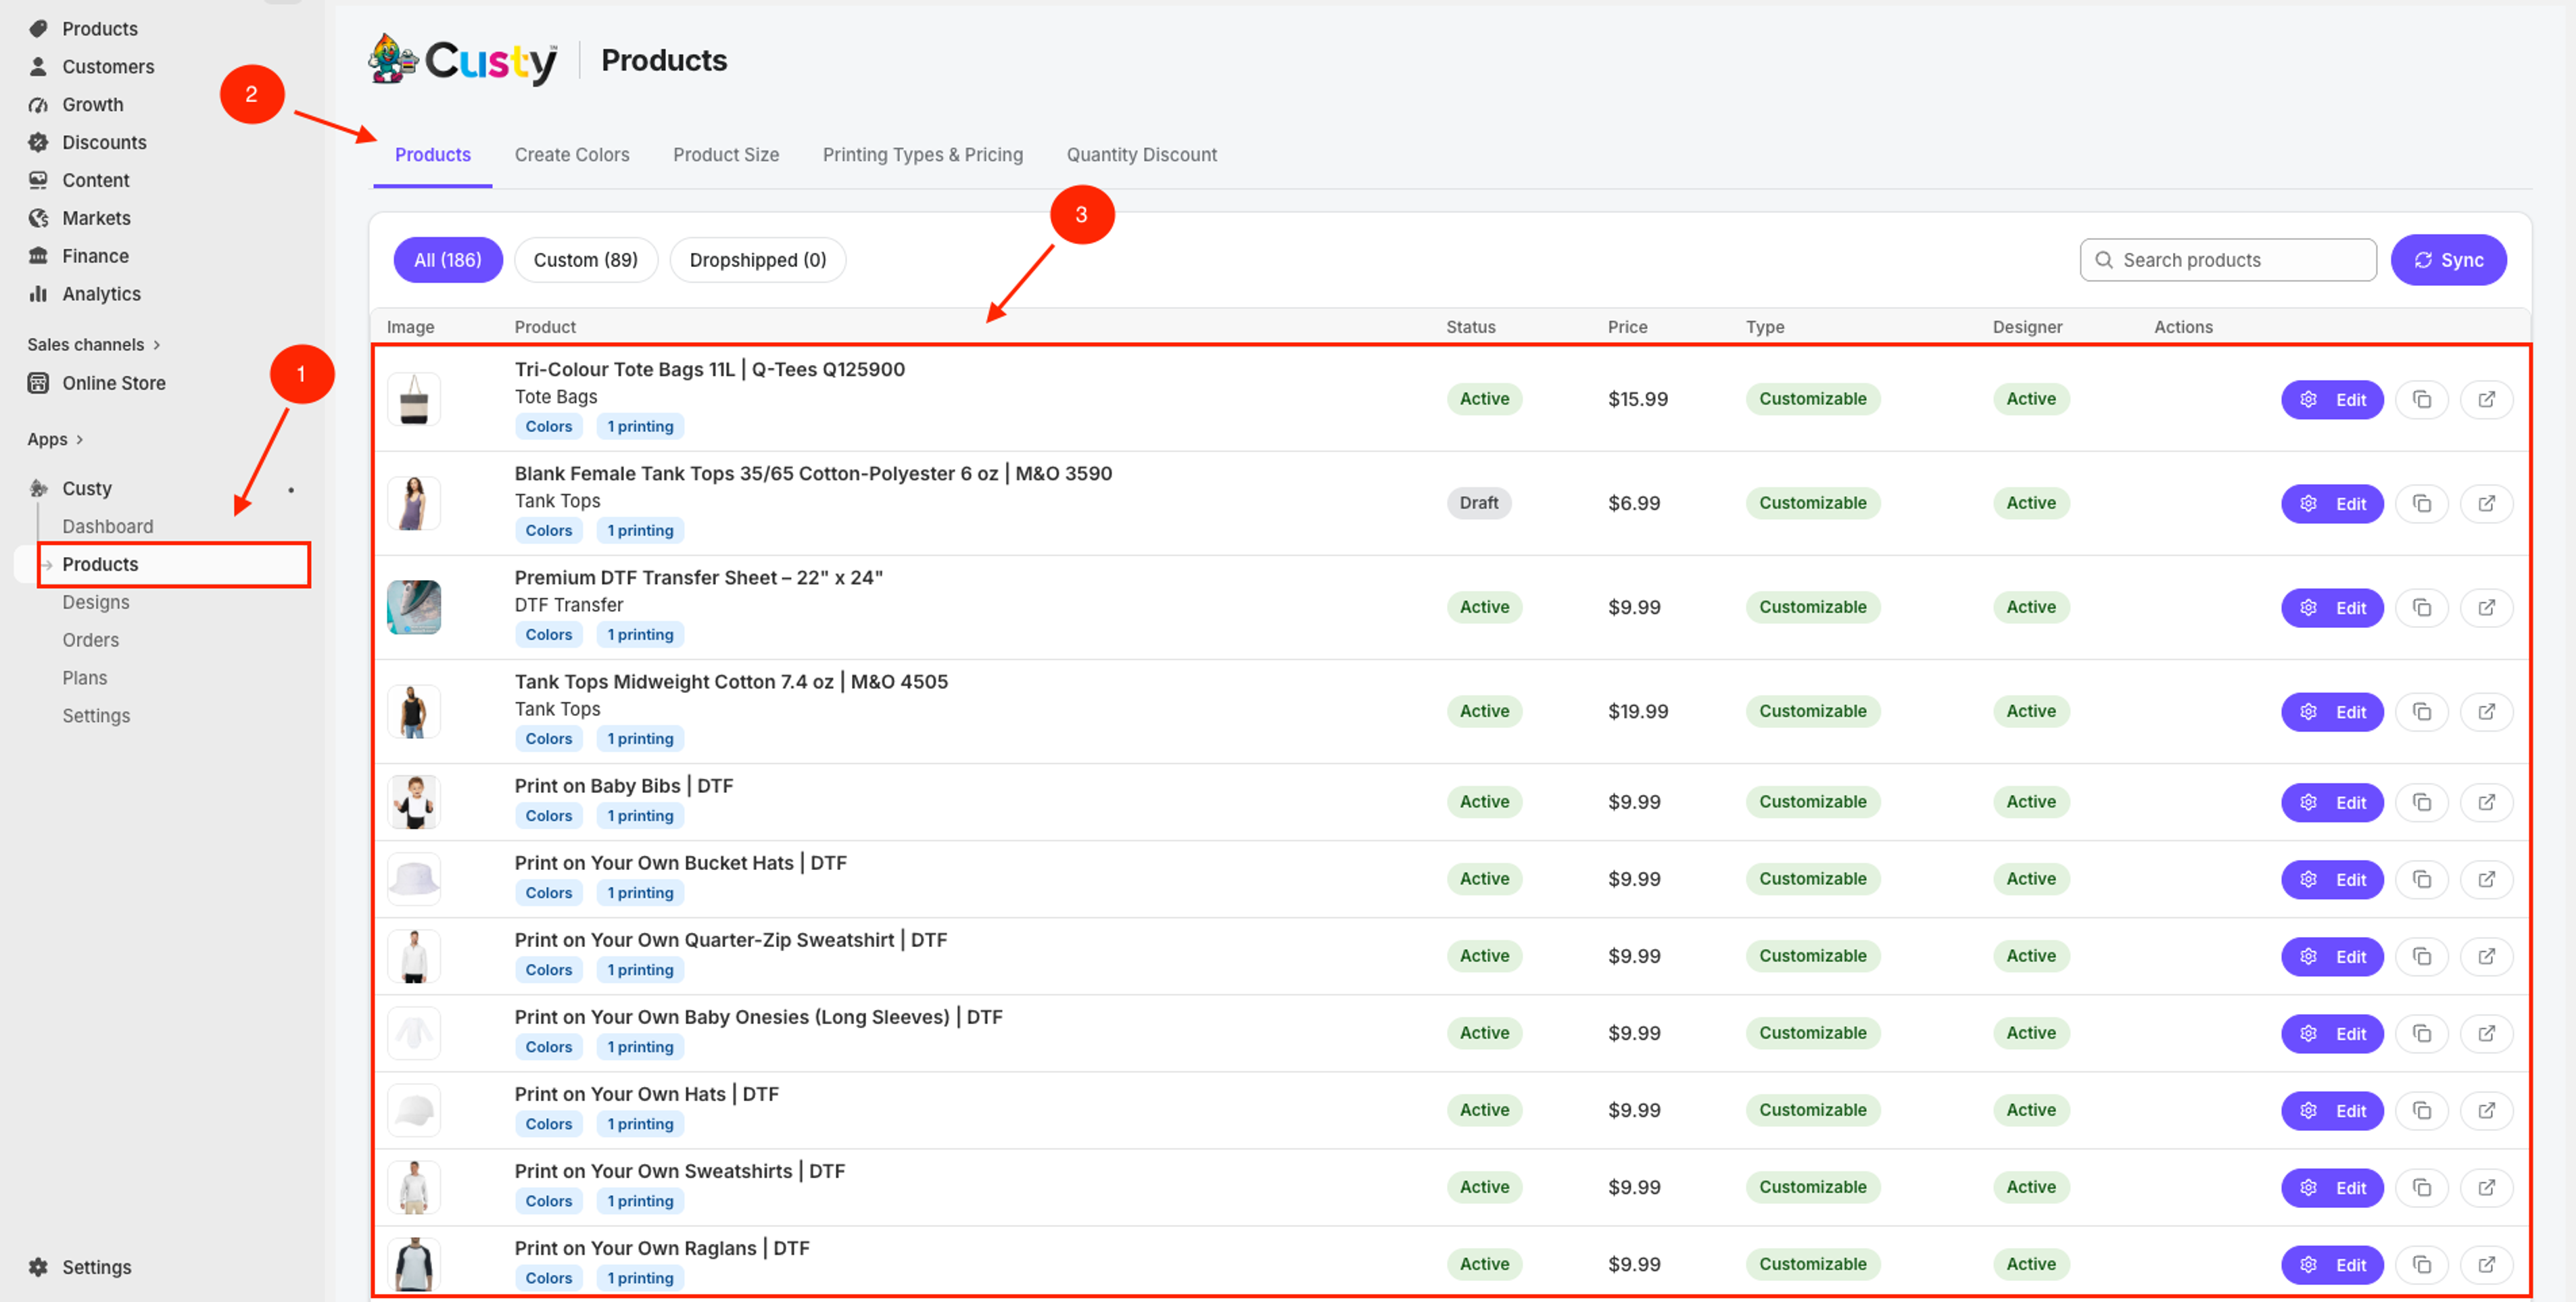 Full size
- 1
Products (left menu)
Opens the product list for this store.
- 2
Products tab
Stay on this tab to see the catalog.
- 3
Product list
Find the product you want to update.
Step 2: Find and edit the product
Find the product and click Edit. If it is not customizable yet, click Make it customizable first.
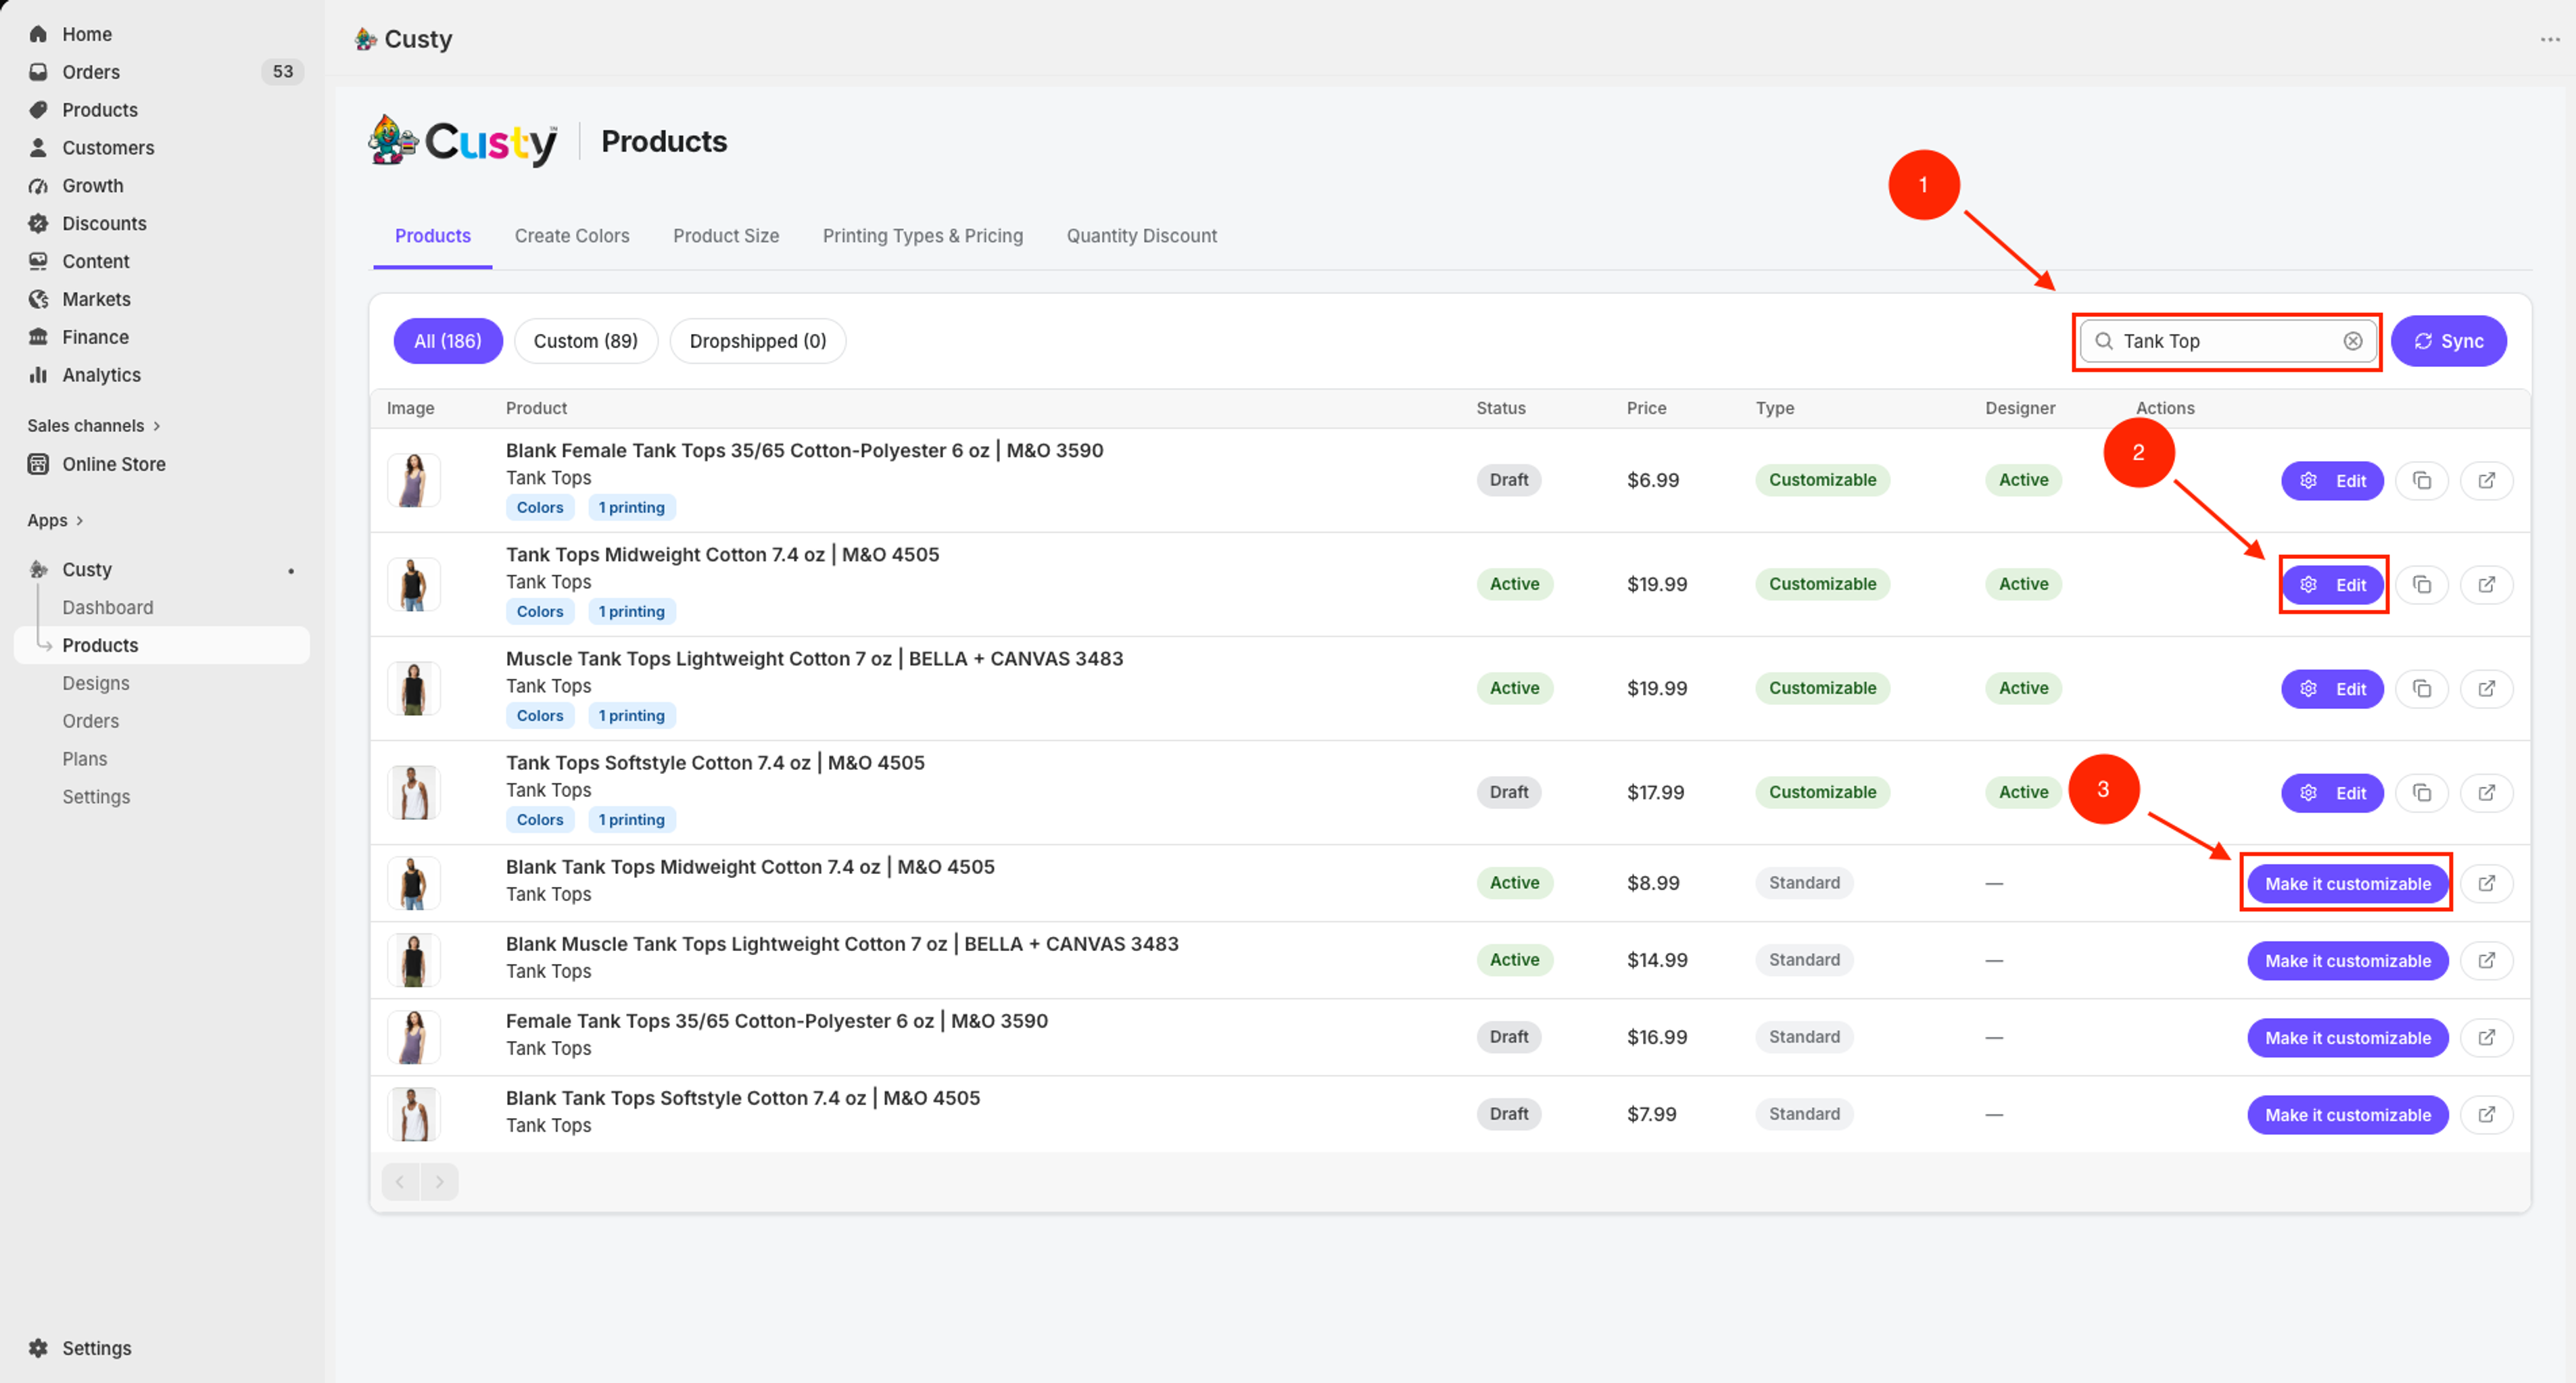 Full size
- 1
Search products
Type part of the product name to find it faster.
- 2
Edit
Opens Customize Product for a product that is already customizable.
- 3
Make it customizable
Use this first if the product still says Standard.
Step 3: Open Advanced Settings
On Customize Product, scroll to Design Tool Setup. Add a side if you need one, then open Advanced Settings on that side.
- Click Advanced Settings on the side you are setting up (Front, Back, and so on).
- Open the Upload Images & Styles tab.
Do this for each side
If Front and Back both need photos, repeat the upload steps for each side.
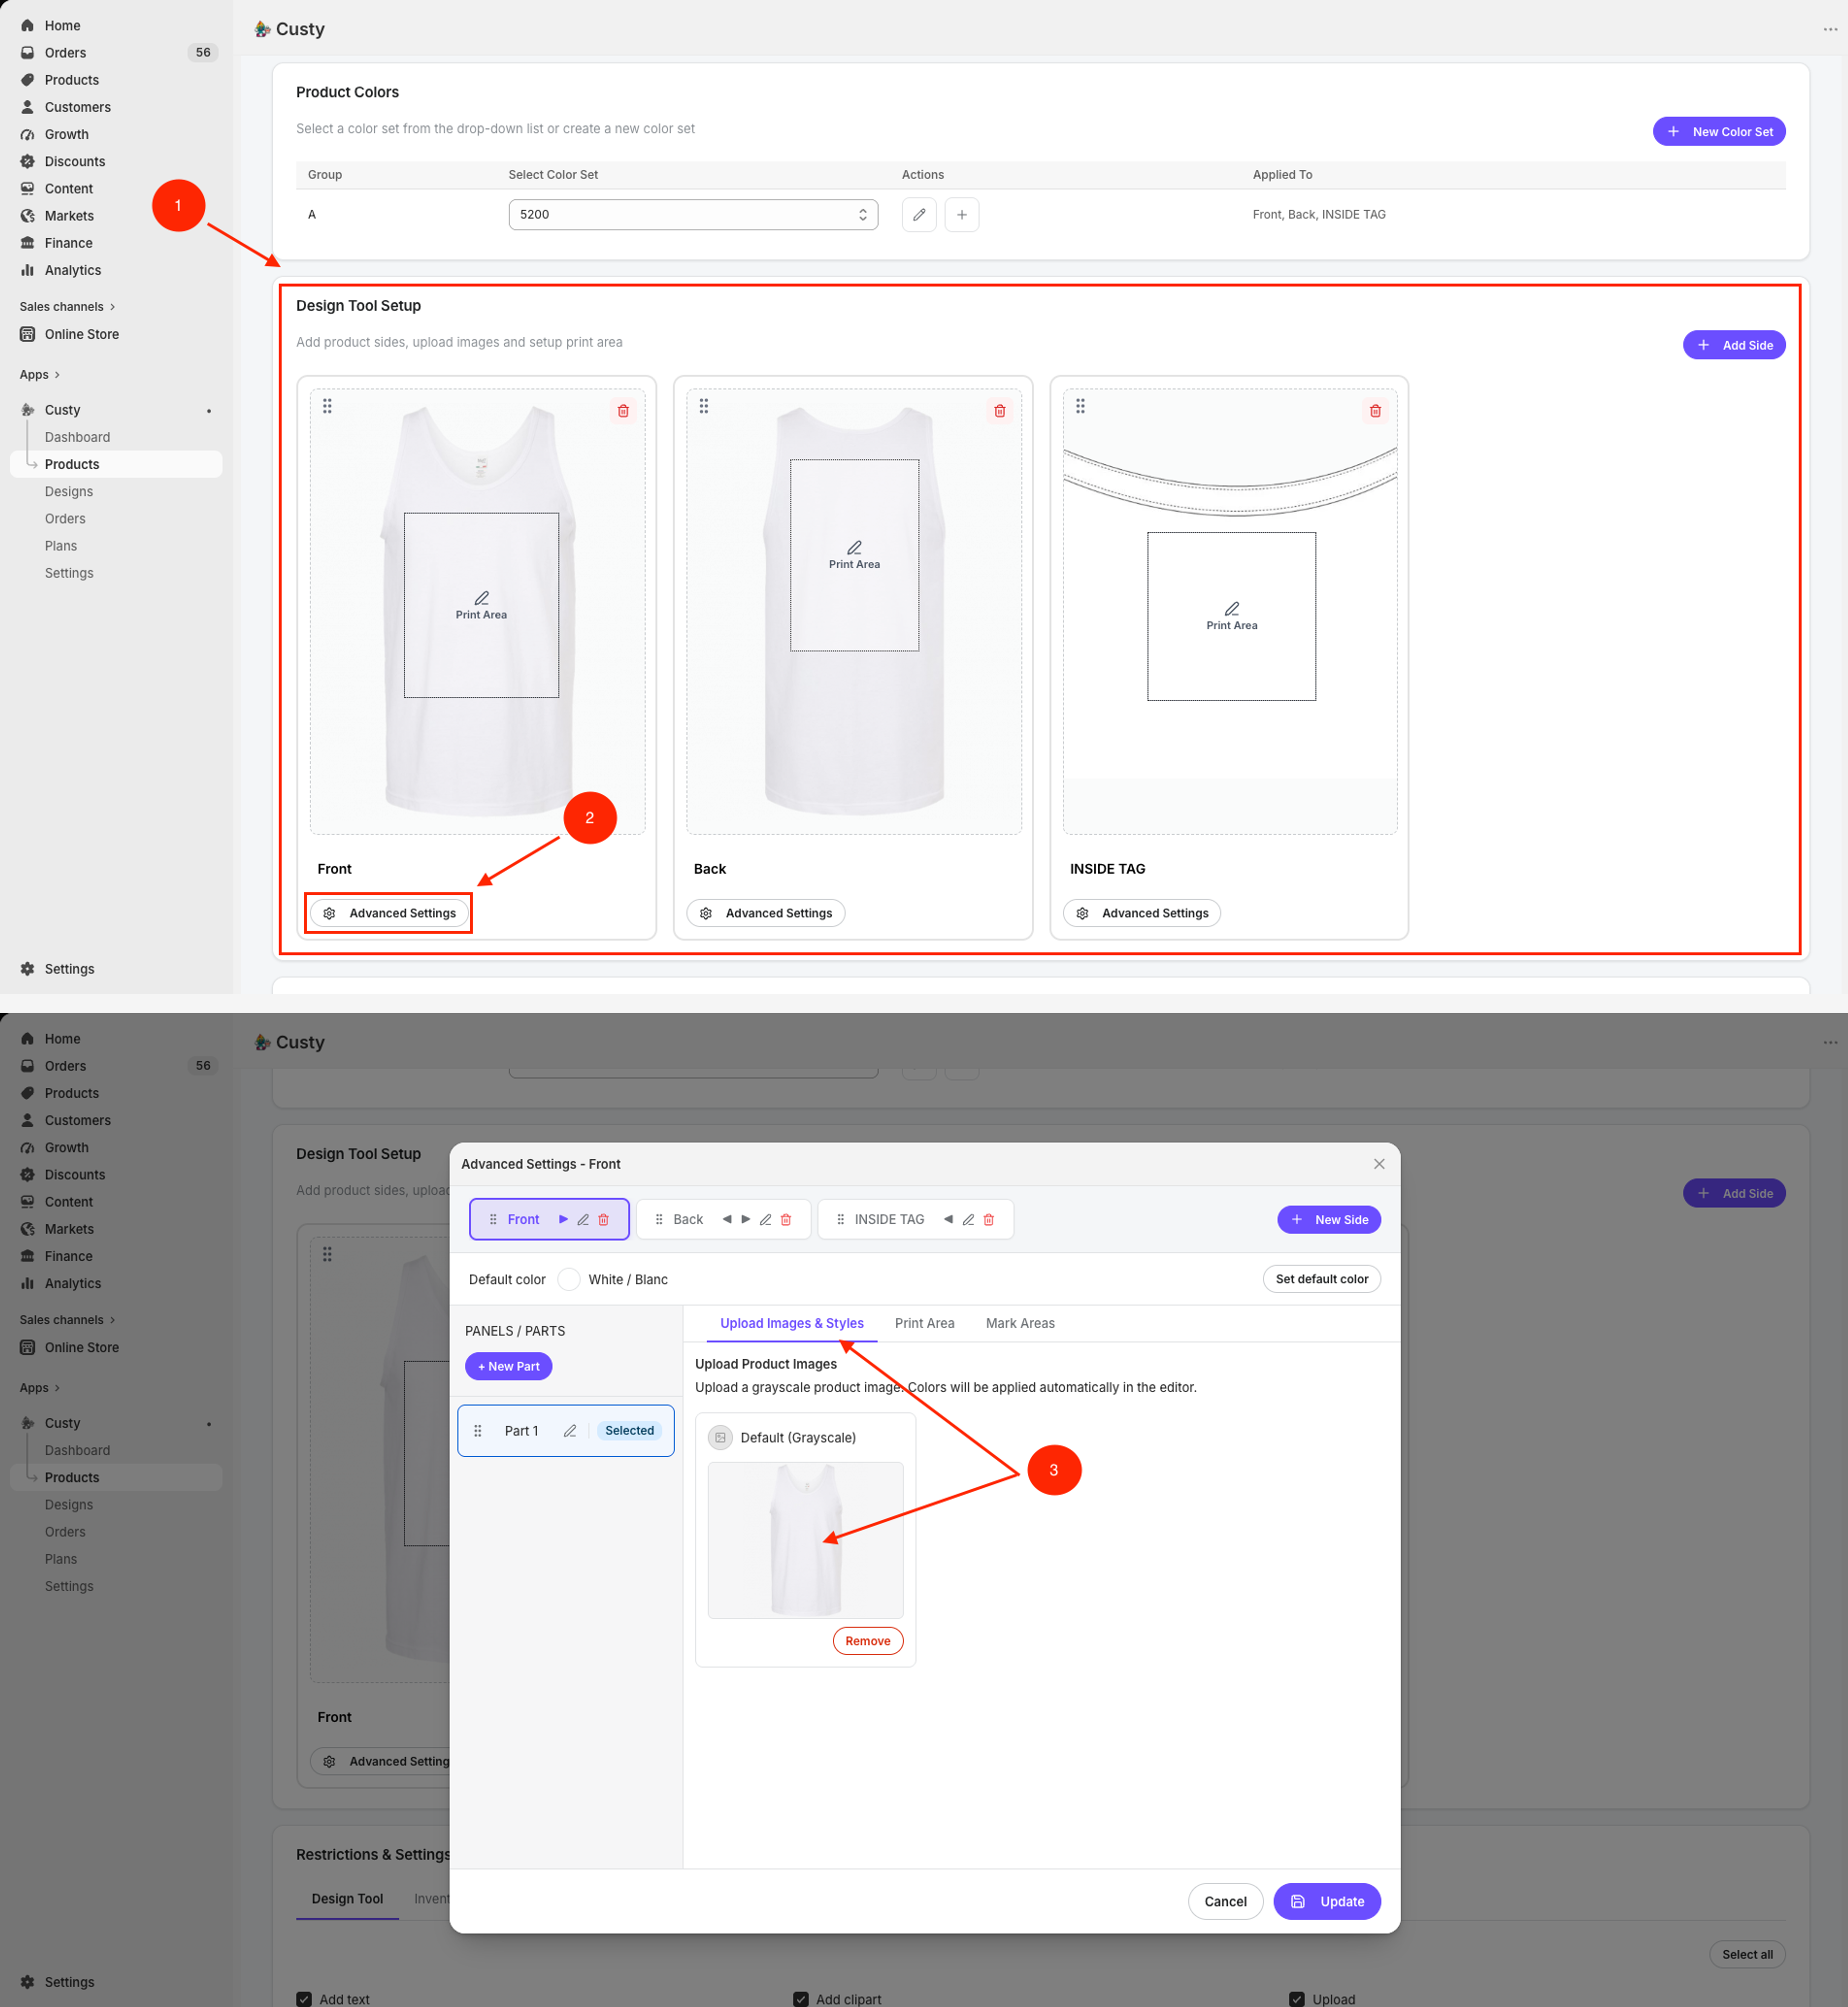 Full size
- 1
Design Tool Setup
Your product sides live here.
- 2
Advanced Settings
Click this on the side you are setting up.
- 3
Upload Images & Styles
Tab where you add Default (Grayscale) and per-color photos.
Step 4: Upload Default (Grayscale)
Under Upload Product Images, find the Default (Grayscale) card when your color set still has colors with Image Instead of Color = No.
- Click Upload Image on Default (Grayscale) and choose your prepared mockup.
- Wait until the preview shows. Use Remove if you need to replace it.
- Click Update at the bottom of Advanced Settings when this side looks right.
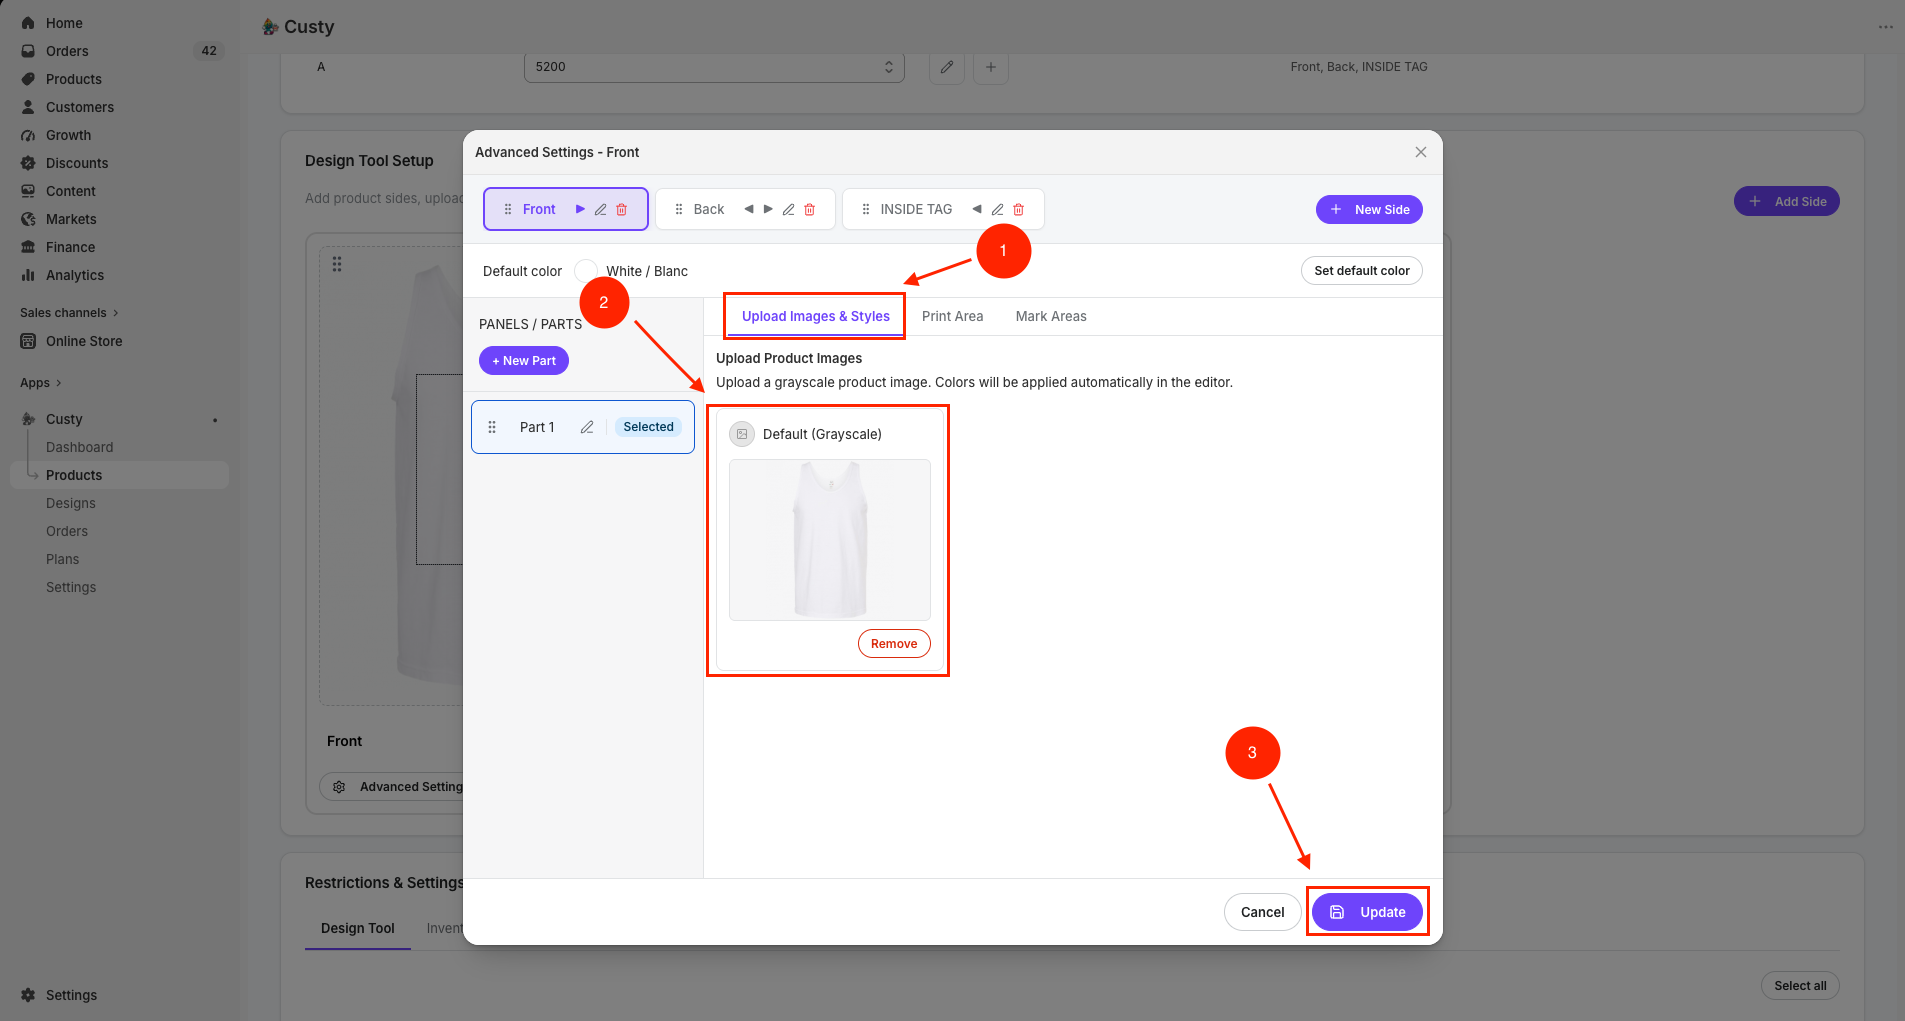 Full size
- 1
Upload Images & Styles
Stay on this tab while you add photos.
- 2
Default (Grayscale)
One shared photo for all colors that use hex tinting.
- 3
Upload Image
Click to add or replace the grayscale mockup.
Step 5: Turn on Image Instead of Color (optional)
If you want a real photo for some colors, enable that on the color set first. Photos are uploaded per side in Advanced Settings, not inside the color set modal.
- On Customize Product, scroll to Product Colors.
- Confirm the product uses a custom color set (not Full Color Set).
- Click the pencil to open Edit Color Set.
- On each special color, set Image Instead of Color to Yes.
- Leave No on colors that should still tint from grayscale.
- Click Update.
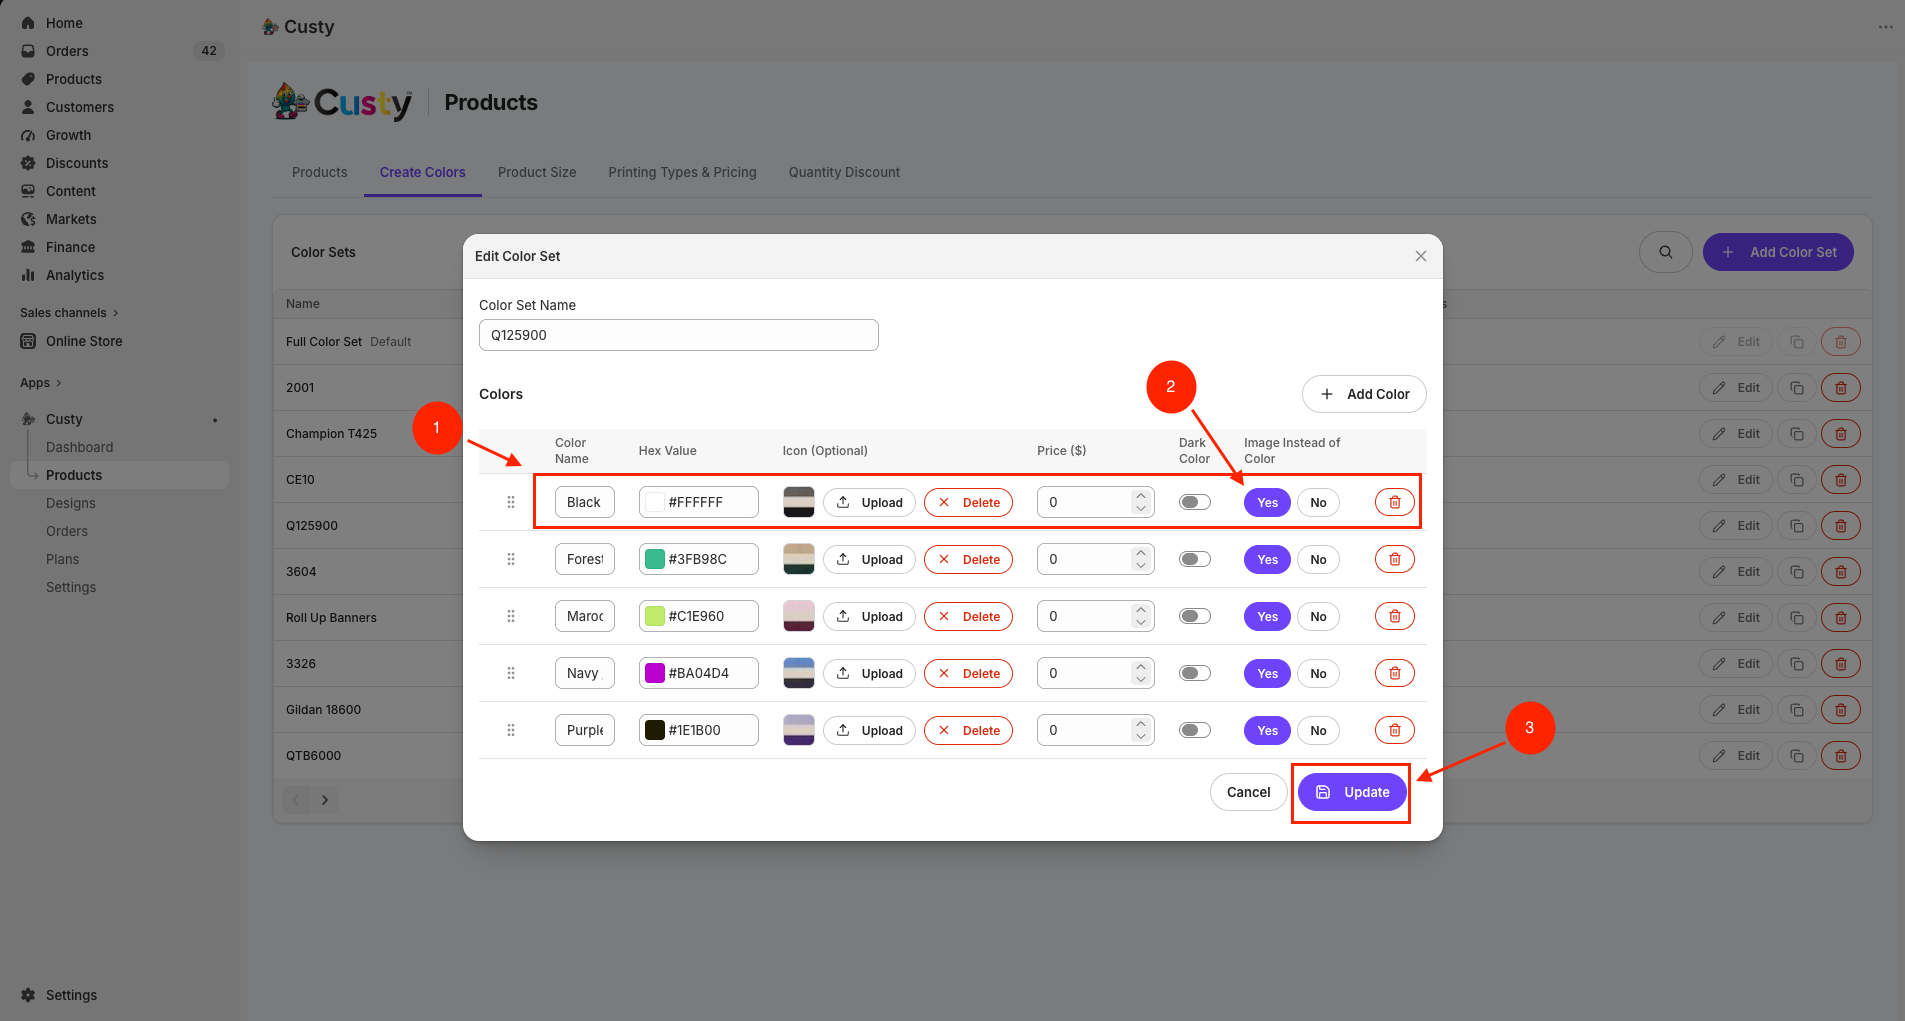 Full size
- 1
Color row
The color that should show a real photo.
- 2
Image Instead of Color
Click Yes for a photo. Click No to tint grayscale with the hex.
- 3
Update
Save the color set before you upload per-color photos.
Step 6: Upload a photo for each Image Instead color
Go back to Design Tool Setup → Advanced Settings → Upload Images & Styles. You will see a card named after each color that has Image Instead of Color = Yes.
- Click Upload Image on each color card and choose the photo of the product in that color.
- Use the same width and height for every color photo on this side.
- Click Update in Advanced Settings.
- On Customize Product, click Save if you still need to save the whole product.
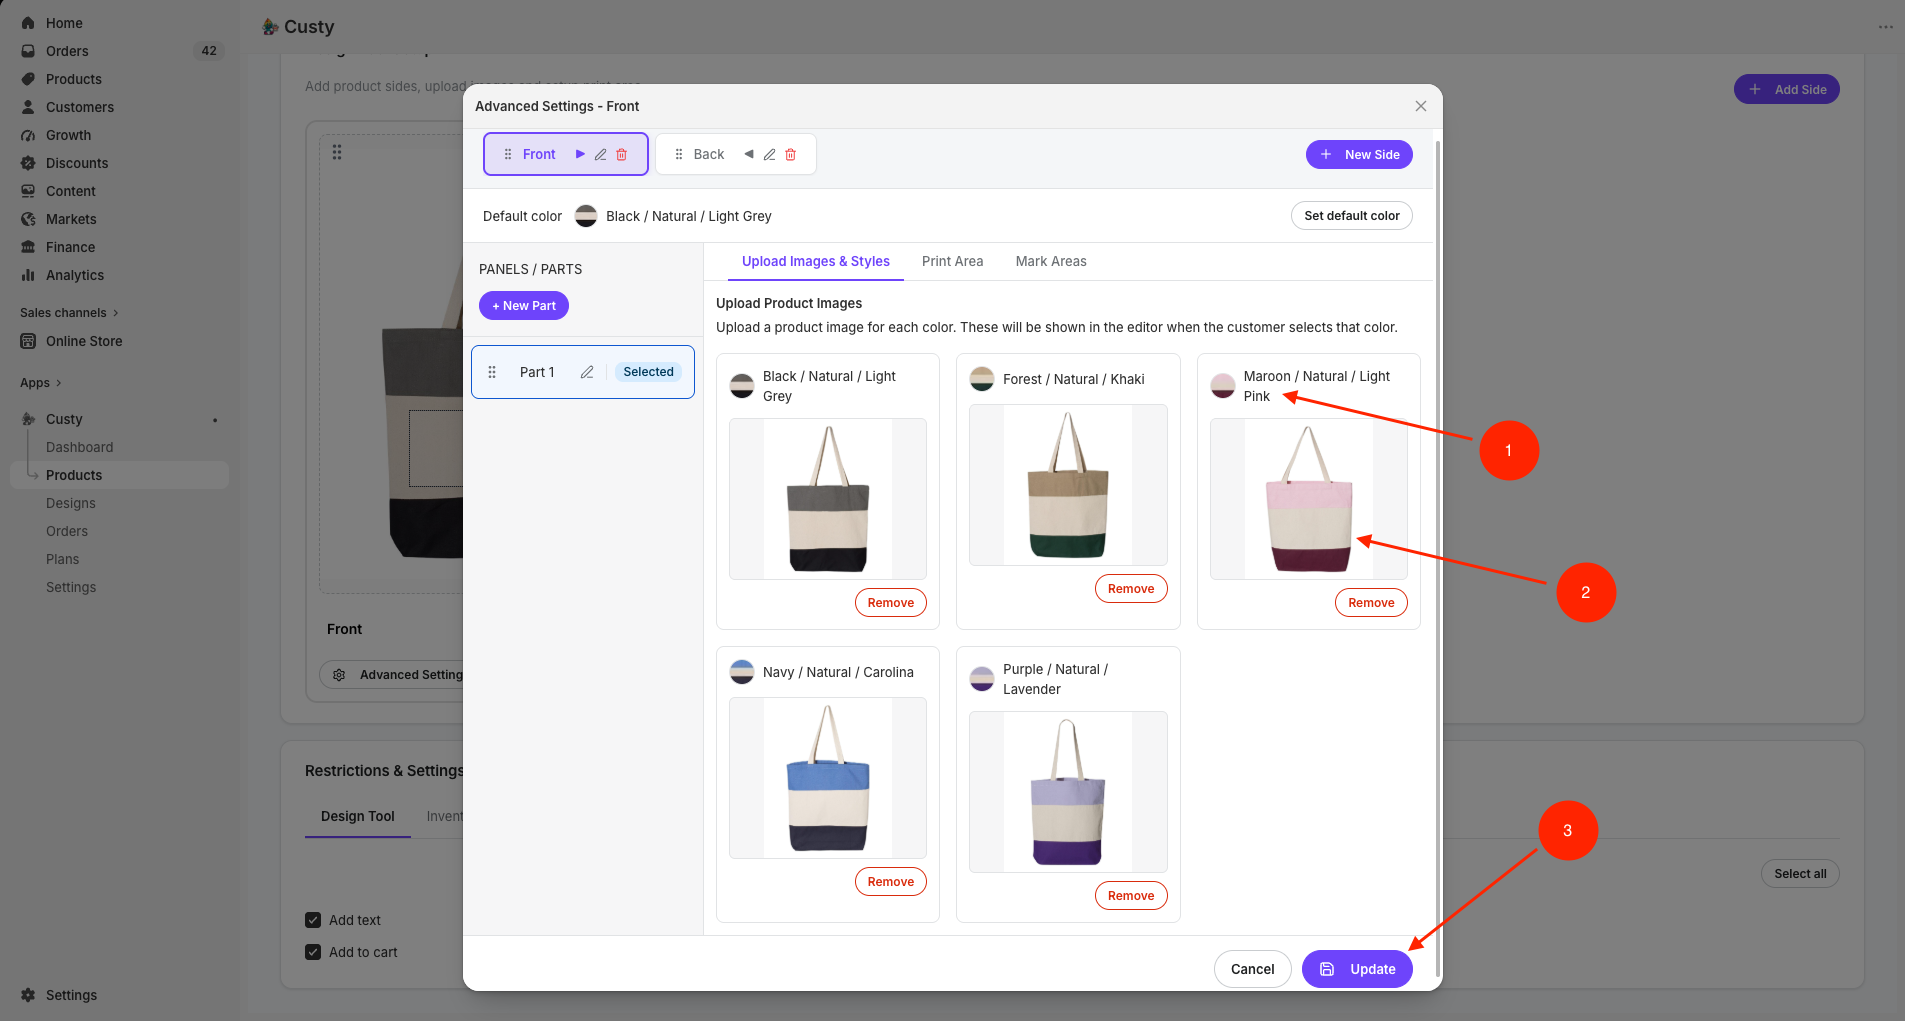 Full size
- 1
Color name card
Appears for each color with Image Instead of Color = Yes.
- 2
Upload Image
Add the real product photo for that color.
- 3
Update
Save Advanced Settings for this side when the photos look right.
Quick summary
- 1Upload product photos in Advanced Settings → Upload Images & Styles on each side.
- 2Use Default (Grayscale) when you want automatic color tinting from your color set.
- 3Use Image Instead of Color = Yes on the color set, then upload a photo per those colors.
- 4Keep the same width and height across all color photos on a side so the print area stays aligned.
What to do next
Next, add every printable side if you need more than one, then draw the print area on each side. Then set Active on designer to Yes and click Save.